

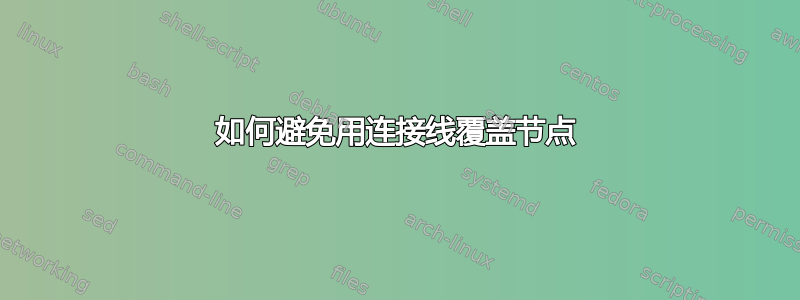
在节点之间绘制连接线 ( edge) 时,这些线将绘制在节点上方(根据绘制顺序)。如果有许多连接,它可能会有问题地覆盖节点,特别是其中的文本。一个非常基本的例子是
\documentclass{article}
\usepackage{tikz}

\begin{document}

\begin{tikzpicture}
   \node[fill=blue,circle,text width=3cm] (first) at (1,1) {First};
   \node[fill=green,circle,text width=3cm] (second) at (5,5) {This is the text that will be cover with the connection lines};
   \node[fill=purple,circle,text width=3cm] (third) at (1,9) {This text will be covered too};

\draw[->,thick,draw=red!50] (first.east) to [out=0,in=0] (third.east);
\draw[->,thick,draw=red!50] (first.west) to [out=180,in=75] (third.north east);
\end{tikzpicture}

\end{document}

理想的解决方案:将连接线绕节点走。其实节点区域应该是线的禁区。
实际解决方案:将线条放在节点下。至少线条不会影响文本的可读性。
如何实施这些解决方案之一以避免节点上的线路?
答案1
一个解决方案(可以放在实际的分支(branch)就是使用backgrounds图书馆。
代码如下:
\documentclass{article}
\usepackage{tikz}
\usetikzlibrary{backgrounds}
\begin{document}

\begin{tikzpicture}
\node[fill=blue,circle,text width=3cm] (first) at (1,1) {First};
\node[fill=green,circle,text width=3cm] (second) at (5,5) {This is the text that will be cover with the connection lines};
\node[fill=purple,circle,text width=3cm] (third) at (1,9) {This text will be covered too};
% insert connection lines in background
\begin{pgfonlayer}{background}
\draw[->,thick,draw=red!50] (first.east) to [out=0,in=0] (third.east);
\draw[->,thick,draw=red!50] (first.west) to [out=180,in=75] (third.north east);
\end{pgfonlayer}
\end{tikzpicture}

\end{document}
图形结果:

有关详细信息,请参阅 pgfmanual(2010 年 10 月 25 日版本)上的第 25 节背景库和第 82 节分层图形。
编辑
按照 Andrew Stacey 的建议,在代码中将定义一个在该main图层之前的新图层集(以便相对于该main图层在背景中看到它)。
修改后的代码:
\documentclass{article}
\usepackage{tikz}
\usetikzlibrary{backgrounds}
\pgfdeclarelayer{myback}
\pgfsetlayers{background,myback,main}
% to still have the possibility of exploiting the background layer
\begin{document}

\begin{tikzpicture}
\node[fill=blue,circle,text width=3cm] (first) at (1,1) {First};
\node[fill=green,circle,text width=3cm] (second) at (5,5) {This is the text that will be cover with the connection lines};
\node[fill=purple,circle,text width=3cm] (third) at (1,9) {This text will be covered too};
% insert connection lines in background using myback layer
\begin{pgfonlayer}{myback}
\draw[->,thick,draw=red!50] (first.east) to [out=0,in=0] (third.east);
\draw[->,thick,draw=red!50] (first.west) to [out=180,in=75] (third.north east);
\end{pgfonlayer}
\end{tikzpicture}

\end{document}
将导致与上面相同的图形结果。
答案2
免责声明:对于本案来说,这有点过分了。请阅读评论。
另一个选择是使用append after commandkey 在图片中绘制节点之前使用节点名称和位置。由于节点与交互(second)无关,因此可以稍后放置。(first)(third)
\documentclass{article}
\usepackage{tikz}

\begin{document}

\begin{tikzpicture}
\node[fill=blue,circle,text width=3cm] (first) at (1,1) {First};
\draw[->,thick,draw=red!50] node[
     fill=purple,
     circle,
     text width=3cm,
     append after command={
           (first.west) to [out=180,in=75] (third.north east)
     }]
     (third) at (1,9) {This text will be covered too};

\draw[->,thick,draw=red!50] (first.east) to [out=0,in=0] (third.east);

\node[fill=green,circle,text width=3cm] (second) at (5,5) {This is the text that will be cover with the connection lines};
\end{tikzpicture}
\end{document}
