

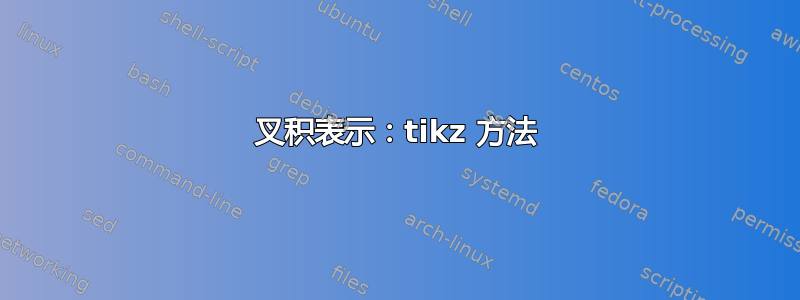
如何在 tikz 中生成以下图表:

答案1
这很简单,我将展示一种使用不同“变量”的方法。这会使代码稍微复杂一些,但也更加灵活。
步骤1
设置基本环境:加载包和arrows库calc:
\documentclass{article}% ... or whatever you like

\usepackage{tikz}
\usetikzlibrary{arrows,calc}

\begin{document}
\begin{tikzpicture}
   % picture commands
\end{tikzpicture}
\end{document}
随后的每件事都进入其中{tikzpicture}。
第2步
设置变量。我们将向量设置为坐标,从原点开始。
\coordinate (A) at (3,0);
\coordinate (B) at (0,-2);
以及叉积的左上边缘
\coordinate (cross prod) at (1,4);
我们添加一个\def来存储刻度的长度
\def\tick{0.1}
步骤3
绘制轴:使用\draw带有选项的命令->来添加箭头。我们node在路径末尾使用带有一些选项的命令来添加标签。
\draw [->] (-1,0) -- (6,0) node [below] {$x$};
\draw [->] (0,-1) -- (0,5) node [left]  {$y$};
然后我们使用\foreach循环来添加刻度。
\foreach \x in {1,...,5}
   \draw (\x,\tick/2) -- ++(0,-\tick) node [below] {\x};
\foreach \y in {1,...,4}
   \draw (\tick/2,\y) -- ++(-\tick,0) node [left] {\y};
步骤4
绘制向量。我们定义一个样式,使所有向量看起来相同,并将其作为选项添加到{tikzpicture}。向量应该是thick,并且两侧都有“箭头”尖端([-))
\begin{tikzpicture}[
   vec/.style={thick,[-)},
]
现在我们可以绘制向量了。从某个点开始,然后使用语法++添加向量的分量。我们再次使用节点来添加名称。
\draw [vec] (1,-1) -- ++(A) node [midway,below] {$A$};
\draw [vec] (-1,4) -- ++(B) node [midway,left]  {$B$};
步骤5
gray现在画出叉积。首先我们使用\fill宏和路径操作来画出填充rectangle。
\fill [gray] (cross prod) rectangle ++($(A)+(B)$);
然后再次使用边框和标签\draw。-|路径操作允许自动创建直角。
\draw [thick] ($(cross prod)+(A)$) -| ($(cross prod)+(B)$);
\draw [thick,dashed] ($(cross prod)+(A)$) |- ($(cross prod)+(B)$)
   node [pos=0.25,right] {$A \times B$};
就是这样。

完整代码
\documentclass{article}% ... or whatever you like

\usepackage{tikz}
\usetikzlibrary{arrows,calc}

\begin{document}
\begin{tikzpicture}[
    vec/.style={thick,[-)},
]
    % Step 2
    \coordinate (A) at (3,0);
    \coordinate (B) at (0,-2);
    \coordinate (cross prod) at (1,4);
    \def\tick{0.2}
    % Step 3
    \draw [->] (-1,0) -- (6,0) node [below] {$x$};
    \draw [->] (0,-1) -- (0,5) node [left]  {$y$};
    \foreach \x in {1,...,5}
        \draw (\x,\tick/2) -- ++(0,-\tick) node [below] {\x};
    \foreach \y in {1,...,4}
        \draw (\tick/2,\y) -- ++(-\tick,0) node [left] {\y};
    % Step 4
    \draw [vec] (1,-1) -- ++(A) node [midway,below] {$A$};
    \draw [vec] (-1,4) -- ++(B) node [midway,left]  {$B$};
    % Step 5
    \fill [gray] (cross prod) rectangle ++($(A)+(B)$);
    \draw [thick] ($(cross prod)+(A)$) -| ($(cross prod)+(B)$);
    \draw [thick,dashed] ($(cross prod)+(A)$) |- ($(cross prod)+(B)$)
        node [pos=0.25,right] {$A \times B$};
\end{tikzpicture}
\end{document}
更新
经过一些调整,这将适用于每两个向量。

\documentclass{article}% ... or whatever you like

\usepackage{tikz}
\usetikzlibrary{arrows,calc}

\begin{document}
\begin{tikzpicture}[
    vec/.style={thick,[-)},
]
    % Step 2
    \coordinate (A) at (3,-1);
    \coordinate (B) at (-0.5,-2);
    \coordinate (cross prod) at (1,4);
    \def\tick{0.2}
    % Step 3
    \draw [->] (-1,0) -- (6,0) node [below] {$x$};
    \draw [->] (0,-1) -- (0,5) node [left]  {$y$};
    \foreach \x in {1,...,5}
        \draw (\x,\tick/2) -- ++(0,-\tick) node [below] {\x};
    \foreach \y in {1,...,4}
        \draw (\tick/2,\y) -- ++(-\tick,0) node [left] {\y};
    % Step 4
    \draw [vec] (1,-1) -- ++(A) node [midway,below] {$A$};
    \draw [vec] (-1,4) -- ++(B) node [midway,left]  {$B$};
    % Step 5
    \fill [gray] (cross prod) -- +(A) -- +($(A)+(B)$) -- +(B);
    \draw [thick] ($(cross prod)+(A)$) -- (cross prod) -- ($(cross prod)+(B)$);
    \draw [thick,dashed] ($(cross prod)+(A)$) -- ($(cross prod)+(A)+(B)$)
        node [midway,right] {$A \times B$} -- ($(cross prod)+(B)$);
\end{tikzpicture}
\end{document}
这个使用的+语法意味着坐标是相对的,但没有像它那样将其设置为新的参考点++。
答案2
如果你要多次使用,你可能想创建一个宏。这是为了说明如何将 Tobi 的优秀代码转换为一个。
\documentclass{article}% ... or whatever you like

\usepackage{tikz}
\usetikzlibrary{arrows,calc}

\newcommand\crossprod[4][5]{%
\begin{tikzpicture}[
    vec/.style={thick,[-)},
]
    % Step 2
    \coordinate (A) at #3;
    \coordinate (B) at #4;
    \coordinate (cross prod) at #2;
    \def\tick{0.2}
    % Step 3
    \draw [-stealth] (-1,0) -- ($(#1,0)+(0.5,0)$) node [below] {$x$};
    \draw [-stealth] (0,-1) -- ($(0,#1)+(0,0.5)$) node [left]  {$y$};
    \foreach \x in {1,...,#1}
        \draw (\x,\tick/2) -- ++(0,-\tick) node [below] {\x};
    \foreach \y in {1,...,#1}
        \draw (\tick/2,\y) -- ++(-\tick,0) node [left] {\y};
    % Step 4
    \draw [vec] (1,-1) -- ++(A) node [midway,below] {$A$};
    \draw [vec] (-1,4) -- ++(B) node [midway,left]  {$B$};
    % Step 5
    \fill [gray!30] (cross prod) -- +(A) -- +($(A)+(B)$) -- +(B);
    \draw [thick] ($(cross prod)+(A)$) -- (cross prod) -- ($(cross prod)+(B)$);
    \draw [thick,dashed] ($(cross prod)+(A)$) -- ($(cross prod)+(A)+(B)$)
        node [midway,right] {$A \times B$} -- ($(cross prod)+(B)$);
\end{tikzpicture}
}

%% #1 -- Optional argument for length of x and y axes; default is 5. Adjust for suitability
%% #2 -- upper left edge of the cross product. Adjust for suitability
%% #3 -- vector A as coordinate, starting from the origin.
%% #4 -- vector B as coordinate, starting from the origin.

\begin{document}
\crossprod{(1,5)}{(3,0)}{(0,-2)}

\crossprod[6]{(2,5)}{(3,-2)}{(-0.5,-2)}
\end{document}
答案3
这是一个简单的代码:
\begin{tikzpicture}[font={\small}]
\draw[-latex] (-0.5,0) -- (5.5,0) node[below] {$x$};
\draw[-latex] (0,-0.5) -- (0,5.5) node[left] {$y$};
\foreach \x in {1,2,3,4,5}
{
\draw (0.1,\x) -- (-0.1,\x) node[left] {$\x$};
\draw (\x,0.1) -- (\x,-0.1) node[below] {$\x$};
}
\path[fill=lightgray] (1,2) rectangle +(3,2);
\draw[thick] (1,2) -- (1,4) -- (4,4);
\draw[thick,dashed] (1,2) -- (4,2) -- (4,4) node[right,midway] {$A\times B$};
\draw[very thick] (1,-1) node {\small [} -- (4,-1) node {)} node[below,midway] {$A$};
\draw[very thick] (-1,2) node[rotate=90] {[} -- (-1,4) node[rotate=90] {)}
node[left,midway] {$B$};
\end{tikzpicture}