

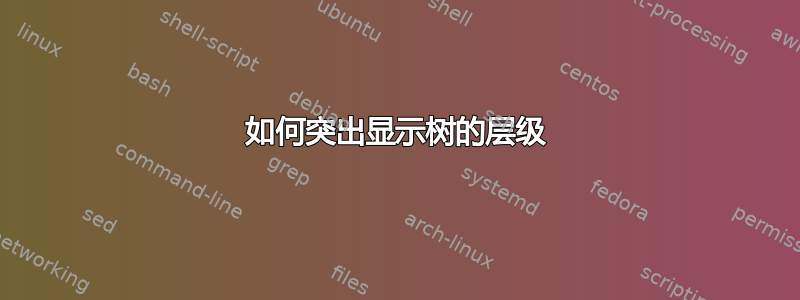
我怎样才能突出显示树的级别,使其看起来像这样......
我用这段代码画了我的树
\documentclass[landscape]{article}
\usepackage[utf8]{inputenc}
\usepackage[T1]{fontenc}

\usepackage{tikz-qtree}
\usetikzlibrary{shadows,trees}
\begin{document}
\tikzset{font=\large,
edge from parent fork down,
level distance=60pt,
every node/.style=
    {top color=white,
    bottom color=blue!25,
    rectangle,rounded corners,
    minimum height=8mm,
    draw=blue!75,
    very thick,
    drop shadow,
    align=center,
    text depth = 0pt
    },
edge from parent/.style=
    {draw=blue!50,
    thick
    }}

\centering
\begin{tikzpicture}

\Tree [.Parent
        [.one
            [.one1
                   [.one11
                        [.one111 ]
                        [.one112 ]
                        [.one113 ] ]
                   [.one12 ]
                   [.one13 ] ]
            [.one2 one21 ] ]
        [.two
            [.two1 two11 ]
            [.two2 [.two21 two211 ]
                   [.two22 [.two221 two2211 ]
                           [.two222 two321 ] ] ] ]
        [.three
            [.three1 ] ] ]

\end{tikzpicture}
\end{document}
答案1
一种可能性是命名一些树节点,定义一些辅助节点(用于文本)和坐标,然后使用fit和background库来绘制背景填充(可以使用简化代码\foreach,但这留作练习):
\documentclass{article}
\usepackage[utf8]{inputenc}
\usepackage[landscape]{geometry}
\usepackage[T1]{fontenc}
\usepackage{tikz-qtree}
\usetikzlibrary{positioning,shadows,trees,backgrounds,fit}

\pgfdeclarelayer{background}
\pgfsetlayers{background,main}

\definecolor{myfilling}{RGB}{208,215,222}

\begin{document}
\tikzset{font=\large,
edge from parent fork down,
level distance=60pt,
edge from parent/.style=
    {draw=blue!50,
    thick
    },
filling/.style=
    {minimum height=12mm,
     draw=myfilling!75!black,
     very thick,
     drop shadow,
     rectangle,rounded corners,
     fill=myfilling,
    },
ntext/.style=
    {draw=none,
     text width=4cm,
     align=center
    },
}

\centering
\begin{tikzpicture}
\begin{scope}[
every node/.style=
    {top color=white,
    bottom color=blue!25,
    rectangle,rounded corners,
    minimum height=8mm,
    draw=blue!75,
    very thick,
    drop shadow,
    align=center,
    text depth = 0pt
    },
]
\Tree [.\node (p) {Parent};
        [.\node (o) {one};
            [.\node (1) {one1};
                   [.\node (11) {one11};
                        [.\node (111) {one111}; ]
                        [.one112 ]
                        [.one113 ] ]
                   [.one12 ]
                   [.one13 ] ]
            [.one2 one21 ] ]
        [.two
            [.two1 two11 ]
            [.two2 [.two21 two211 ]
                   [.two22 [.two221 \node (2211) {two2211}; ]
                           [.two222 two321 ] ] ] ]
        [.three
            [.\node (31) {three1}; ] ] ]
\end{scope}
% auxuliary constructs for level 4
\node[left=of 111,ntext]
  (text4) {Level 4 text};
\coordinate (aux2) at ([xshift=5pt]31.east|-text4);
% auxuliary constructs for level 3
\node[ntext] at (text4|-11)
  (text3) {Level 3 text};
\coordinate (aux4) at ([xshift=5pt]31.east|-11);
% auxuliary constructs for level 2
\node[ntext] at (text4|-1)
  (text2) {Level 2 text};
\coordinate (aux6) at ([xshift=5pt]31.east|-1);
% auxuliary constructs for level 1
\node[ntext] at (text4|-o)
  (text1) {Level 1 text};
\coordinate (aux8) at ([xshift=5pt]31.east|-o);
% auxuliary constructs for level 0
\node[ntext] at (text4|-p)
  (text0) {Level 0 text};
\coordinate (aux10) at ([xshift=5pt]31.east|-p);
% auxuliary constructs for level 5
\node[ntext] at (text4|-2211)
  (text5) {Level 5 text};
\coordinate (aux12) at ([xshift=5pt]31.east|-2211);
\begin{pgfonlayer}{background}
\node[filling,fit=(text4) (aux2)] {};
\node[filling,fit=(text3) (aux4)] {};
\node[filling,fit=(text2) (aux6)] {};
\node[filling,fit=(text1) (aux8)] {};
\node[filling,fit=(text0) (aux10)] {};
\node[filling,fit=(text5) (aux12)] {};
\end{pgfonlayer}
\end{tikzpicture}
\end{document}

答案2
我在这里做的是将你创建的树插入到包含黄色条和文本的背景上。必须小心匹配黄色条的正确尺寸(与\rule在内)\crow和间隙大小(\vspace在内\crow)。我还将宽度设置为 9"。
\documentclass[landscape]{article}
\usepackage[utf8]{inputenc}
\usepackage[T1]{fontenc}
\usepackage{stackengine}[2013-09-11]
\usepackage{xcolor}
\newcommand\crow[1]{\colorbox{yellow}{\parbox{9in}{%
  \rule[-5pt]{0pt}{25pt}\Huge\bfseries #1\hfill}}\par\vspace*{28pt}}

\usepackage{tikz-qtree}
\usetikzlibrary{shadows,trees}
\begin{document}
\tikzset{font=\large,
edge from parent fork down,
level distance=60pt,
every node/.style=
    {top color=white,
    bottom color=blue!25,
    rectangle,rounded corners,
    minimum height=8mm,
    draw=blue!75,
    very thick,
    drop shadow,
    align=center,
    text depth = 0pt
    },
edge from parent/.style=
    {draw=blue!50,
    thick
    }}

\newsavebox{\myboxA}
\newsavebox{\myboxB}
\centering
\sbox{\myboxA}{%
\begin{tikzpicture}
\Tree [.Parent
        [.one
            [.one1
                   [.one11
                        [.one111 ]
                        [.one112 ]
                        [.one113 ] ]
                   [.one12 ]
                   [.one13 ] ]
            [.one2 one21 ] ]
        [.two
            [.two1 two11 ]
            [.two2 [.two21 two211 ]
                   [.two22 [.two221 two2211 ]
                           [.two222 two321 ] ] ] ]
        [.three
            [.three1 ] ] ]

\end{tikzpicture}%
}
\sbox{\myboxB}{\parbox{9in}{\crow{Parent}\crow{Level 1}\crow{Level 2}%
  \crow{Level 3}\crow{Level 4}\crow{Level 5}}}
\hsmash{\stackinset{r}{}{t}{3pt}{\usebox{\myboxA}}{\usebox{\myboxB}}}
\end{document}

{tikz-pgf}{graphics}{highlighting}{tikz-trees}

答案3
这只是我通过尝试我为回答另一个问题而编写的包来进行的练习。那个包是justtrees,它是prooftrees我出于沮丧而编写的简化版本。这两个包都提供了一种forest风格,新版本提供了具有各种优点的相应环境。
这使用了软件包的 v0.03 版本。如果您有足够的勇气亲自尝试,请询问!
right justifications开头的调用确保即使不需要任何可见节点right just 1,right just 2也会创建 等。无需添加,left justifications因为left just={<text>}无论如何都会确保这种情况发生。
这些节点会自动命名,然后用于绘制树后面的背景矩形。这必须使用 来完成,forest因为end draw否则,即使我们尝试将它们放置在层上,矩形也会被绘制在树的顶部background。
just format用于指定级别描述符的格式。除其他事项外,这可确保其高度与主树中的节点高度相匹配,这对于获取适当大小的背景矩形是必需的。
我对它的效果感到非常惊讶,说实话,我一分钟都不相信我的代码。
\documentclass[tikz,border=5pt,multi]{standalone}

\usepackage{justtrees}
\usetikzlibrary{shadows,fit,backgrounds}
\tikzset{
  my node/.style={
    top color=white,
    bottom color=blue!25,
    rounded corners,
    minimum height=8mm,
    draw=blue!75,
    very thick,
    drop shadow,
    align=center,
    text depth = 0pt,
  },
  level descriptors/.style={
    font=\sffamily,
    text=blue!75!black,
    minimum height=8mm,
    text depth = 0pt,
  },
  my edges/.style={
    draw=blue!50,
    ultra thick,
    rounded corners
  },
  my level fill/.style={
    draw=blue!75, fill=blue!20, drop shadow, rounded corners
  }
}

\begin{document}
\begin{justtree}
  {
    right justifications,
    just format/.append style={level descriptors},
    for tree={
      my node,
      edge={my edges},
      edge path={
        \noexpand\path [draw, \forestoption{edge}] (!u.parent anchor) -- +(0,-2mm-5pt) -| (.child anchor)\forestoption{edge label};
      },
      l sep+=2mm,
    },
    end draw/.code={
        \begin{scope}[on background layer]
          \foreach \i in {1,...,6}{
            \node [my level fill, fit=(left just \i.north west) (right just \i.south east)] {};}
        \end{scope}
      \end{tikzpicture}
    }
  }
  [Parent, left just=level 1 descriptor
    [one, left just=level 2 descriptor
        [one1, left just=level 3 descriptor
             [one11, left just=level 4 descriptor
                    [one111, left just=level 5 descriptor]
                    [one112]
                    [one113]
              ]
              [one12]
              [one13]
        ]
        [one2
          [one21]
        ]
    ]
    [two
        [two1
          [two11]
        ]
      [two2
         [two21
            [two211]
         ]
         [two22
          [two221
            [two2211]
          ]
          [two222
            [two321, left just=level 6 descriptor]
          ]
        ]
      ]
    ]
    [three
        [three1]
    ]
  ]
\end{justtree}

\end{document}
