

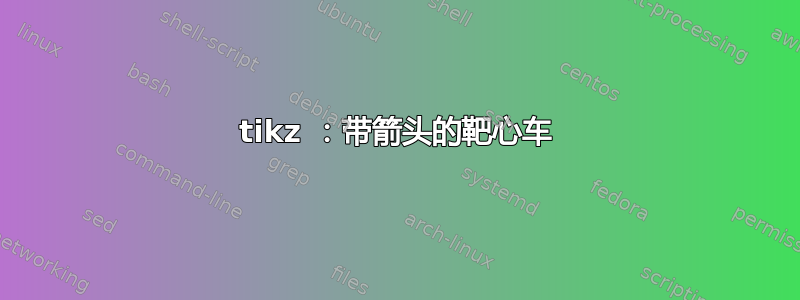
期望输出

我的MWE
代码借自这里。
% Dartboard.
% Author: Roberto Bonvallet <[email protected]>
% Under Creative Commons attribution license.

\documentclass[tikz]{standalone}
\usepackage{mathpazo}

\tikzstyle{wired}=[draw=gray!30, line width=0.15mm]
\tikzstyle{number}=[anchor=center, color=white]
% Sectors are numbered 0-19 counterclockwise from the top.

% \strip{color}{sector}{outer_radius}{inner_radius}
\newcommand{\strip}[4]{
    \filldraw[#1, wired]
      ({18 *  #2}      :                   #3) arc
      ({18 *  #2}      : {18 * (#2 + 1)} : #3) --
      ({18 * (#2 + 1)} :                   #4) arc
      ({18 * (#2 + 1)} : {18 *  #2}      : #4) -- cycle;
}

% \sector{color}{sector}{radius}
\newcommand{\sector}[3]{
    \filldraw[#1, wired]
      (0, 0) --
      ({18 * #2} :                   #3) arc
      ({18 * #2} : {18 * (#2 + 1)} : #3) -- cycle;
}

\begin{document}

% 81 degrees = 4.5 sectors.
% The rotation leaves 20 at the top.
\begin{tikzpicture}[rotate=81, scale=.14]

  % These are the official dartboard dimensions as per BDO's regulations.

  % The whole board's background.
  \fill[black] (0, 0) circle (225.5mm);

  % Even sections.
  \foreach\i in {0,2,...,18} {
    \sector{black}{\i}{162mm}
    \strip{red}{\i}{170mm}{162mm} % Double strip.
    \strip{red}{\i}{107mm}{ 99mm} % Treble strip.
  }

  % Odd sections.
  \foreach\i in {1,3,...,19} {
    \sector{white}{\i}{162mm}
    \strip{green}{\i}{170mm}{162mm} % Double strip.
    \strip{green}{\i}{107mm}{ 99mm} % Treble strip.
  }

  % Bull's ring and eye.
  \filldraw[green, wired] (0, 0) circle (15.9mm);
  \filldraw[red,   wired] (0, 0) circle (6.35mm);

  % Labels.
  \foreach \sector/\label in {%
      0/20,  1/ 1,  2/18,  3/ 4,  4/13,
      5/ 6,  6/10,  7/15,  8/ 2,  9/17,
     10/ 3, 11/19, 12/ 7, 13/16, 14/ 8,
     15/11, 16/14, 17/ 9, 18/12, 19/ 5}%
  {
    \node[number] at ({18 * (-\sector + .5)} : 197.75mm) {\label};
  }
\end{tikzpicture}

\end{document}
输出

问题
- 我的 MWE 生成了错误的页面。如何纠正?
- 怎样放箭?
在此先感谢您的帮助。
答案1
关于飞镖:
\documentclass{article}
\usepackage{tikz}
\begin{document}
\colorlet{gold}{orange!50!yellow}
\def\dart#1#2#3{ % 1 = tip position, 2 = rotation angle, 3 = dart color
  \begin{scope}[rotate=#2]
  \colorlet{dart color}{#3}
  % tip
  \fill[top color=black!30, bottom color=black!60, middle color=white]
     (#1) ++(0,0) -- ++(1,0.04) -- ++(0,-0.04) -- cycle;
  % golden mass
  \fill[top color=gold, bottom color=gold!60!black, middle color=gold!20!white]
    (#1) ++(0.99,0) to[out=90, in=180] ++(0.2, 0.2) -- ++(0.5, 0) -- ++(0, -0.4) -- ++(-0.5,0) to[out=180, in=-90] ++(-0.2,0.2) -- cycle;
  % wings
  \fill[top color=dart color!20!white, bottom color=dart color!10!black, middle color=dart color!70!white]
    (#1) ++(4.5,0) to[out=60, in=150] ++(3.1,1) -- ++(-0.3,-1) -- cycle;
  \fill[top color=dart color!20!black, bottom color=dart color]
    (#1) ++(4.5,0) to[out=-60, in=-150] ++(3.1,-1) -- ++(-0.3,1) -- cycle;
  % body
  \fill[top color=dart color!20!white, bottom color=dart color!10!black, middle color=dart color]
    (#1) ++(1.7,0.2) .. controls +(1,.2) and +(-4,.4) .. ++(6,-0.2) .. controls +(-4, -.4) and +(1,-.2) .. ++(-6, -0.2) -- cycle;
\end{scope}
}

\begin{tikzpicture} % Demo
\dart{0,0}{30}{yellow}
\dart{0,0}{-10}{red}
\dart{0,0}{10}{green!70!cyan}
\dart{0,0}{-25}{blue!50!cyan}
\dart{0,0}{30}{yellow}
\end{tikzpicture}
\end{document}
结果:

与靶心的整合:
\documentclass{article}
\usepackage{tikz}
\begin{document}
\colorlet{gold}{orange!50!yellow}
\def\dart#1#2#3{ % 1 = tip position, 2 = rotation angle, 3 = dart color
  \begin{scope}[rotate=#2, scale=0.3]
  \colorlet{dart color}{#3}
  % tip
  \fill[top color=black!30, bottom color=black!60, middle color=white]
     (#1) ++(0,0) -- ++(1,0.04) -- ++(0,-0.04) -- cycle;
  % golden mass
  \fill[top color=gold, bottom color=gold!60!black, middle color=gold!20!white]
    (#1) ++(0.99,0) to[out=90, in=180] ++(0.2, 0.2) -- ++(0.5, 0) -- ++(0, -0.4) -- ++(-0.5,0) to[out=180, in=-90] ++(-0.2,0.2) -- cycle;
  % wings
  \fill[top color=dart color!20!white, bottom color=dart color!10!black, middle color=dart color!70!white]
    (#1) ++(4.5,0) to[out=60, in=150] ++(3.1,1) -- ++(-0.3,-1) -- cycle;
  \fill[top color=dart color!20!black, bottom color=dart color]
    (#1) ++(4.5,0) to[out=-60, in=-150] ++(3.1,-1) -- ++(-0.3,1) -- cycle;
  % body
  \fill[top color=dart color!20!white, bottom color=dart color!10!black, middle color=dart color]
    (#1) ++(1.7,0.2) .. controls +(1,.2) and +(-4,.4) .. ++(6,-0.2) .. controls +(-4, -.4) and +(1,-.2) .. ++(-6, -0.2) -- cycle;
\end{scope}
}

% The code from next line to line marked with % <<<END is from:
% Dartboard.
% Author: Roberto Bonvallet <[email protected]>
% Under Creative Commons attribution license.
\tikzstyle{wired}=[draw=gray!30, line width=0.15mm]
\tikzstyle{number}=[anchor=center, color=white]
% Sectors are numbered 0-19 counterclockwise from the top.

% \strip{color}{sector}{outer_radius}{inner_radius}
\newcommand{\strip}[4]{
    \filldraw[#1, wired]
      ({18 *  #2}      :                   #3) arc
      ({18 *  #2}      : {18 * (#2 + 1)} : #3) --
      ({18 * (#2 + 1)} :                   #4) arc
      ({18 * (#2 + 1)} : {18 *  #2}      : #4) -- cycle;
}

% \sector{color}{sector}{radius}
\newcommand{\sector}[3]{
    \filldraw[#1, wired]
      (0, 0) --
      ({18 * #2} :                   #3) arc
      ({18 * #2} : {18 * (#2 + 1)} : #3) -- cycle;
}


% 81 degrees = 4.5 sectors.
% The rotation leaves 20 at the top.
\begin{tikzpicture}
% Next scope and its options are not from the original code,
% but added here to better integrate with my darts
\begin{scope}[rotate=81,scale=0.14,  yscale=0.7]
  % These are the official dartboard dimensions as per BDO's regulations.

  % The whole board's background.
  \fill[black] (0, 0) circle (225.5mm);

  % Even sections.
  \foreach\i in {0,2,...,18} {
    \sector{black}{\i}{162mm}
    \strip{red}{\i}{170mm}{162mm} % Double strip.
    \strip{red}{\i}{107mm}{ 99mm} % Treble strip.
  }

  % Odd sections.
  \foreach\i in {1,3,...,19} {
    \sector{white}{\i}{162mm}
    \strip{green}{\i}{170mm}{162mm} % Double strip.
    \strip{green}{\i}{107mm}{ 99mm} % Treble strip.
  }

  % Bull's ring and eye.
  \filldraw[green, wired] (0, 0) circle (15.9mm);
  \filldraw[red,   wired] (0, 0) circle (6.35mm);

  % Labels.
  \foreach \sector/\label in {%
      0/20,  1/ 1,  2/18,  3/ 4,  4/13,
      5/ 6,  6/10,  7/15,  8/ 2,  9/17,
     10/ 3, 11/19, 12/ 7, 13/16, 14/ 8,
     15/11, 16/14, 17/ 9, 18/12, 19/ 5}%
  {
    \node[number] at ({18 * (-\sector + .5)} : 197.75mm) {\label};
  }
\end{scope}
% <<<END of the code by Roberto Bonvallet

\dart{0,0}{30}{yellow}
\dart{0,0}{-10}{red}
\dart{0,0}{10}{green!70!cyan}
\dart{0,0}{-25}{blue!50!cyan}
\dart{0,0}{30}{yellow}
\end{tikzpicture}
\end{document}
结果:

更新:
通过使用画布变换改进了“透视”。还添加了一个棕色圆圈来伪造飞镖靶的一些深度:

代码中唯一的变化是在开头tikzpicture:
\begin{tikzpicture}
% Next scope and its options are not from the original code,
% but added here to better integrate with my darts
\begin{scope}[rotate=81,scale=0.14,  transform canvas={xscale=0.6,xslant=-0.3}]
  % These are the official dartboard dimensions as per BDO's regulations.

  % The whole board's background.
  \fill[brown!80!black] (-1,2) circle (225.5mm);  % <-- Fake "depth"
  \fill[black] (0, 0) circle (225.5mm);

 % The remaining is unchanged...
更新 2
(最后一个,保证;-))
我认为通过改变数字使用的字体可以改善结果:
\node[number] at ({18 * (-\sector + .5)} : 197.75mm) {\sffamily\bfseries\large\label};

答案2
这只是一次尝试。我尝试让棋盘倾斜,并在棋盘上添加数字。我已经使用了该asymptote包。以下是代码:
\documentclass{standalone}
\usepackage{asymptote}
\begin{document}
\begin{asy}
size(3cm);
path p1 = ellipse((1,0), 9, 10);
path p2 = ellipse((1,0), 8.8, 9.8);
path p3 = ellipse((1,0), 7, 8);
draw(rotate(30)*p1);
fill(rotate(30)*p1, gray);
draw(rotate(30)*p2);
fill(rotate(30)*p2, white);
draw(rotate(30)*p3);
fill(rotate(30)*p2);
fill(rotate(30)*p3, white);
label("20", (1,9),white);
label("8", (9,1),white);
label("11", (1,-8.2),white);
label("2", (-7.5,0.8),white);
\end{asy}
\end{document}
生成的输出是:

现在,这似乎是一项非常繁琐的任务TikZ。然而,使用asymptote包75%是可能的(专家可以达到 100%,但需要相当大的耐心)。我已经展示了绘制倾斜椭圆和填充相交区域的方法。对所有椭圆和相应的标签执行相同的步骤。要获得箭头的 3d 效果,您可以这样做(如果您满意的话):

相应的 MWE 是:
settings.render=16;
import three;
size(4cm,0);
draw(O--2X ^^ O--2Y ^^ O--2Z);
triple circleCenter = (Y+Z)/sqrt(2) +
X;
path3 mycircle =
circle(c=circleCenter, r=1,
normal=Y+Z);
draw(plane(O=sqrt(2)*Z, 2X, 2*unit(Y-Z)), gray + 0.1cyan);
draw(mycircle, blue);
draw(shift(circleCenter) * (O -- Y+Z), green, arrow=Arrow3());
(以上是asy您需要在\begin{asy}和中添加的代码\end{asy})。