

我想使用 TikZ 绘制一个相对简单的草图,但我做不到。
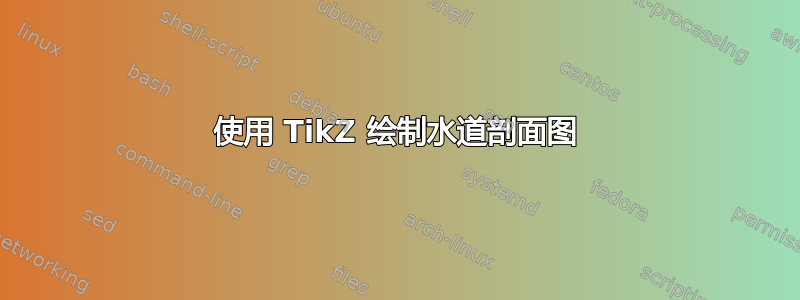
我想要的是一个有 4 个水池、上游有一个水坝、下游有一个废水库的开放水道的表示,如下图所示:

我想像在图纸中那样标记水池、水坝和废弃物。此外,我还想标记接口位置(在本例中编号为 4 至 8)。
那些斜线应该代表地面。水本身(蓝色)不是强制性的,我把它包含在图中只是为了更好地理解。我可能不会把它包含在最终的草图中。
我喜欢使用 LaTeX 和 TikZ,并且喜欢以灵活的方式进行这些操作,这样我可以轻松调整大小或在其他图片中重用部分代码。
答案1
钛钾Z 解决方案,其中一个L shape pool由一个需要 6 个参数的宏绘制mypool,如下所示。
#1=starting point, #2=vertically down  length, #3=for Label L4-L8,
#4=horizontal length of the pool #5=end point #6=Pool label 1-5.
更新:楼主想让标签位于水面边界上方和中间的某个位置。好吧,这里只需将宏修改为如下所示的内容即可。
\newcommand\mypool[6]{
% draw L shape line
\draw[line width=1pt] ([yshift=1cm]#1) -- +(0,#2)coordinate[](a){}node[below=0.5cm](){#3} --node[above=0.2cm, pos=0.5]{#6} +(#4,#2)coordinate[](#5){}; <---- see #6 there
% fill water and patterns
\path[fill=blue!30](a) -- ([yshift=0.3cm]a)-- ([yshift=0.3cm]#5) -- (#5)--cycle;
\path[pattern=north east lines](a) -- ([yshift=-0.3cm]a)-- ([yshift=-0.3cm]#5) -- (#5)--cycle;
\draw[line width=1pt]([yshift=1cm]#1) |-(#5);
}
并产生


代码
\documentclass[border=10pt]{standalone}%[11pt]{article}

\usepackage{tikz}
\usetikzlibrary{positioning,patterns}
\newcommand\mypool[6]{
% draw L shape line
\draw[line width=1pt] ([yshift=1cm]#1)node[right=0.5cm]{#6} -- +(0,#2)coordinate[](a){}  node[below=0.5cm](){#3} -- +(#4,#2)coordinate[](#5){};
% fill water and patterns
\path[fill=blue!30](a) -- ([yshift=0.3cm]a)-- ([yshift=0.3cm]#5) -- (#5)--cycle;
\path[pattern=north east lines](a) -- ([yshift=-0.3cm]a)-- ([yshift=-0.3cm]#5) -- (#5)--cycle;
\draw[line width=1pt]([yshift=1cm]#1) |-(#5);
}
\begin{document}
%#1=starting point, #2=vertically down  length, #3=L4-L8, #4=length of the pool #5=end point #6=pool1-5.
\begin{tikzpicture}
\node[inner sep=0pt, outer sep=0pt] at (0,0) (O){};
\mypool{O}{-1}{}{2}{A}{Dam}
\mypool{A}{-2}{L4}{1}{B}{POOL1}
\mypool{B}{-2}{L5}{2}{C}{POOL2}
\mypool{C}{-2}{L6}{3}{D}{POOL3}
\mypool{D}{-2}{L7}{4}{E}{POOL4}
\mypool{E}{-2}{L8}{3}{F}{Waste}
\end{tikzpicture}
\end{document}
答案2
再次tikz使用pic:
\documentclass[border=3mm]{standalone}

\usepackage{tikz}
\usetikzlibrary{patterns,calc}

\tikzset{%
pics/.cd,
dam/.style args={#1#2#3#4#5}{
  code={
    \begin{scope}[shift={(#1)}]
    \coordinate (a) at (0,0);     %% starting point
    \coordinate (b) at +(0,#2);   % height of right side
    \coordinate (c) at ([shift={(-#3,0.5)}]$(a)!0.5!(b)$); %top left point of water
    \coordinate (d) at ([shift={(-#3,-0.25)}]$(a)!0.5!(b)$); %bottom left point of hatch
    \fill [cyan!50] ($(a)!0.5!(b)$) rectangle ([xshift=\pgflinewidth]c)node[black,midway,above=2ex]{#4};
    \draw[thick] ($(a)!0.5!(b)$) -- ([yshift=-0.5cm]c);
    \fill [pattern = north east lines] ($(a)!0.5!(b)$) rectangle ([xshift=\pgflinewidth]d);
    \draw[thick] (a) -- (b);
    \path (a) -- +(0,-0.5)node[pos=1.2] {#5};
    \end{scope}
  }
},
}

\begin{document}
  \begin{tikzpicture}
    %dam={starting point}{height of right side}{width}{pool label Pool1..}{location label L1...}
    \pic {dam={0,0}{2}{3}{Dam}{L4}};
    \pic {dam={2,-1}{2}{2}{Pool1}{L5}};
    \pic {dam={5,-2.5}{3}{3}{Pool2}{L6}};
    \pic {dam={9,-4.5}{4}{4}{Pool3}{L7}};
    \pic {dam={10,-5.2}{1.4}{1}{Pool4}{L8}};
    \pic {dam={13,-5.2}{0}{3}{Waste}{}};
  \end{tikzpicture}

\end{document}

答案3
PSTricks 解决方案:
\documentclass{article}

\usepackage[pdf]{pstricks}

\newpsobject{water}{psframe}{
  dimen = m,
  linestyle = none,
  fillstyle = solid,
  fillcolor = blue!30
}
\newpsobject{basin}{psframe}{
  dimen = m,
  linestyle = none,
  fillstyle = hlines,
  hatchsep = 2pt
}

\def\pool(#1,#2)[#3,#4]#5#6{
  \water(#1,#2)(!#1 #4 add #2 0.5 add)
  \basin(!#1 #2 0.3 sub)(!#1 #4 add #2)
  \psline(!#1 #2 #3 add)(#1,#2)(!#1 #4 add #2)
  \rput(!#1 #4 2 div add #2 1 add){\small #5}
  \psline[linestyle = dashed, dash = 3pt 3pt](#1,#2)(!#1 #2 1 sub)
  \rput(!#1 #2 1.5 sub){\small $L_{#6}$}
%  \rput(!#1 #2 1.5 sub){\small L#6}
}
% syntax for \pool:
% \pool(<start position of basin; (x,y)>)
%      [<height of left side of basin>,
%       <width of basin>]
%      {<first label>}
%      {<second label>}

\begin{document}

\psset{unit = 0.64} % to avoid `overfull \hbox'
\begin{pspicture}(18,8.9)
  % dam
  \water(0,7.7)(3,8.2)
  \basin(0,7.4)(3,7.7)
  \psline(0,7.7)(3,7.7)
  \rput(1.5,8.7){\small Dam}
  % pools
  \pool(3,5.7)[3,4]{Pool~1}{4}
  \pool(7,4.7)[2,2]{Pool~2}{5}
  \pool(9,3.7)[2,3]{Pool~3}{6}
  \pool(12,2.7)[2,3.5]{Pool~4}{7}
  % waste
  \pool(15.5,1.7)[2,2.5]{Waste}{8}
\end{pspicture}

\end{document}

更新
如果您希望不同池之间的垂直距离统一,您可以稍微简化代码:
\documentclass{article}

\usepackage[pdf]{pstricks}

\newpsobject{water}{psframe}{
  dimen = m,
  linestyle = none,
  fillstyle = solid,
  fillcolor = blue!30
}
\newpsobject{basin}{psframe}{
  dimen = m,
  linestyle = none,
  fillstyle = hlines,
  hatchsep = 2pt
}

\def\pool(#1,#2)[#3]#4#5{
  \water(#1,#2)(!#1 #3 add #2 0.5 add)
  \basin(!#1 #2 0.3 sub)(!#1 #3 add #2)
  \psline(!#1 #2 2 add)(#1,#2)(!#1 #3 add #2)
  \rput(!#1 #3 2 div add #2 1 add){\small #4}
  \psline[linestyle = dashed, dash = 3pt 3pt](#1,#2)(!#1 #2 1 sub)
  \rput(!#1 #2 1.5 sub){\small $L_{#5}$}
%  \rput(!#1 #2 1.5 sub){\small L#5}
}
% syntax for \pool:
% \pool(<start position of basin; (x,y)>)
%      [<width of basin>]
%      {<first label>}
%      {<second label>}

\begin{document}

\psset{unit = 0.64} % to avoid `overfull \hbox'
\begin{pspicture}(18,7.9)
  % dam
  \water(0,6.7)(3,7.2)
  \basin(0,6.4)(3,6.7)
  \psline(0,6.7)(3,6.7)
  \rput(1.5,7.7){\small Dam}
  % pools
  \pool(3,5.7)[4]{Pool~1}{4}
  \pool(7,4.7)[2]{Pool~2}{5}
  \pool(9,3.7)[3]{Pool~3}{6}
  \pool(12,2.7)[3.5]{Pool~4}{7}
  % waste
  \pool(15.5,1.7)[2.5]{Waste}{8}
\end{pspicture}

\end{document}

答案4
这里有一个稍微不同的方法元帖子。

prologues := 3;
outputtemplate := "%j%c.eps";

% routine to make a ragged version of a path
vardef ragged(expr n, r, p) =
   save s; s = arclength(p)/n;
   point 0 of p
     for t=s step s until arclength(p)-s:
       -- point arctime t of p of p shifted (r*normaldeviate, r*normaldeviate)
   endfor -- point infinity of p
   enddef;

beginfig(1);

% define a line of regular steps with varying widths, that finishes on the y-axis
path ground_level;
step_height = 20; x = 0; y = 6*step_height;
ground_level = for dx=70,90,50,70,80,80:
                 (x,y) -- hide(x:=x+dx)
                 (x,y) -- hide(y:=y-step_height) endfor (x,0);

% water reaches this far up each step
water_depth = step_height/4;

color earth; earth = (213/255,197/255,165/255);
color water; water = (192/255,212/255,230/255);

% overlay three solid fills to create the desired areas of colour
fill origin -- ground_level shifted (0,water_depth) -- cycle withcolor water;
fill origin -- ground_level                         -- cycle withcolor earth;
fill origin -- ragged(500,1/5,ground_level) shifted (-4,-4) -- cycle withcolor background;

% draw the barriers and the call outs
for i=1 step 2 until 10:
  draw ((0,0) -- (0,1.2water_depth)) shifted point i of ground_level;
  draw ((0,0) -- (0,-20)) shifted point i+1 of ground_level dashed evenly scaled .4;
  endfor

% draw in the ground level with a thicker pen
draw ground_level withpen pencircle scaled 1;

% add the labels in the right places
label.top(btex Dam    etex, point 0.5 of ground_level shifted (0,water_depth));
label.top(btex Pool 1 etex, point 2.5 of ground_level shifted (0,water_depth));
label.top(btex Pool 2 etex, point 4.5 of ground_level shifted (0,water_depth));
label.top(btex Pool 3 etex, point 6.5 of ground_level shifted (0,water_depth));
label.top(btex Pool 4 etex, point 8.5 of ground_level shifted (0,water_depth));
label.top(btex Waste  etex, point 10.4 of ground_level shifted (0,water_depth));

label.bot(btex $L_4$ etex, point  2 of ground_level shifted 20 down);
label.bot(btex $L_5$ etex, point  4 of ground_level shifted 20 down);
label.bot(btex $L_6$ etex, point  6 of ground_level shifted 20 down);
label.bot(btex $L_7$ etex, point  8 of ground_level shifted 20 down);
label.bot(btex $L_8$ etex, point 10 of ground_level shifted 20 down);

% trim the rough edges left and right
setbounds currentpicture to bbox currentpicture shifted (10,0) xscaled 0.95;

endfig;
end.