

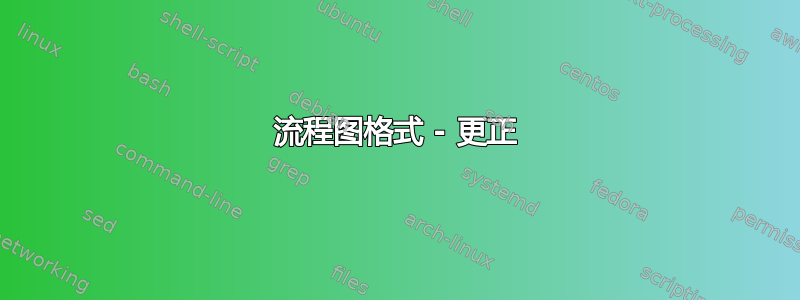
我正在尝试绘制如下所示的流程图:

我尝试如下:
\documentclass[border=10pt]{standalone}
\usepackage{tikz}
\usetikzlibrary{arrows,positioning,shapes.geometric}

\begin{tikzpicture}[>=latex']
\tikzset{process/.style= {draw, shape=rectangle, align=center}}

   \node [process] (a1) {Input color face image};
   \node [process, below = of a1] (a2) {Image decolorization};
   \node [process, right = of a1] (a3) {Face Detection};
   \node [process, below = of a2] (a4) {Image binarization};
   \node [process, below = of a3] (a5) {Facial feature \\ extraction};
   \node [process, left = of a5] (a6) {Create\\ region, \textit{R}, for\\ determining\\ threshold $\theta$};
   \node [process, below =of a4] (a7) {Repeat “region growing” \\ and set the traced pixels to \\ “0” until there is no\\  nonzero pixel within the \\ “seed moustache region”};
   \node [process, below =of a5] (a8) {Create “moustache \\ region” and “seed \\ moustache region” \\ for the region \\ following};
   \node [process, below =of a7] (a9) {Is the total size of the region \\ growing resulting regions larger \\ than a threshold?};
   \node [process, left =of a9] (a10) {Non- \\ moustache \\ face};
   \node [process, below =of a9] (a11) {Is the moustache \\ region classified as \\ moustache?};
   \node [process, right =of a11] (a12) {Texture- \\ moustache \\ AdaBoost \\ classifier};
   \node [process, below =of a11] (a13) {moustache face};

   \path[draw,->] (a1) edge (a2)
               (a1.east) -| (a3)
               (a2) edge (a4)
               (a3) edge (a5)
               (a5) edge (a6)
               (a4) edge (a7)
               (a5) edge (a8)
               (a6) edge (a4)
               (a7) edge (a9)
               (a8) edge (a7)
               (a9.west) |- (a10)
               (a9) edge (a11)
               (a11) edge (a10)
               (a12) edge (a11)
               (a11) edge (a13)
               ;

\end{tikzpicture}
\end{document}
这就是我得到的:

有人能纠正我做错的事情吗?试了很多次了!
答案1
您可以将节点放在网格上并指定它们之间的距离。但最重要的是,要创建图表,流程不应从顶部开始,而应从最中心的部分开始。
\documentclass[border=10pt]{standalone}
\usepackage{tikz}
\usetikzlibrary{arrows.meta,positioning,shapes.geometric,calc}

\begin{document}

\def\aes{*1}
\begin{tikzpicture}[>={LaTeX[scale=1.25]}]
\tikzset{process/.style= {draw, shape=rectangle, align=center,on grid,minimum height=1.5\baselineskip,inner sep=6pt}}

   \node [process,text width=2.25cm]                           (a6)  {Create region, \textit{R}, for determining threshold $\theta$};
   \node [process, right = 3.5cm\aes of a6,text width=2.25cm]  (a5)  {Facial feature extraction} ;
   \node [process, above = 2cm\aes of a5]                      (a3)  {Face Detection};
   \node [process, left  = 4cm\aes of a6]                      (a4)  {Image binarization};
   \node [process, above = 2cm\aes of a4]                      (a2)  {Image decolorization};
   \node [process, above = 1.5cm\aes of a2]                    (a1)  {Input color face image};
   \node [process, below = 3cm\aes of a5,text width=3.00cm]    (a8)  {Create “moustache region” and “seed moustache region” for the region following};
   \node [process, left  = 5cm\aes of a8,text width=4.25cm]    (a7)  {Repeat “region growing” and set the traced pixels to “0” until there is no  nonzero pixel within the  “seed moustache region”};
   \node [process, below = 3cm\aes of a7,text width=5.00cm]    (a9)  {Is the total size of the region  growing resulting regions larger  than a threshold?};
   \node [process, below = 3cm\aes of a9,text width=3.00cm]    (a11) {Is the moustache  region classified as  moustache?};
   \node [process, left  = 4cm\aes of a11,text width=2.00cm]   (a10) {Non-moustache face};
   \node [process, right = 4cm\aes of a11,text width=2.00cm]   (a12) {Texture-moustache AdaBoost  classifier};
   \node [process, below = 2cm\aes of a11]                     (a13) {moustache face};

   \draw[->] ($(a4.south)!0.5!(a4.south east)$) -- (a7.north-|{$(a4.south)!0.5!(a4.south east)$});

   \path[draw,->] (a1)      edge (a2)
                  (a2)      edge (a4)
                  (a3)      edge (a5)
                  (a5)      edge (a6)
                  (a5)      edge (a8)
                  (a6)      edge (a4)
                  (a7)      edge (a9)
                  (a8)      edge (a7)
                  (a9)      edge  node [midway,right]  {Yes} (a11)
                  (a11)     edge  node [midway,above]  {No}  (a10)
                  (a12)     edge (a11)
                  (a11)     edge  node [midway,left]   {Yes} (a13)
               ;

  \draw[->] (a9.west) -|    node [pos=0.75,left] {Yes} (a10.north);
  \draw[->] (a1.east) -|   (a3.north);

%% to help place nodes and determine what the `text width` should be
%% \draw[help lines] (current bounding box.north west) grid (current bounding box.south east);

\end{tikzpicture}
\end{document}
无需手动添加新行。您可以使用 来设置每个节点的文本宽度text width。我还设置了 ,minimum height以使框的外观更加统一。
