

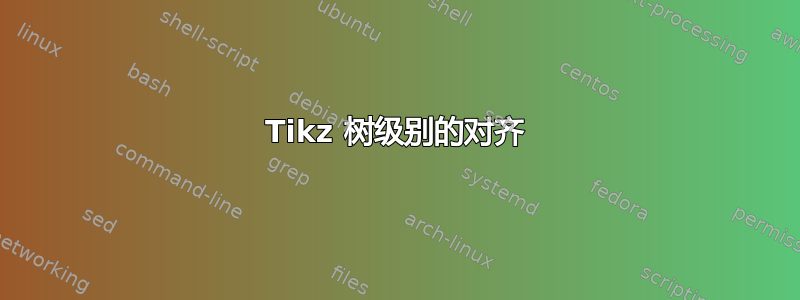
我想要重现下图。

并使用下面给出的代码得到了下图:

\documentclass{standalone}
\usepackage{tikz}
\usetikzlibrary{arrows, shapes, trees, positioning}

\begin{document}

\begin{tikzpicture}[
node distance = 1cm
, level distance=1.15cm
,  every node/.style = {
shape=rectangle
%                                           ,  rounded corners
, draw=blue!50
, inner sep=1mm
, outer sep=0mm
,  minimum size=2.5cm
, minimum height=8mm
, align=center
, anchor=north
}
,  Trt/.style = {
shape=rectangle
,  rounded corners
, draw=black!90
,  top color=blue!10
,  bottom color=blue!30
, inner sep=1mm
, outer sep=0mm
,  minimum size=2.5cm
, minimum height=8mm
, align=center
, anchor=north
}
,  Th/.style = {
shape=rectangle
,  rounded corners
, draw=black!90
, inner sep=1mm
, outer sep=0mm
,  minimum size=2.5cm
, minimum height=8mm
, align=center
, anchor=north
}
,  Control/.style = {
shape=rectangle
,  rounded corners
, draw=green!90
,  top color=green!10
,  bottom color=green!30
, inner sep=1mm
, outer sep=0mm
,  minimum size=2.5cm
, minimum height=8mm
, align=center
, anchor=north
}
,  Comment/.style = {
shape=rectangle
,  draw=none
,  inner sep=0mm
,  outer sep=0mm
,  minimum height=5mm
,  align=right
}
,  level 1/.style = {
sibling distance=35mm
}
,  level 2/.style = {
sibling distance=20mm
}
,  level 3/.style = {
sibling distance=20mm
}
,  edge from parent fork down
,  edge from parent/.style = {
draw
,   semithick
, -latex
}
,
]


% Theraspist 1
\node[Trt]   (Trt)   {Treatment}
child {node[Th] (Th1) {Theraspist 1}
child {node (S1) {Subject 1}
child {node (S1Y)  { $\textrm{T}_{1}$,  $\textrm{T}_{2}$, $\textrm{T}_{3}$}}
}
}
child {node[Th] (Th2) {Theraspist 2}
child {node (S2) {Subject 2}
child {node (S2Y) {$\textrm{T}_{1}$,  $\textrm{T}_{2}$, $\textrm{T}_{3}$}}
}
};

%from bottom to top
\node[Comment] (L1)    [left=5.0mm of S1Y] {Level 1};
\node[Comment] (L2)    [left=5.5mm of S1] {Level 2};
\node[Comment] (L3)    [left=5.5mm of Th1] {Level 3};


% Theraspist 2
\node[Control]   (Control)   [right=45mm of Trt] {Control}
child {node (S3) {Subject 3}
child {node (S3Y)  { $\textrm{T}_{1}$,  $\textrm{T}_{2}$, $\textrm{T}_{3}$}}
}
child {node (S4) {Subject 4}
child {node (S4Y) {$\textrm{T}_{1}$,  $\textrm{T}_{2}$, $\textrm{T}_{3}$}}
};

\end{tikzpicture}
\end{document}
我想知道如何像第一张图那样垂直对齐级别。如能得到任何帮助,我将不胜感激。谢谢
答案1
您可以向下移动节点S3并S4使用yshift=-1.55cm。
\documentclass{standalone}
\usepackage{tikz}
\usetikzlibrary{arrows, shapes, trees, positioning}

\begin{document}

\begin{tikzpicture}[
  node distance = 1cm
, level distance=1.15cm
, every node/.style = {
  shape=rectangle
%                                           ,  rounded corners
, draw=blue!50
, inner sep=1mm
, outer sep=0mm
, minimum size=2.5cm
, minimum height=8mm
, align=center
, anchor=north
}
,  Trt/.style = {
  shape=rectangle
, rounded corners
, draw=black!90
, top color=blue!10
, bottom color=blue!30
, inner sep=1mm
, outer sep=0mm
, minimum size=2.5cm
, minimum height=8mm
, align=center
, anchor=north
}
,  Th/.style = {
  shape=rectangle
, rounded corners
, draw=black!90
, inner sep=1mm
, outer sep=0mm
, minimum size=2.5cm
, minimum height=8mm
, align=center
, anchor=north
}
,  Control/.style = {
  shape=rectangle
, rounded corners
, draw=green!90
, top color=green!10
, bottom color=green!30
, inner sep=1mm
, outer sep=0mm
, minimum size=2.5cm
, minimum height=8mm
, align=center
, anchor=north
}
,  Comment/.style = {
  shape=rectangle
, draw=none
, inner sep=0mm
, outer sep=0mm
, minimum height=5mm
, align=right
}
,  level 1/.style = {
  sibling distance=35mm
}
,  level 2/.style = {
  sibling distance=20mm
}
,  level 3/.style = {
  sibling distance=20mm
}
,  edge from parent fork down
,  edge from parent/.style = {
draw
,  semithick
, -latex
}
,
]


% Theraspist 1
\node[Trt]   (Trt)   {Treatment}
child {node[Th] (Th1) {Theraspist 1}
child {node (S1) {Subject 1}
child {node (S1Y)  { $\textrm{T}_{1}$,  $\textrm{T}_{2}$, $\textrm{T}_{3}$}}
}
}
child {node[Th] (Th2) {Theraspist 2}
child {node (S2) {Subject 2}
child {node (S2Y) {$\textrm{T}_{1}$,  $\textrm{T}_{2}$, $\textrm{T}_{3}$}}
}
};

%from bottom to top
\node[Comment] (L1)    [left=5.0mm of S1Y] {Level 1};
\node[Comment] (L2)    [left=5.5mm of S1] {Level 2};
\node[Comment] (L3)    [left=5.5mm of Th1] {Level 3};


% Theraspist 2
\node[Control]   (Control)   [right=45mm of Trt] {Control}
child {node[yshift=-1.55cm] (S3) {Subject 3}
child {node (S3Y)  { $\textrm{T}_{1}$,  $\textrm{T}_{2}$, $\textrm{T}_{3}$}}
}
child {node[yshift=-1.55cm] (S4) {Subject 4}
child {node (S4Y) {$\textrm{T}_{1}$,  $\textrm{T}_{2}$, $\textrm{T}_{3}$}}
};
\end{tikzpicture}
\end{document}

答案2
这是使用包的解决方案forest。侧面的注释节点是单独完成的。
一些说明:
- 在设置样式时
\tikzset,您不需要为所有样式重复相同的选项。您可以创建一个基本样式,然后只编写不同的样式,这些样式优先于基本样式。 - 无需指定
shape=rectangle,这是默认形状。与写一样draw=black,draw结果也一样。 - 出于与 2 相同的原因,您不需要加载库
shapes。我还用 替换了arrows新arrows.meta库。另一个仍然受支持,但已弃用。 - 我创建了一个
phantom节点,所以你看到两棵树,但实际上它是一棵树。两个彩色节点都有一个父节点。
输出

代码
\documentclass[margin=10pt]{standalone}
\usepackage{tikz}
\usepackage{forest}

\usetikzlibrary{arrows.meta, calc, positioning}

\tikzset{%
    every node/.style={%
        draw=blue!50,
        inner sep=1mm,
        outer sep=0,
        minimum size=2.5cm,
        minimum height=8mm,
        align=center,
        anchor=north,
    },
    Trt/.style={%
        rounded corners,
        draw=black!90,
        top color=blue!10,
        bottom color=blue!30
    },
    Th/.style={%
        rounded corners,
        draw=black!90
    },
    Control/.style={%
        rounded corners,
        draw=green!90,
        top color=green!10,
        bottom color=green!30,
    },
    Comment/.style={%
        draw=none,
        inner sep=0mm,
        outer sep=0mm,
        minimum height=5mm,
        align=right
    },
}

\forestset{myst/.style={%
    for tree={%
        parent anchor=south,
        child anchor=north,
        l sep=1.15cm,
        edge path={\noexpand\path[\forestoption{edge},-{Latex}]
         (!u.parent anchor) |- ($(!u.parent anchor)!.5!(.child anchor)$) -| (.child anchor)
         \forestoption{edge label};}
        }
    }
}

\begin{document}
\begin{forest} myst,
[,phantom
    [Treatment, Trt
        [Therapist 1, Th
            [Subject 1, tier=word
                [{$T_1$, $T_2$, $T_3$}]
            ]
        ]
        [Therapist 2, Th, name=lvl3
            [Subject 2, tier=word, name=lvl2
                [{$T_1$, $T_2$, $T_3$}, name=lvl1]
            ]
        ]
    ]
    [Control, Control,
        [Subject 3, tier=word
            [{$T_1$, $T_2$, $T_3$}]
        ]
        [Subject 4, tier=word
            [{$T_1$, $T_2$, $T_3$}]
        ]
    ]
]
\node[left=3cm of lvl1, Comment] {Level 1};
\node[left=3cm of lvl2, Comment] {Level 2};
\node[left=3cm of lvl3, Comment] {Level 3};
\end{forest}
\end{document}
答案3
只需稍微重新设计一下您的 MWE 和 @salim bou 答案代码。为了使树形图看起来更美观:

\documentclass[border=5mm,tikz,preview]{standalone}
\usetikzlibrary{arrows, positioning, trees}

    \begin{document}
\begin{tikzpicture}[
every node/.style = {shape=rectangle, minimum width=22mm, inner sep=2mm,
                     font=\sffamily},
       Trt/.style = {rounded corners, draw=blue!90,
                     top color=blue!10,  bottom color=blue!30},
        Th/.style = {rounded corners, draw=black!90},
     Other/.style = {draw=blue!50},
     Cntrl/.style = {rounded corners, draw=green!90,
                     top color=green!10,  bottom color=green!30},
 sibling distance = 33mm,
   level 1/.style = {level distance = 16mm},
   level 2/.style = {level distance = 12mm},
    edge from parent fork down,
    edge from parent/.style = {draw, semithick, -latex}
                    ]
% Theraspist 1
\node[Trt]   (Trt)   {Treatment}
    child {node[Th] (Th1) {Theraspist 1}
        child {node[Other] (S1) {Subject 1}
            child {node[Other] (S1Y)  {T$_1$,  T$_2$, T$_3$}}
                }
            }
    child {node[Th] (Th2) {Theraspist 2}
        child {node[Other] (S2) {Subject 2}
            child {node[Other] (S2Y) {T$_1$,  T$_2$, T$_3$}}
                }
            };
% comments, from bottom to top
\node   [left=of S1Y] {Level 1};
\node   [left=of S1]  {Level 2};
\node   [left=of Th1] {Level 3};

% Theraspist 2
\node[Cntrl,right=45mm of Trt]   (Control)  {Control}
        child {node[Other,yshift=-12mm] (S3) {Subject 3}
            child {node[Other] (S3Y)  {T$_1$,  T$_2$, T$_3$}}
            }
        child {node[Other,yshift=-12mm] (S4) {Subject 4}
            child {node[Other] (S4Y) {T$_1$,  T$_2$, T$_3$}}
            };
\end{tikzpicture}
    \end{document}
答案4
justtrees.sty该解决方案使用森林这使得指定树左侧和右侧的对齐节点变得非常容易。这也意味着我们不必担心使用多棵树或使用幻像根。这使用了包装器的 0.05 版本。如果您有兴趣使用它,请告诉我,我可以为您提供最新的副本。目前,包装器仍处于实验阶段,但到目前为止似乎运行良好。
要使用包装器,我们只需说
\usepackage{justtrees}
这使得我们可以使用以下环境:
\begin{justtree}{<preamble, possibly empty>}
  <specification of tree in bracket notation>
\end{justtree}
在树规范中,我们可以使用以下样式将对齐节点的内容设置为树的左侧和/或右侧。指定的内容将与当前级别对齐。
left just=<content of node aligned to left of tree>
right just=<content of node aligned to right of tree>
可以指定以下样式来调整对齐节点的格式。
just format=<style for aligned nodes>
因此,我们可以写类似下面的内容。
\documentclass[tikz,border=10pt,multi]{standalone}
装入包装器。
\usepackage{justtrees}% v 0.05
使用当前箭头库,arrows.meta。
\usetikzlibrary{arrows.meta}
\begin{document}
定义样式,使用一些基本样式以避免不必要的重复,并更容易实现对样式的一致调整。
\tikzset{
  basic/.style={
    inner sep=1mm,
    outer sep=0mm,
    minimum size=2.5cm,
    minimum height=8mm,
    align=center,
    semithick,
  },
  basic round/.style={
    basic,
    rounded corners,
  },
  blue box/.style={
    basic,
    draw=blue!50,
  },
  Trt/.style = {
    basic round,
    draw=black!90,
    top color=blue!10,
    bottom color=blue!30,
  },
  Th/.style = {
    basic round,
    draw=black!90,
  },
  Control/.style = {
    basic round,
    draw=green!90,
    top color=green!10,
    bottom color=green!30,
  },
}
现在来看看树。首先,启动环境和第一个参数。
\begin{justtree}{%
现在更改默认设置来定制这棵树的外观。
我们希望这些能够应用到整棵树上。
for tree={
将边的格式从父级更改为子级。
      edge path={
        \noexpand\path [\forestoption{edge}] (!u.parent anchor) -- +(0,-5pt) -| (.child anchor)\forestoption{edge label};
      },
设置从父节点到子节点的边的锚点。
      parent anchor=south,
      child anchor=north,
调整边缘的格式。
edge={-LaTeX, semithick},
为树中的节点设置默认格式,该格式将根据需要被覆盖。
blue box,
稍微增加级别之间的距离。
l sep+=5pt,
将左侧对齐的节点稍微移动一点,以增加这些节点与树内的节点之间的距离。
      just format={xshift=-2.5pt}
    },
现在我们需要推迟一个改变。我们将在树被已打包(看森林的手册了解详情)。
before packing={
我们希望将其应用于整棵树。也就是说,我们希望考虑将其应用于所有节点。
for tree={
但实际上我们只会触及终端元素,即没有子元素的元素。我们将为这些元素添加一个单数,tier以确保它们都水平对齐。我们需要为它起一个名字tier。我们将使用terminal。
        if n children=0{tier=terminal}{}
      }
    }
结束序言并关闭对justtree环境的强制参数。
}
现在指定树森林的括号语法。请注意,这里似乎有两个根是可以的,但在普通forest环境中是不允许的。
最左上角的节点采用一种特殊格式,Trt,其子节点采用另一种格式,Th。
[Treatment, Trt, for children={Th}
这里我们指定左边第一个对齐的节点,Level 3。
[Therapist 1, left just=Level 3
下一个左对齐节点。
[Subject 1, left just=Level 2
最后一个左对齐节点。
        [{$T_1, T_2, T_3$}, left just=Level 1]
      ]
    ]
    [Therapist 2
      [Subject 2
        [{$T_1, T_2, T_3$}]
      ]
    ]
  ]
最右边的顶部节点具有特殊的格式。
[Control, Control
这棵子树的其余部分很简单。这里没什么特别的。如果我们愿意,我们可以用left just这里代替上面。左对齐的节点仍然会自动放置在相同的位置。
    [Subject 3
      [{$T_1, T_2, T_3$}]
    ]
    [Subject 4
      [{$T_1, T_2, T_3$}]
    ]
  ]
关闭justtree和document环境。
\end{justtree}
\end{document}
我们就完成了。

完整代码:
\documentclass[tikz,border=10pt,multi]{standalone}
\usepackage{justtrees}% v 0.05
\usetikzlibrary{arrows.meta}
\begin{document}
\tikzset{
  basic/.style={
    inner sep=1mm,
    outer sep=0mm,
    minimum size=2.5cm,
    minimum height=8mm,
    align=center,
    semithick,
  },
  basic round/.style={
    basic,
    rounded corners,
  },
  blue box/.style={
    basic,
    draw=blue!50,
  },
  Trt/.style = {
    basic round,
    draw=black!90,
    top color=blue!10,
    bottom color=blue!30,
  },
  Th/.style = {
    basic round,
    draw=black!90,
  },
  Control/.style = {
    basic round,
    draw=green!90,
    top color=green!10,
    bottom color=green!30,
  },
}
\begin{justtree}{%
    for tree={
      edge path={
        \noexpand\path [\forestoption{edge}] (!u.parent anchor) -- +(0,-5pt) -| (.child anchor)\forestoption{edge label};
      },
      parent anchor=south,
      child anchor=north,
      edge={-LaTeX, semithick},
      blue box,
      l sep+=5pt,
      just format={xshift=-2.5pt}
    },
    before packing={
      for tree={
        if n children=0{tier=terminal}{}
      }
    }
  }
  [Treatment, Trt, for children={Th}
    [Therapist 1, left just=Level 3
      [Subject 1, left just=Level 2
        [{$T_1, T_2, T_3$}, left just=Level 1]
      ]
    ]
    [Therapist 2
      [Subject 2
        [{$T_1, T_2, T_3$}]
      ]
    ]
  ]
  [Control, Control
    [Subject 3
      [{$T_1, T_2, T_3$}]
    ]
    [Subject 4
      [{$T_1, T_2, T_3$}]
    ]
  ]
\end{justtree}
\end{document}