

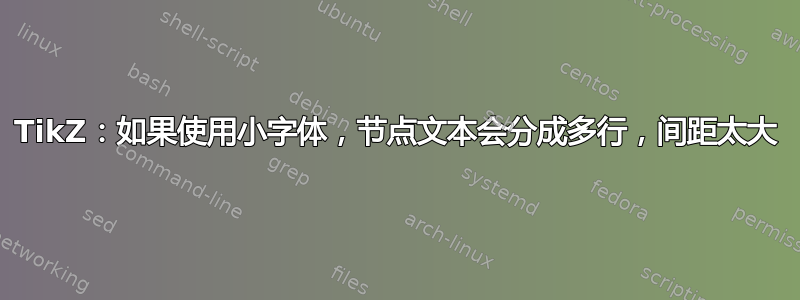
我使用以下代码生成了一个简单的框图:
\documentclass[12pt,letterpaper]{article}

\usepackage{tikz}
\usetikzlibrary{shapes,arrows}

\begin{document}

\tikzstyle{block} = [draw, rectangle,
minimum height=3em, minimum width=5em, align=left]
\tikzstyle{pinstyle} = [pin edge={to-,thin,black}]

% The block diagram code is probably more verbose than necessary
\begin{tikzpicture}[auto,>=latex']
    % We start by placing the blocks
    \node [block, name=message-source] {message \\ source};
    \node [block, name=encoder, right of=message-source, node distance=3.5cm] {encoder};
    \node [block, name=channel, right of=encoder, node distance=3.5cm, pin={[pinstyle]above:\scriptsize noise},
    node distance=3.5cm] {channel};
    \node [block, name=decoder, right of=channel, node distance=3.5cm] {decoder};
    \node [block, name=user, right of=decoder, node distance=3.5cm] {user};


    % Once the nodes are placed, connecting them is easy.
    \draw [->] (message-source) -- node[name=message, align=center] {\scriptsize message} (encoder);
    \draw [->] (encoder) -- node[name=codeword, align=center] {\scriptsize codeword} (channel);
    \draw [->] (channel) -- node[name=receivedword, align=center, text width=1.75cm] {{\scriptsize received word}} (decoder);
    \draw [->] (decoder) -- node[name=decodedmsg, align=center, text width=1.75cm] {{\scriptsize decoded message}} (user);
\end{tikzpicture}

\end{document}

我想提请您注意“接收的单词”和“解码的消息”是如何被分割的,并且对于字体大小来说“行距太大”(scriptsize)。
我尝试过的解决方法(但没有成功)是使用关键字限制文本框的高度(类似于我限制框的宽度的方式),text height但这不起作用。
我能想到的一个丑陋的解决方案是使用手动拆分文本\\,但也提供一个间距参数\\[0.25em],如(参见TikZ 节点中的手动/自动换行和文本对齐)但随后我必须针对每次分割进行调整...很繁重!
我该如何修复此问题?
答案1
不要将字体大小命令与节点文本一起使用!它应由节点参数决定:
\documentclass[12pt,letterpaper]{article}
\usepackage{tikz}
\usetikzlibrary{shapes,arrows}

\begin{document}

\tikzstyle{block} = [draw, rectangle,
minimum height=3em, minimum width=5em, align=left]
\tikzstyle{pinstyle} = [pin edge={to-,thin,black}]

% The block diagram code is probably more verbose than necessary
\begin{tikzpicture}[auto,>=latex']
% We start by placing the blocks
    \node [block, name=message-source] {message \\ source};
    \node [block, name=encoder, right of=message-source, node distance=3.5cm] {encoder};
    \node [block, name=channel, right of=encoder, node distance=3.5cm, pin={[pinstyle]above:\scriptsize noise},
    node distance=3.5cm] {channel};
    \node [block, name=decoder, right of=channel, node distance=3.5cm] {decoder};
    \node [block, name=user, right of=decoder, node distance=3.5cm] {user};

    % Once the nodes are placed, connecting them is easy.
    \draw [->] (message-source) -- node[name=message, align=center] {\scriptsize message} (encoder);
    \draw [->] (encoder) -- node[name=codeword, align=center] {\scriptsize codeword} (channel);
    \draw [->] (channel) -- node[name=receivedword, align=center, text width=1.75cm,
                                 font=\scriptsize] { received word} (decoder);  <-- here is correct definition of font size!
    \draw [->] (decoder) -- node[name=decodedmsg, align=center, text width=1.75cm] {{\scriptsize decoded message}} (user);
\end{tikzpicture}

\end{document}
我只在一个节点上改变这一点,你会看到差异:

升级:您的 MWE 的另一种编码(仅供我练习,但也许您会喜欢它):
\documentclass[12pt,letterpaper]{article} \usepackage{tikz} \usetikzlibrary{箭头,链条,引号}
\usepackage[margin=0.75in,showframe]{几何}
    \begin{document}
\noindent%
    \begin{tikzpicture}[
    node distance = 7mm and 18mm,
      start chain = going right,
     block/.style = {rectangle, draw,
                     minimum height=3em, minimum width=5em, align=left,
                     on chain},
every edge/.style = {draw,-latex'},
every edge quotes/.style = {auto, text width=17mm, align=center, font=\scriptsize},
 every pin/.style = {in distance=7mm, font=\scriptsize},
   every pin edge/.style = {black, latex'-},
                        ]
% We start by placing the blocks
\node [block, name=message-source]  {message\\ source};
\node [block, name=encoder]         {encoder};
\node [block, name=channel,
       pin=above:noise]             {channel};
\node [block, name=decoder]         {decoder};
\node [block, name=user]            {user};

% Once the nodes are placed, connecting them is easy.
\draw   (message-source) edge["message"] (encoder)
        (encoder) edge["codeword"] (channel)
        (channel) edge["received word"] (decoder)
        (decoder) edge["decoded message"] (user);
\end{tikzpicture}
    \end{document}
这个更简洁的代码给出了与以前相同的结果。在其中我使用 tikzlibraryquotes来标记块之间的箭头。所有样式的定义都集中在图片代码的开头(可以放在 中\tikzset,\tikzstyle已弃用)。借助链库,节点位于“链”中,它们之间的距离由 决定node distance。
答案2
您可以使用\scriptsize\vbox{received word}减少行间距
\documentclass[12pt,letterpaper]{article}

\usepackage{tikz}
\usetikzlibrary{shapes,arrows}

\begin{document}

\tikzstyle{block} = [draw, rectangle,
minimum height=3em, minimum width=5em, align=left]
\tikzstyle{pinstyle} = [pin edge={to-,thin,black}]

% The block diagram code is probably more verbose than necessary
\begin{tikzpicture}[auto,>=latex']
    % We start by placing the blocks
    \node [block, name=message-source] {message \\ source};
    \node [block, name=encoder, right of=message-source, node distance=3.5cm] {encoder};
    \node [block, name=channel, right of=encoder, node distance=3.5cm, pin={[pinstyle]above:\scriptsize noise},
    node distance=3.5cm] {channel};
    \node [block, name=decoder, right of=channel, node distance=3.5cm] {decoder};
    \node [block, name=user, right of=decoder, node distance=3.5cm] {user};


    % Once the nodes are placed, connecting them is easy.
    \draw [->] (message-source) -- node[name=message, align=center] {\scriptsize message} (encoder);
    \draw [->] (encoder) -- node[name=codeword, align=center] {\scriptsize codeword} (channel);
    \draw [->] (channel) -- node[name=receivedword, align=center, text width=1.75cm] {{\scriptsize\vbox{received  word}}} (decoder);
    \draw [->] (decoder) -- node[name=decodedmsg, align=center, text width=1.75cm] {{\scriptsize \vbox{decoded message}}} (user);
\end{tikzpicture}

\end{document}