

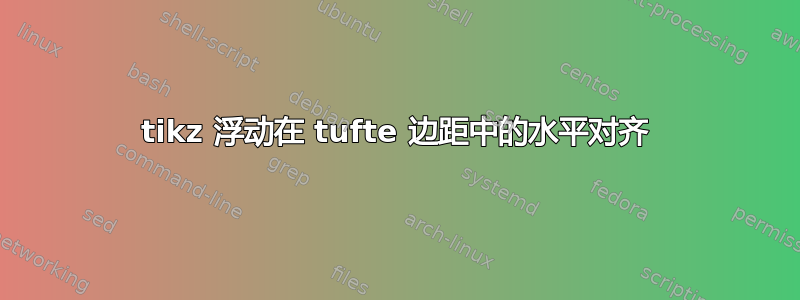
我尝试在 tufte 类书籍的正反面页面上制作对称浮动。此图显示了我想要实现的目标,也显示了差异:

(第一页并不重要)。问题是:如何使浮动“右对齐”,使其右侧对齐,从而与其右侧对应部分对称。标题必须保持原位 - 在页边距上。
这是 MWE。
\documentclass[twoside,symmetric,notoc,justified]{tufte-book}%

\usepackage[utf8]{inputenc}
\usepackage[latin]{babel}
\usepackage[OT1]{fontenc}
\usepackage[pdftex]{graphicx}
\usepackage{lipsum}
\usepackage{float}
\usepackage{pgf,caption,calc}
\usepackage{tikz,tkz-euclide}
\usepackage{cutwin}
\usetkzobj{all}


\geometry{
  %showframe,%Показывает рамки
  paperwidth=145mm,
  paperheight=215mm,
  inner=16mm,
  outer=10mm,
  top=10mm,
  bottom=40mm,
  marginparsep=3mm,
  marginparwidth=40mm,
  includemp,
  includehead,
}

\begin{document}

\lipsum[1]


\opencutleft
\begin{shapedcutout}{2}{16}{0.90\textwidth, 0.79\textwidth,0.7\textwidth, 0.65\textwidth,0.61\textwidth, 0.6\textwidth, 0.55\textwidth, 0.55\textwidth, 0.55\textwidth, 0.55\textwidth, 0.6\textwidth,0.61\textwidth, 0.65\textwidth,0.7\textwidth, 0.79\textwidth,0.90\textwidth}
\lipsum[1-2]
\end{shapedcutout}

\begin{marginfigure}[-25.5cm]
{\caption{This is caption}\label{fig:label}}
{\begin{tikzpicture}[scale=1]
\tkzInit[xmin=-0.5, xmax=7, ymin=-5, ymax=2.5]
\tkzClip
\tkzDefPoints{0/0/A, 2.5/2/B, 6/0/C}
\tkzCircumCenter(A,B,C)\tkzGetPoint{O}
\tkzDrawCircle(O,A)
\end{tikzpicture}}
\end{marginfigure}


\opencutright
\begin{shapedcutout}{2}{16}{0.90\textwidth, 0.79\textwidth,0.7\textwidth, 0.65\textwidth,0.61\textwidth, 0.6\textwidth, 0.55\textwidth, 0.55\textwidth, 0.55\textwidth, 0.55\textwidth, 0.6\textwidth,0.61\textwidth, 0.65\textwidth,0.7\textwidth, 0.79\textwidth,0.90\textwidth}
\lipsum[1-2]
\end{shapedcutout}

\begin{marginfigure}[-25.5cm]
{\caption{This is caption}\label{fig:label1}}
{\begin{tikzpicture}[scale=1]
\tkzInit[xmin=-0.5, xmax=7, ymin=-5, ymax=2.5]
\tkzClip
\tkzDefPoints{0/0/A, 2.5/2/B, 6/0/C}
\tkzCircumCenter(A,B,C)\tkzGetPoint{O}
\tkzDrawCircle(O,A)
\end{tikzpicture}}
\end{marginfigure}


\end{document}
答案1
这就是我的做法。但我仍然欢迎其他解决方案。诀窍是像这样启动第二个 tikzpicture:
\rightline{\begin{tikzpicture}[scale=1]
这是完整的代码:
\documentclass[twoside,symmetric,notoc,justified]{tufte-book}%

\usepackage[utf8]{inputenc}
\usepackage[latin]{babel}
\usepackage[OT1]{fontenc}
\usepackage[pdftex]{graphicx}
\usepackage{lipsum}
\usepackage{float}
\usepackage{pgf,caption,calc}
\usepackage{tikz,tkz-euclide}
\usepackage{cutwin}
\usetkzobj{all}


\geometry{
  %showframe,%Показывает рамки
  paperwidth=145mm,
  paperheight=215mm,
  inner=16mm,
  outer=10mm,
  top=10mm,
  bottom=40mm,
  marginparsep=3mm,
  marginparwidth=40mm,
  includemp,
  includehead,
}

\begin{document}

\lipsum[1]


\opencutleft
\begin{shapedcutout}{2}{16}{0.90\textwidth, 0.79\textwidth,0.7\textwidth, 0.65\textwidth,0.61\textwidth, 0.6\textwidth, 0.55\textwidth, 0.55\textwidth, 0.55\textwidth, 0.55\textwidth, 0.6\textwidth,0.61\textwidth, 0.65\textwidth,0.7\textwidth, 0.79\textwidth,0.90\textwidth}
\lipsum[1-2]
\end{shapedcutout}

\begin{marginfigure}[-25.5cm]
{\caption{This is caption}\label{fig:label}}
{\begin{tikzpicture}[scale=1]
\tkzInit[xmin=-0.5, xmax=7, ymin=-5, ymax=2.5]
\tkzClip
\tkzDefPoints{0/0/A, 2.5/2/B, 6/0/C}
\tkzCircumCenter(A,B,C)\tkzGetPoint{O}
\tkzDrawCircle(O,A)
\end{tikzpicture}}
\end{marginfigure}


\opencutright
\begin{shapedcutout}{2}{16}{0.90\textwidth, 0.79\textwidth,0.7\textwidth, 0.65\textwidth,0.61\textwidth, 0.6\textwidth, 0.55\textwidth, 0.55\textwidth, 0.55\textwidth, 0.55\textwidth, 0.6\textwidth,0.61\textwidth, 0.65\textwidth,0.7\textwidth, 0.79\textwidth,0.90\textwidth}
\lipsum[1-2]
\end{shapedcutout}

\begin{marginfigure}[-25.5cm]
{\caption{This is caption}\label{fig:label1}}
\rightline{\begin{tikzpicture}[scale=1]
\tkzInit[xmin=-0.5, xmax=7, ymin=-5, ymax=2.5]
\tkzClip
\tkzDefPoints{0/0/A, 2.5/2/B, 6/0/C}
\tkzCircumCenter(A,B,C)\tkzGetPoint{O}
\tkzDrawCircle(O,A)
\end{tikzpicture}}
\end{marginfigure}
\end{document}
这是输出:
 再次,我不确定这是否是最好的解决方案,但它确实使图片准确对齐。
\hspace*{-3cm}
也可以工作,但需要手动调整。