

请考虑以下示例:
\documentclass{article}
\usepackage{tikz}
\usetikzlibrary{positioning}
\begin{document}
\begin{tikzpicture}
\node (A) {A};
\node (B) [right=2cm of A] {B};
\draw[->,bend left=20] (A) to (B);
\draw[->,bend left=20,red] (B) to (A);
\draw[->,bend right=40,blue] (B) to (A);
\end{tikzpicture}
\end{document}

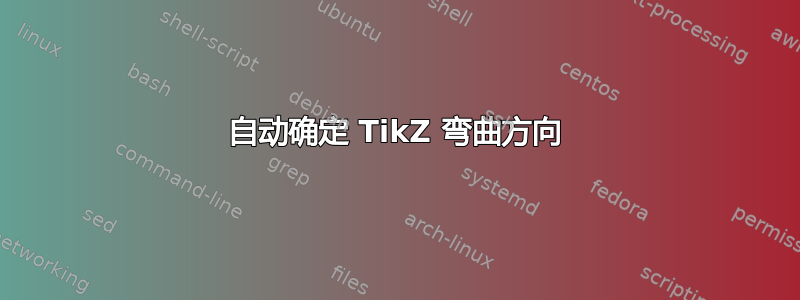
如果我从 A 画箭头到 B,那么bend left曲线会如预期那样高于 A 和 B 的高度(黑色箭头)。但如果我反转路径中节点的顺序,bend left曲线就会低于 A 和 B(红色箭头)。
我想要做的是始终让箭头位于上方(如蓝色箭头),而不必手动指定弯曲方向。因此直观地讲,我希望能够执行以下操作:
if A is left of B then bend left
else
if B is left of A then bend right
我该如何做呢?
答案1
实际的数学很简单,我们计算起点和终点之间的差异,并根据\pgf@x或 的符号选择适当的弯曲方向\pgf@y。(不过,这里不考虑差异为零的特殊情况。)
这也仅使用节点的中心,如果节点的大小不同,则可能不会导致正确的结果。
下面的实现使用 PGF 来计算差异,并且使用更快的方法来使用密钥。使用该calc库,可以通过以下操作完成数学运算let:
\tikzset{
  bend north/.style={
    to path={
      let \p0=($(\tikztostart)-(\tikztotarget)$) in
      [bend \ifdim\x0<0pt left\else right\fi={#1}]
      \tikz@to@curve@path}}}
直接使用\tikz@to@curve@path可以让我们避免嵌套to路径,这需要一些特殊的扩展控制,否则可以避免像\def\tikztotarget{\tikztotarget}和to节点这样的递归定义丢失或无法正确应用:
\expanded{
   to[bend <left or right>=<angle>]
   \unexpanded\expandafter{\tikz@tonodes}
   (\tikztotarget)
}
代码
\documentclass[tikz]{standalone}
\usepackage{tikz}
\usetikzlibrary{positioning}
\makeatletter
\tikzset{
  % “execute at begin to” can't be used inside “to[bend north]”
  % which is why we do this simply at the start of “to path”
  auto bend/north/.code={{{%
    \pgf@process{%
      \pgfpointdiff{\tikz@scan@one@point\pgfutil@firstofone(\tikztostart)}
                   {\tikz@scan@one@point\pgfutil@firstofone(\tikztotarget)}}%
    \pgfkeysvalueof{/tikz/bend \ifdim\pgf@x<0pt right\else left\fi/.@cmd}#1\pgfeov}}},
  auto bend/south/.code={{{%
    \pgf@process{%
      \pgfpointdiff{\tikz@scan@one@point\pgfutil@firstofone(\tikztostart)}
                   {\tikz@scan@one@point\pgfutil@firstofone(\tikztotarget)}}%
    \pgfkeysvalueof{/tikz/bend \ifdim\pgf@x<0pt left\else right\fi/.@cmd}#1\pgfeov}}},
  auto bend/west/.code={{{%
    \pgf@process{%
      \pgfpointdiff{\tikz@scan@one@point\pgfutil@firstofone(\tikztostart)}
                   {\tikz@scan@one@point\pgfutil@firstofone(\tikztotarget)}}%
    \pgfkeysvalueof{/tikz/bend \ifdim\pgf@y<0pt right\else left\fi/.@cmd}#1\pgfeov}}},
  auto bend/east/.code={{{%
    \pgf@process{%
      \pgfpointdiff{\tikz@scan@one@point\pgfutil@firstofone(\tikztostart)}
                   {\tikz@scan@one@point\pgfutil@firstofone(\tikztotarget)}}%
    \pgfkeysvalueof{/tikz/bend \ifdim\pgf@y<0pt left\else right\fi/.@cmd}#1\pgfeov}}},
  /utils/temp/.style={
    bend #1/.style={
      to path={% this should be faster than “[auto bend/#1={##1}]”
        \pgfextra{\pgfkeysvalueof{/tikz/auto bend/#1/.@cmd}##1\pgfeov}
        \tikz@to@curve@path}}},
  /utils/temp/.list={north, south, west, east}}
\makeatother
\begin{document}
\begin{tikzpicture}
\node (A) {A};
\node (B) [right=2cm of A] {B};
\draw[->, bend north=20      ] (A) to (B);
\draw[->, bend north=30,  red] (B) to (A);
\draw[->, bend north=40, blue] (B) to (A);
\end{tikzpicture}

\foreach \ang in {0, 10, ..., 359}{%
  \begin{tikzpicture}[nodes={sloped, fill=white, inner ysep=+.1em,
                             fill opacity=.8, text opacity=1, scale=.5}]
    \useasboundingbox (-3,-3) (3,3);
    \foreach[count=\i] \c/\d in {black/north, red/south,
      green!50!black/west, yellow!50!black/east}
      \draw[\c] (0,0) to[bend \d=\i0] node{\d} (\ang:3);
  \end{tikzpicture}}
\end{document}
输出
