

我正在尝试做什么
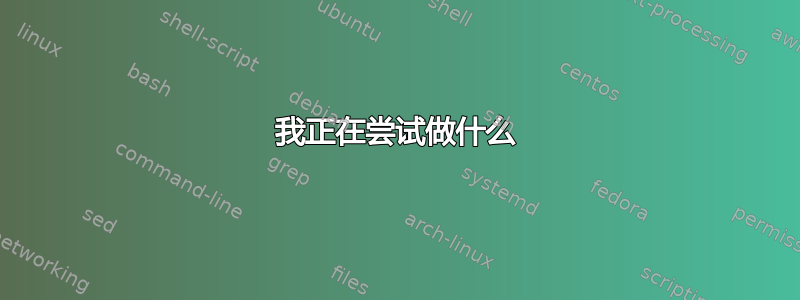
我正在创建一些手写练习表。在这些练习表中,完全相同的图案在整个页面上水平和垂直重复。以下 3 幅图像是使用 Inkscape 创建的,每幅图像都代表我想使用 TikZ 创建的单个页面的内容。


我知道的
我刚刚了解到我可以在里面定义一个模式\newsavebox。
\documentclass{article}

\usepackage{tikz}

\newsavebox \mybox
\sbox \mybox {%
  \tikz{%
    \draw (0,0) circle (0.2);
    \draw (0,0) circle (0.4);
    \draw (0,0) circle (0.6);
    \draw (0,0) circle (0.8);
    \draw (0,0) circle (1);
  }%
}

\begin{document}
  \begin{tikzpicture}
    \node at (0, 0) {\usebox\mybox};
    \node at (2, 0) {\usebox\mybox};
  \end{tikzpicture}
\end{document}

我还知道我可以使用循环重复相同的图案,以便它填满整个页面(不超过页面边框)。
\documentclass{article}

\usepackage{parskip}

\usepackage[showframe]{geometry}

\usepackage{tikz}

\newsavebox \mybox
\sbox \mybox {%
  \tikz{%
    \draw (0,0) circle (0.2);
    \draw (0,0) circle (0.4);
    \draw (0,0) circle (0.6);
    \draw (0,0) circle (0.8);
    \draw (0,0) circle (1);
  }%
}

\begin{document}
  \begin{tikzpicture}
    \foreach \row in {2,4,...,18} {
      \foreach \column in {2,4,...,14} {
        \node at (\column, \row) {\usebox\mybox};
      }
    }
  \end{tikzpicture}
\end{document}

有时使用该包会更改页面尺寸geometry。当发生这种情况时,我需要手动更新循环的迭代次数,并查看重复次数是否不超过页面边界。我希望循环在到达页面的右边界或页面的下边界时自动停止。
我还知道如何使用 重复某些操作,直到达到页面的正确限制\xleaders。(请参阅这个答案)。我利用这些知识重复了 tikz 图形(参见下面的最小工作示例)。但是,问题是tikzpicture使用了多个环境。我希望使用单个环境tikzpicture以降低源代码的复杂性。
\documentclass{article}

\usepackage{parskip}

\usepackage[showframe]{geometry}

\usepackage{tikz}

\newsavebox \mybox
\sbox \mybox {%
  \tikz{%
    \draw (0,0) circle (0.2);
    \draw (0,0) circle (0.4);
    \draw (0,0) circle (0.6);
    \draw (0,0) circle (0.8);
    \draw (0,0) circle (1);
  }%
}

\newcommand\asteriskfill{\leavevmode\xleaders\hbox{%
  \begin{tikzpicture}
    \node at (0, 0) {\usebox\mybox};
  \end{tikzpicture}%
  }%
  \hfill\kern0pt}

\begin{document}
\asteriskfill
\end{document}

我不知道如何重复一个模式,直到达到页面的底部限制。
问题
如何重复完全相同的 TikZ 模式以使用页面中的整个可用空间而不超出页面限制?
我认为解决这个问题的一个可能方法是使用定义一个模式\newsavebox并以某种方式定义一个宏,该宏水平和垂直地重复相同的框,直到达到页面限制。
答案1
\documentclass{article}
\usepackage{parskip}
\usepackage[showframe]{geometry}
\usepackage{tikz}

\newsavebox{\mybox}
\newlength{\myboxwidth}
\newlength{\myboxheight}

\NewDocumentCommand{\fillPageWithContent}{m}{%
  \newpage
  \sbox\mybox{#1}%
  \setlength{\myboxwidth}{\wd\mybox}%
  \setlength{\myboxheight}{\dimexpr\ht\mybox+\dp\mybox}%
  \noindent
  \begin{tikzpicture}[x=\myboxwidth, y=\myboxheight]
    % "parse=true" \pgfmathparse's the upper bound in the loop
    \foreach[parse=true] \row in {1, ..., \textwidth/\myboxwidth} {%
      \foreach[parse=true] \column in {1, ..., \textheight/\myboxheight} {%
        \node at (\row, \column) {\usebox\mybox};
      }
    }
  \end{tikzpicture}
  \newpage
}

\begin{document}
\fillPageWithContent{%
  \tikz{%
    \draw (0,0) circle (0.2)
          (0,0) circle (0.4)
          (0,0) circle (0.6)
          (0,0) circle (0.8)
          (0,0) circle (1);
    % enlarge bounding box to make some separation
    \path (-1.05, -1.05) (1.05, 1.05);
  }%
}

\fillPageWithContent{%
  \tikz{
    \draw (0, 0) rectangle (2,3)
          (.2, .3) rectangle (1.8, 2.7)
          (.4, .6) rectangle (1.6, 2.4)
          (.6, .8) rectangle (1.4, 2.1);
    \path (-.1, -.1) (2.1, 3.1);
  }%
}

\fillPageWithContent{%
  \tikz{
    \draw (0, 0) rectangle (1,1);
    \draw[rotate=30] (0, 0) rectangle (1,1);
    \draw[rotate=60] (0, 0) rectangle (1,1);
    \draw[rotate=90] (0, 0) rectangle (1,1);
    \draw[rotate=120] (0, 0) rectangle (1,1);
  }
}
\end{document}

为了使图案在文本区域内水平和垂直居中,我
- 添加
inner sep=0pt到和tikzpicture\fillPageWithContent - 使用从北向西
\path <coordinate>;放大,移动量需要多少。这比传统方法更棘手,但它适用于任何大小的目标矩形进行填充。tikzpicture\centering\vfill
\documentclass{article}
\usepackage{parskip}
\usepackage[showframe]{geometry}
\usepackage{tikz}

\usetikzlibrary{calc}

\newsavebox{\mybox}
\newlength{\myboxwidth}
\newlength{\myboxheight}

\NewDocumentCommand{\fillPageWithContent}{m}{%
  \newpage
  \sbox\mybox{#1}%
  \setlength{\myboxwidth}{\wd\mybox}%
  \setlength{\myboxheight}{\dimexpr\ht\mybox+\dp\mybox}%
  \noindent
  \begin{tikzpicture}[x=\myboxwidth, y=\myboxheight, inner sep=0pt]
    % "parse=true" \pgfmathparse's the upper bound in the loop
    \foreach[parse=true] \row in {1, ..., \textwidth/\myboxwidth} {%
      \foreach[parse=true] \column in {1, ..., \textheight/\myboxheight} {%
        \node at (\row, \column) {\usebox\mybox};
      }
    }
    \path
      let \n{xshift} = {\textwidth-\myboxwidth*int(\textwidth/\myboxwidth)},
          \n{yshift} = {\textheight-\myboxheight*int(\textheight/\myboxheight))}
          % Only north and west sides of current bounding box are enlarged,
          % since if all four sides are enlarged, the resulting tikzpicture
          % might be slightly larger than the target rectangle due to rounding
          % errors. May fail in RTL scripts.
          % Also the "pt" following ".5" is important: it makes the x- and
          % y-coordinate with units, so the unit-vectors (which we altered with
          % "x=\myboxwidth, y=\myboxheight") won't be applied.
      in  ([shift={(-.5pt*\n{xshift}, .5pt*\n{yshift})}]
           current bounding box.north west);
  \end{tikzpicture}
  \newpage
}

\begin{document}
\fillPageWithContent{%
  \tikz{%
    \draw (0,0) circle (0.2)
          (0,0) circle (0.4)
          (0,0) circle (0.6)
          (0,0) circle (0.8)
          (0,0) circle (1);
    % enlarge bounding box to make some separation
    \path (-1.05, -1.05) (1.05, 1.05);
  }%
}

\fillPageWithContent{%
  \tikz{
    \draw (0, 0) rectangle (2,3)
          (.2, .3) rectangle (1.8, 2.7)
          (.4, .6) rectangle (1.6, 2.4)
          (.6, .8) rectangle (1.4, 2.1);
    \path (-.1, -.1) (2.1, 3.1);
  }%
}

\fillPageWithContent{%
  \tikz{
    \draw (0, 0) rectangle (1,1);
    \draw[rotate=30] (0, 0) rectangle (1,1);
    \draw[rotate=60] (0, 0) rectangle (1,1);
    \draw[rotate=90] (0, 0) rectangle (1,1);
    \draw[rotate=120] (0, 0) rectangle (1,1);
  }
}
\end{document}

答案2

Knuth 设计的 TeX 非常适合此用途。您可以使用水平和垂直引线来避免所有计算。
\documentclass{article}
\usepackage{fontspec}
\usepackage{tikz}
\setmainfont{symbola}
\def\phone{☏}
\def\bullseye{\tikz\draw (0,0) circle (0.2)
          (0,0) circle (0.4)
          (0,0) circle (0.6)
          (0,0) circle (0.8)
          (0,0) circle (1);}

\begin{document}
\newbox\mybox
\setbox\mybox\vbox to .3\textheight{%
\null
\xleaders\hbox{\strut\Huge\kern.2em\bullseye\kern.2em}
\vfill
}
\usebox\mybox
\null\xleaders\hbox{\usebox\mybox}\hfill\null
\end{document}
从代码中可以看出,通过将 \bullseye 替换为 \phone,它也会响应诸如\Huge或 之类的大小调整命令\large。我建议将所有坐标更改为相对单位。在\fbox领导者中添加一个,您将获得我所展示的图像。
\def\bullseye{\tikz\draw (0,0) circle (0.2)
          (0,0) circle (0.4em)
          (0,0) circle (0.6em)
          (0,0) circle (0.8em)
          (0,0) circle (1em);}