

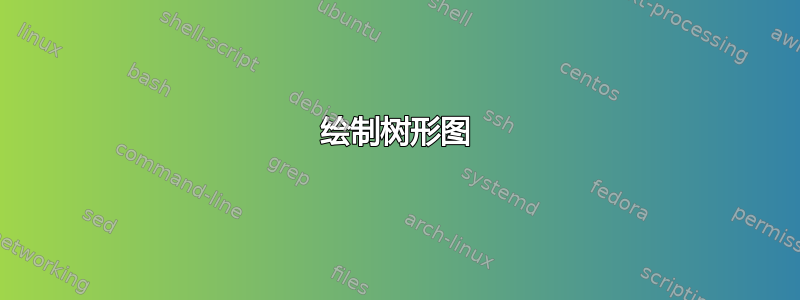
如何在 Latex 中绘制下面的树形图?我还想按照图中的方式标记分支。

以下是我的序言:
\documentclass[11pt,reqno]{amsart}

% Packages
\usepackage{graphicx}
\usepackage{amssymb,amsthm}
\usepackage{amsmath}
\makeatletter
\newcommand*\rel@kern[1]{\kern#1\dimexpr\macc@kerna}
\newcommand*\widebar[1]{%
  \begingroup
  \def\mathaccent##1##2{%
    \rel@kern{0.8}%
    \overline{\rel@kern{-0.8}\macc@nucleus\rel@kern{0.2}}%
    \rel@kern{-0.2}%
  }%
  \macc@depth\@ne
  \let\math@bgroup\@empty \let\math@egroup\macc@set@skewchar
  \mathsurround\z@ \frozen@everymath{\mathgroup\macc@group\relax}%
  \macc@set@skewchar\relax
  \let\mathaccentV\macc@nested@a
  \macc@nested@a\relax111{#1}%
  \endgroup
}
\makeatother
\usepackage{cite}
%\usepackage{natbib}
%\bibpunct{(}{)}{;}{;}{,}{,}
\usepackage{xr-hyper}
\usepackage[
  colorlinks=true,
  citecolor=blue,
  urlcolor=blue,
  linkcolor=blue
]{hyperref}
\usepackage{bm}
\usepackage{fullpage}
\usepackage{ amssymb }
\usepackage{caption}
\captionsetup{labelfont=normalfont,
              labelsep=colon}
\usepackage{mathabx}
\usepackage{subfig}
\makeatletter
\def\subsection{\@startsection{subsection}{1}%
  \z@{.5\linespacing\@plus.7\linespacing}{-.5em}%
  {\normalfont\itshape}}
\def\@sect#1#2#3#4#5#6[#7]#8{%
  \edef\@toclevel{\ifnum#2=\@m 0\else\number#2\fi}%
  \ifnum #2>\c@secnumdepth \let\@secnumber\@empty
  \else \@xp\let\@xp\@secnumber\csname the#1\endcsname\fi
  \@tempskipa #5\relax
  \ifnum #2>\c@secnumdepth
    \let\@svsec\@empty
  \else
    \refstepcounter{#1}%
    \edef\@secnumpunct{%
      \ifdim\@tempskipa>\z@ % not a run-in section heading
        \@ifnotempty{#8}{.\@nx\enspace}%
      \else
        \@ifempty{#8}{.}{.\@nx\enspace}%
      \fi
    }%
    \@ifempty{#8}{%
      \ifnum #2=\tw@ \def\@secnumfont{\bfseries}\fi}{}%
    \protected@edef\@svsec{%
      \ifnum#2<\@m
        \@ifundefined{#1name}{}{%
          \ignorespaces\csname #1name\endcsname\space
        }%
      \fi
      \@seccntformat{#1}%
    }%
  \fi
  \ifdim \@tempskipa>\z@ % then this is not a run-in section heading
    \begingroup #6\relax
    \@hangfrom{\hskip #3\relax\@svsec}{\interlinepenalty\@M #8\par}%
    \endgroup
    \ifnum#2>\@m \else \@tocwrite{#1}{#8}\fi
  \else
  \def\@svsechd{#6\hskip #3\@svsec
    \@ifnotempty{#8}{\ignorespaces#8\unskip
       %\@addpunct.
       }%
    \ifnum#2>\@m \else \@tocwrite{#1}{#8}\fi
  }%
  \fi
  \global\@nobreaktrue
  \@xsect{#5}}
\makeatother

\pagestyle{plain}

\setlength{\parskip}{\baselineskip}
\setlength{\parindent}{12pt}

\setcounter{secnumdepth}{2}

\allowdisplaybreaks[4]
% Commenting/debugging
\let\IG\iffalse
\let\ENDIG\fi

%% Shortcuts
\newcommand{\td}[2]{\dfrac{d #1}{d #2}}
\newcommand{\std}[2]{\dfrac{d^2 #1}{d {#2}^2}}
\newcommand{\ctd}[3]{\dfrac{d^2 #1}{d #2 d #3}}

\newcommand{\pd}[2]{\dfrac{\partial #1}{\partial #2}}
\newcommand{\spd}[2]{\dfrac{\partial^2 #1}{\partial {#2}^2}}
\newcommand{\cpd}[3]{\dfrac{\partial^2 #1}{\partial #2 \partial #3}}

\newcommand{\pdi}[2]{\partial #1/\partial #2}

\newcommand{\LR}{\Leftrightarrow}
\newcommand{\Lg}{\mathcal{L}}
\newcommand{\half}{\tfrac{1}{2}}
\newcommand{\eqp}{\phantom{=}}
\newcommand{\eqs}{\buildrel s \over =}
\newcommand{\me}{\mathrm{e}}
%begin codes for footnotes (symbols)
\makeatletter
\newcommand*{\myfnsymbolsingle}[1]{%
  \ensuremath{%
    \ifcase#1% 0
    \or % 1
      \dagger%
    \or % 2
      1
    \or % 3
      2
    \or % 4
      3
    \or % 5
      4
    \else % >= 6
      \@ctrerr
    \fi
  }%
}
\makeatother

\newcommand*{\myfnsymbol}[1]{%
  \myfnsymbolsingle{\value{#1}}%
}

% remove upper boundary by multiplying the symbols if needed
\usepackage{alphalph}
\newalphalph{\myfnsymbolmult}[mult]{\myfnsymbolsingle}{}

\renewcommand*{\thefootnote}{%
  \myfnsymbolmult{\value{footnote}}%
}
%end codes for footnotes (symbols)
答案1
我看不懂你的笔迹,所以我在大多数节点都添加了占位符;如果你可以在问题中添加它们,我会更新答案。
我认为您可以轻松地使用forest包来实现这一点。如果您想添加一个跟随分支的标签,那么请写入:
edge label={node[midway,sloped,anchor=south]{some calc}}
否则,如果锚点向右移动,则移除锚点并用其替换,如果锚点向左移动,则移除sloped锚点并用其替换。anchor=westanchor=east
编辑:为了添加标题,请将图形放在标签之间\begin{figure} ... \end{figure}。centering在第一个标签后立即添加可确保图形正确居中。
在图片之后但在第二个标签之前,添加\caption{}标题,然后\label{}必须始终将其放在后标题(用于正确引用和编号),或者至少在标题本身内(查看我的代码以了解如何操作)。当您想要引用该图时,只需在常规文本段落中写入以下内容即可。
\cref{<label goes here>}
通常情况下是这样\ref{},但是这个,连同包装在编号前cleveref添加了单词。fig.
最后一件事:更改标签和引用将需要连续两次编译,以便 Latex 能够找到/使用交叉引用。
输出

代码
\documentclass[a4paper]{article}
\usepackage{forest}
\usepackage{cleveref}

\usetikzlibrary{arrows.meta,shapes,positioning}
%
\tikzset{
    full/.style={circle,draw,inner sep=0, minimum size=1mm,fill=black},
    every node/.style={minimum height=5mm,font=\footnotesize}
}
%
\begin{document}
\begin{figure}
    \centering
\begin{forest} for tree={
        l=2cm,
        s sep=5mm
    }
%
[ ,name=root, full
    [ ,name=left, full, edge label={node[midway,sloped,anchor=south]{some calc}}
        [I can't read, name=bottomleft] ]
    [ ,name=right,full, edge label={node[midway,anchor=west]{$P+(d+)$}}
        [what you, edge label={node[midway,sloped,anchor=south]{some calc}}]
        [wrote there, edge label={node[midway,anchor=west]{more calc}}] ] ]
%
\draw[dashed] (-2.2,0) -- (2.2,0) node[anchor=west,right] {$+ = 0$};
\draw[dashed] (-2.2,-2) -- (2.2,-2) node[anchor=west,right] {$+ = 1$};
\node[anchor=east, left=5mm of bottomleft] {Really,};
\end{forest}
\caption{This is a caption\label{myforest}}
\end{figure}

I really enjoyed creating the forest in \cref{myforest}.
\end{document}