

我尝试使用 LaTeX 绘制下面的图片。

答案1
这是 TikZ 解决方案的开始。
\documentclass[border=5pt, multi, tikz]{standalone}
我们加载一个库来帮助处理外边缘的标记,包括标签和椭圆上的小线条。
\usetikzlibrary{decorations.markings}
\begin{document}
开始上图。
\begin{tikzpicture}
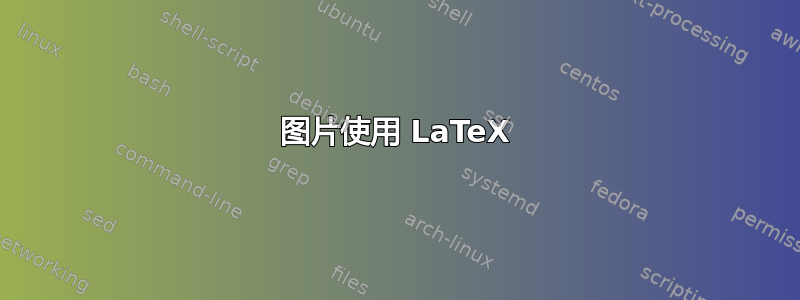
我们首先绘制椭圆并填充它。绘制并填充椭圆后,我们使用两种标记来装饰它。第一种使用直箭头作为三条小线的标记。第二种在距离包含标签的路径不远的地方创建一个节点。这里的关键是标记必须按顺序给出,因此我们需要交替使用这两种标记:节点、箭头、节点、箭头、节点、箭头。路径从 0 度开始。表示路径上的位置,即(起点)和(终点)pos之间的分数。01
\draw [draw=blue!75!black, fill=blue!50!cyan!15, postaction={decorate, decoration={markings, mark=at position .2 with { \node [above right] {$r_m$}; }, mark=at position .33 with { \arrow{|} }, mark=at position .6 with { \node [below left] {$r_2$}; }, mark=at position .8 with { \arrow{|} }, mark=at position .9 with { \node [below right] {$r_1$}; }, mark=at position 1 with { \arrow{|} } } }] (0,0) circle (7 and 5);
为了帮助将物体放置在椭圆中,我们添加了一个网格。当所有物体都处于最终位置时,将其注释掉。
\draw (-7,-5) grid [help lines] (7,5);
现在我们使用循环来绘制黑色圆圈,圆圈下方有标签。除了一个标签外,其他标签都是空的,但非空标签有一些文本。
\foreach \i/\j in {(3,2)/{Wells/Sinks},(-2,3)/,(4,-1)/,(-1,-1)/,(-5,-2)/} \draw [fill] \i circle (5pt) node [below, yshift=-5pt, font=\itshape\bfseries, anchor=north] {\j};
最后,我们添加 Omega。
\node at (0,-3.5) {$\Omega$};
关闭环境即可完成。
\end{tikzpicture}
\end{document}

注释掉网格,我们得到以下结果:

完整代码:
\documentclass[border=5pt, multi, tikz]{standalone}
\usetikzlibrary{decorations.markings}
\begin{document}
\begin{tikzpicture}
  \draw [draw=blue!75!black, fill=blue!50!cyan!15, postaction={decorate, decoration={markings, mark=at position .2 with { \node [above right] {$r_m$}; }, mark=at position .33 with { \arrow{|} }, mark=at position .6 with { \node [below left] {$r_2$}; }, mark=at position .8 with { \arrow{|} }, mark=at position .9 with { \node [below right] {$r_1$}; }, mark=at position 1 with { \arrow{|} } } }] (0,0) circle (7 and 5);
  \draw (-7,-5) grid [help lines] (7,5);
  \foreach \i/\j in {(3,2)/{Wells/Sinks},(-2,3)/,(4,-1)/,(-1,-1)/,(-5,-2)/} \draw [fill] \i circle (5pt) node [below, yshift=-5pt, font=\itshape\bfseries, anchor=north] {\j};
  \node at (0,-3.5) {$\Omega$};
\end{tikzpicture}
\end{document}
显然,我们也可以根据需要修改外观。例如,我们可以尝试使用
font=\large
对于椭圆周围的节点和 Omega。
或者也许椭圆的线条更粗一些,填充也稍微不同:
thick, inner color=blue!50!cyan!15, outer color=blue!50!cyan!35
或者,甚至是对圆圈的填充进行一些变化
inner color=black!70, outer color=black
给我们更多像这样的东西:

答案2
假设 OP 正在努力使用 TikZ 中的 MWE,这里有一些东西可能会帮助某人开始使用lualatex和luamplib。绘图语言是 Metapost,你可以阅读这里。您需要使用 编译该文档,lualatex并且需要安装 TeX Gyre Termes 字体,包括数学扩展。

\documentclass{article}
\usepackage{luamplib}
\usepackage{unicode-math}
\setmainfont{TeX Gyre Termes}
\setmathfont{TeX Gyre Termes Math}
\begin{document}
However, a service-oriented paradigm is further compounded when taking into account
the evolution of specifications over a given time period.
\[
\begin{mplibcode}
beginfig(1);
% make an ellipse
path e; e = fullcircle xscaled 377 yscaled 233;
fill e withcolor .9[green,white];
draw e withcolor .67 blue;
% draw a dot
fill fullcircle scaled 5 shifted (33,21);
% make some labels
label(btex My text etex, (-42,16));
label(btex $Ω$ etex, (42,-16));
% make a label part of the way round "e"
label.urt(btex $\Gamma_1$ etex, point 0.7 of e);
% draw a bar slightly further round "e"
draw (down--up) scaled 4
                rotated angle direction 1.414 of e
                shifted point 1.414 of e;
endfig;
\end{mplibcode}
\]
Conversely, any associated supporting element recognizes
other systems' importance and the necessity for possible bidirectional logical
relationship approaches. Does this give you enough ideas to get on with?
\end{document}