

我正在尝试绘制一棵带双箭头的树。为此,我结合了文件系统树来自 texample.net,基本思想是双箭厨师:
\documentclass{standalone}
\usepackage{tikz}
\usetikzlibrary{trees,decorations.markings}
\begin{document}
\tikzstyle{every node}=[draw=black,thick,anchor=west]
\tikzstyle{selected}=[draw=red,fill=red!30]
\tikzstyle{optional}=[dashed,fill=gray!50]

\newcommand{\arrowcolor}{red}
\newcommand{\arrowfillcolor}{white}

\begin{tikzpicture}[%
  rightarr/.pic={\path[pic actions] (-0.4,0)--(-1,-0.35)--(-1,.35)--cycle;},
  grow via three points={one child at (0.5,-0.7) and
  two children at (0.5,-0.7) and (0.5,-1.4)},
  edge from parent path={(\tikzparentnode.south) |- (\tikzchildnode.west)},
  edge from parent/.style={
    decoration={
      markings,
      mark=at position 1 with{\coordinate (0, 0) pic[\arrowcolor,fill=\arrowfillcolor,scale=0.22]{rightarr};},
    },
    draw = \arrowcolor,
    line width = 3pt,
    shorten >= 5.7pt,
    shorten <= 2pt,
    postaction = {decorate},
    postaction = {draw,line width=1.4pt, white},
  }]
  \node {texmf}
    child { node {doc}}
    child { node {fonts}}
    child { node {source}}
    child { node [selected] {tex}
      child { node {generic}}
      child { node [optional] {latex}}
      child { node {plain}}
    }
    child [missing] {}
    child [missing] {}
    child [missing] {}
    child { node {texdoc}};
\end{tikzpicture}
\end{document}
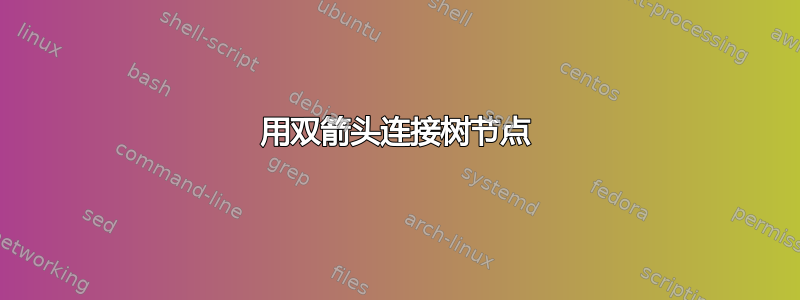
看起来是这样的:

我不明白为什么垂直箭头线会直接穿过交叉点。“绘制”后动作难道不应该重现确切的路径并在现有路径上绘制一个内部、1.4pt 宽的白色连接表面吗?
答案1
哟!Ignasi 的评论让人大开眼界:“路径”实际上是多条路径,每条路径都从顶部开始到其各自的子路径。如果你仔细想想,这似乎很明显。每条路径都很漂亮,但每条路径也破坏了之前绘制的那条路径。很酷,所以这是我对这个问题的下一个看法,加入\pgfonlayer其中,借用自这篇关于层的帖子:
\documentclass{standalone}
\usepackage{tikz}
\usetikzlibrary{trees,decorations.markings}
\begin{document}
\tikzstyle{every node}=[draw=black,thick,anchor=west]
\tikzstyle{selected}=[draw=red,fill=red!30]
\tikzstyle{optional}=[dashed,fill=gray!50]

\newcommand{\arrowcolor}{red}
\newcommand{\arrowfillcolor}{white}

\pgfdeclarelayer{front}
\pgfsetlayers{main,front}

\makeatletter
\pgfkeys{%
  /tikz/path on layer/.code={
    \def\tikz@path@do@at@end{\endpgfonlayer\endgroup\tikz@path@do@at@end}%
    \pgfonlayer{#1}\begingroup%
  }%
}
\makeatother

\begin{tikzpicture}[%
  rightarr/.pic={\path[pic actions] (-0.4,0)--(-1,-0.35)--(-1,.35)--cycle;},
  grow via three points={one child at (0.5,-0.7) and
  two children at (0.5,-0.7) and (0.5,-1.4)},
  edge from parent path={(\tikzparentnode.south) |- (\tikzchildnode.west)},
  edge from parent/.style={
    decoration={
      markings,
      mark=at position 1 with{\coordinate (0, 0) pic[\arrowcolor,fill=\arrowfillcolor,scale=0.22]{rightarr};},
    },
    draw = \arrowcolor,
    line width = 3pt,
    shorten >= 5.7pt,
    shorten <= 2pt,
    postaction = {decorate},
    postaction = {draw,line width=1.4pt,white,path on layer=front},
  }]
  \node {texmf}
    child { node {doc}}
    child { node {fonts}}
    child { node {source}}
    child { node [selected] {tex}
      child { node {generic}}
      child { node [optional] {latex}}
      child { node {plain}}
    }
    child [missing] {}
    child [missing] {}
    child [missing] {}
    child { node {texdoc}};
\end{tikzpicture}
\end{document}
这对我来说很有效:

谢谢!