

我使用以下代码从答案 这个帖子, 和这个帖子在不同位置插入骰子模拟代码。
我怎样才能将骰子代码以一种样式插入到网格中的不同位置!
\documentclass[12pt,a4paper]{article}
\usepackage{verbatim}
\usepackage{tikz}
\usetikzlibrary{calc,shapes}
\usepackage{tikz-3dplot}
\begin{document}
%begin defining shapes ==========================
\pgfmathsetmacro{\lwdth}{.3mm}% for line width
\tikzset{%
filrd/.style={%
fill=red},
filgr/.style={%
fill=green},
filyw/.style={%
fill=yellow},
filbl/.style={%
fill=blue},
}
%end defining shapes ==========================
%begin defining grid ==========================
\newcommand\sqw{1}
\tikzset{
pics/square/.default={\sqw},
pics/square/.style = {
code = {
\draw[pic actions, draw=none] (0,0) rectangle (#1,#1);
}}}%draw=none is to avoid displaying the little squares outline

\renewcommand\sqw{1.3}
%end defining grid ==========================

\begin{tikzpicture}
\newcommand{\dice}[5]{
\tdplotsetmaincoords{#3}{#4}
\begin{scope}[shift={(#1,#2)}, tdplot_main_coords, rounded corners=#5, fill=brown!30!white]
%bottom face
\begin{scope}[canvas is xy plane at z=-1]
\filldraw[draw=brown!30!white, fill=brown!30!white] (-1,-1) rectangle (1,1);
\end{scope}
%left face
\begin{scope}[canvas is xz plane at y=-1]
\filldraw[draw=brown!30!white, fill=brown!30!white] (-1,-1) rectangle (1,1);
\end{scope}
%back face
\begin{scope}[canvas is yz plane at x=-1]
\filldraw[draw=brown!30!white, fill=brown!30!white] (-1,-1) rectangle (1,1);
\end{scope}
%top face
\begin{scope}[canvas is xy plane at z=1]
\filldraw[draw=brown!30!white, fill=brown!30!white] (-1,-1) rectangle (1,1);
\fill[green!70!black] circle[radius=2/3];
\end{scope}
%right face
\begin{scope}[canvas is xz plane at y=1]
\filldraw[draw=brown!50!white, fill=brown!50!white] (-1,-1) rectangle (1,1);
\fill[blue] circle[radius=2/3];
\end{scope}
%front face
\begin{scope}[canvas is yz plane at x=1]
\filldraw[draw=brown!40!white, fill=brown!40!white] (-1,-1) rectangle (1,1);
\fill[red] circle[radius=2/3];
\end{scope}
\end{scope}
}
\dice{0}{0}{40}{130}{0.3cm};
\end{tikzpicture}

\begin{tikzpicture}[scale=1, transform shape]
\draw[step=\sqw] (\sqw,\sqw) grid (2*\sqw, 10*\sqw);
\pic[filbl] at (1*\sqw,9*\sqw) {square};
\node at (1.5*\sqw,8.5*\sqw) {\Huge insert dice here};
\pic[filgr] at (1*\sqw,6*\sqw) {square};
\node at (1.5*\sqw,5.5*\sqw) {\Huge insert dice here};
\pic[filgr] at (1*\sqw,4*\sqw) {square};
\node at (1.5*\sqw,3.5*\sqw) {\Huge insert dice here};
\pic[filrd] at (1*\sqw,1*\sqw) {square};
\end{tikzpicture}
\end{document}

答案1
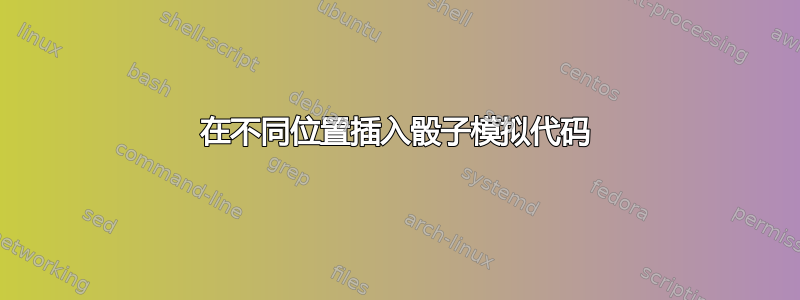
左图将骰子放入保存箱,并将保存箱放入节点。右图\dice对每个位置使用不同的保存箱。
我进行了修改\dice,使命名坐标更加容易,并添加了比例因子。但是,当前版本无法准确处理大旋转。请参阅这里
\documentclass[12pt,a4paper]{article}
\usepackage{verbatim}
\usepackage{tikz}
\usetikzlibrary{calc,shapes}
\usepackage{tikz-3dplot}

\newsavebox{\tempboxA}
\newcommand{\dice}[5]{% #1=shift coordinates, #2=scale, #3,#4=view angles, #5=rounded coner radius
\tdplotsetmaincoords{#3}{#4}
\begin{scope}[shift={(#1)},scale=#2, tdplot_main_coords, rounded corners=#5, fill=brown!30!white]
%bottom face
\begin{scope}[canvas is xy plane at z=-1]
\filldraw[draw=brown!30!white, fill=brown!30!white] (-1,-1) rectangle (1,1);
\end{scope}
%left face
\begin{scope}[canvas is xz plane at y=-1]
\filldraw[draw=brown!30!white, fill=brown!30!white] (-1,-1) rectangle (1,1);
\end{scope}
%back face
\begin{scope}[canvas is yz plane at x=-1]
\filldraw[draw=brown!30!white, fill=brown!30!white] (-1,-1) rectangle (1,1);
\end{scope}
%top face
\begin{scope}[canvas is xy plane at z=1]
\filldraw[draw=brown!30!white, fill=brown!30!white] (-1,-1) rectangle (1,1);
\fill[green!70!black] circle[radius=2/3];
\end{scope}
%right face
\begin{scope}[canvas is xz plane at y=1]
\filldraw[draw=brown!50!white, fill=brown!50!white] (-1,-1) rectangle (1,1);
\fill[blue] circle[radius=2/3];
\end{scope}
%front face
\begin{scope}[canvas is yz plane at x=1]
\filldraw[draw=brown!40!white, fill=brown!40!white] (-1,-1) rectangle (1,1);
\fill[red] circle[radius=2/3];
\end{scope}
\end{scope}
}

\begin{document}
%begin defining shapes ==========================
\pgfmathsetmacro{\lwdth}{.3mm}% for line width
\tikzset{%
filrd/.style={%
fill=red},
filgr/.style={%
fill=green},
filyw/.style={%
fill=yellow},
filbl/.style={%
fill=blue},
}
%end defining shapes ==========================
%begin defining grid ==========================
\newcommand\sqw{1}
\tikzset{
pics/square/.default={\sqw},
pics/square/.style = {
code = {
\draw[pic actions, draw=none] (0,0) rectangle (#1,#1);
}}}%draw=none is to avoid displaying the little squares outline

\renewcommand\sqw{1.3}
%end defining grid ==========================

\savebox{\tempboxA}{\begin{tikzpicture}
  \dice{(0,0)}{0.4}{40}{130}{0.3cm};
\end{tikzpicture}}

\begin{tikzpicture}[scale=1, transform shape]
\draw[step=\sqw] (\sqw,\sqw) grid (2*\sqw, 10*\sqw);
\pic[filbl] at (1*\sqw,9*\sqw) {square};
\node at (1.5*\sqw,8.5*\sqw) {\usebox\tempboxA};
\pic[filgr] at (1*\sqw,6*\sqw) {square};
\node at (1.5*\sqw,5.5*\sqw) {\usebox\tempboxA};
\pic[filgr] at (1*\sqw,4*\sqw) {square};
\node at (1.5*\sqw,3.5*\sqw) {\usebox\tempboxA};
\pic[filrd] at (1*\sqw,1*\sqw) {square};
\end{tikzpicture}
\quad
\begin{tikzpicture}[scale=1, transform shape]
\draw[step=\sqw] (\sqw,\sqw) grid (2*\sqw, 10*\sqw);
\pic[filbl] at (1*\sqw,9*\sqw) {square};
\dice{(1.5*\sqw,8.5*\sqw)}{0.4}{40}{130}{0.3cm};
\pic[filgr] at (1*\sqw,6*\sqw) {square};
\dice{(1.5*\sqw,5.5*\sqw)}{0.4}{40}{130}{0.3cm};
\pic[filgr] at (1*\sqw,4*\sqw) {square};
\dice{(1.5*\sqw,3.5*\sqw)}{0.4}{40}{130}{0.3cm};
\pic[filrd] at (1*\sqw,1*\sqw) {square};
\end{tikzpicture}
\end{document}
