

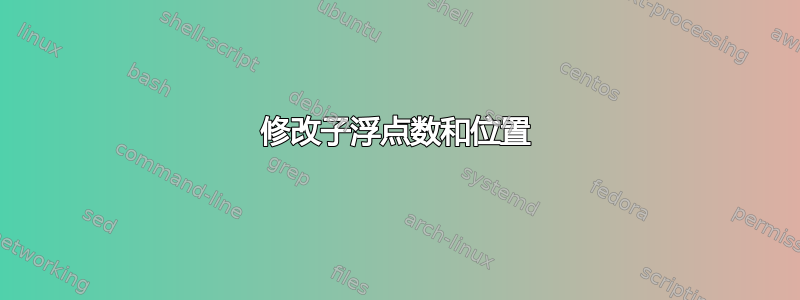
我制作了一个包含 15 个子浮点的图形。下面是第一部分我得到的图形,第二部分是我想要的图形。我想删除子浮点 (m),并保留线上其他两个子浮点的位置,但更改编号。
有人有想法吗?


\documentclass[12pt,a4paper]{article}
\usepackage{graphicx}
\usepackage{subfig}

\begin{figure}
  \centering
  \raisebox{65pt}{\parbox[c]{.05\textwidth}{\rotatebox{90}{Ligne 1}}}%
  \subfloat[][]{\includegraphics[width=.3\textwidth]{Example-Image}}\hfill
  \subfloat[][]{\includegraphics[width=.3\textwidth]{Example-Image}}\hfill
  \subfloat[][]{\includegraphics[width=.3\textwidth]{Example-Image}}\par
  \raisebox{65pt}{\parbox{.05\textwidth}{\rotatebox{90}{Ligne 2}}}%
  \subfloat[][]{\includegraphics[width=.3\textwidth]{Example-Image}}\hfill
  \subfloat[][]{\includegraphics[width=.3\textwidth]{Example-Image}}\hfill
  \subfloat[][]{\includegraphics[width=.3\textwidth]{Example-Image}}\par
  \raisebox{65pt}{\parbox{.05\textwidth}{\rotatebox{90}{Ligne 3}}}%
  \subfloat[][]{\includegraphics[width=.3\textwidth]{Example-Image}}\hfill
  \subfloat[][]{\includegraphics[width=.3\textwidth]{Example-Image}}\hfill
  \subfloat[][]{\includegraphics[width=.3\textwidth]{Example-Image}}\par
  \raisebox{65pt}{\parbox{.05\textwidth}{\rotatebox{90}{Ligne 4}}}%
  \subfloat[][]{\includegraphics[width=.3\textwidth]{Example-Image}}\hfill
  \subfloat[][]{\includegraphics[width=.3\textwidth]{Example-Image}}\hfill
  \subfloat[][]{\includegraphics[width=.3\textwidth]{Example-Image}}\par
  \raisebox{65pt}{\parbox{.05\textwidth}{\rotatebox{90}{Ligne 5}}}%
  \subfloat[][]{\includegraphics[width=.3\textwidth]{Example-Image}}\hfill
  \subfloat[][]{\includegraphics[width=.3\textwidth]{Example-Image}}\hfill
  \subfloat[][]{\includegraphics[width=.3\textwidth]{Example-Image}}\par
    \caption{Fields}
\end{figure}
\end{document}
答案1
用相同宽度的空框替换图像(最后一行的第一个图像)。
\documentclass[12pt,a4paper]{article}
\usepackage{graphicx}

\usepackage{subfig}
\begin{document}
    \begin{figure}
        \centering
        \raisebox{65pt}{\parbox[c]{.05\textwidth}{\rotatebox{90}{Ligne 1}}}%
        \subfloat[][]{\includegraphics[width=.3\textwidth]{Example-Image}}\hfill
        \subfloat[][]{\includegraphics[width=.3\textwidth]{Example-Image}}\hfill
        \subfloat[][]{\includegraphics[width=.3\textwidth]{Example-Image}}\par
        \raisebox{65pt}{\parbox{.05\textwidth}{\rotatebox{90}{Ligne 2}}}%
        \subfloat[][]{\includegraphics[width=.3\textwidth]{Example-Image}}\hfill
        \subfloat[][]{\includegraphics[width=.3\textwidth]{Example-Image}}\hfill
        \subfloat[][]{\includegraphics[width=.3\textwidth]{Example-Image}}\par
        \raisebox{65pt}{\parbox{.05\textwidth}{\rotatebox{90}{Ligne 3}}}%
        \subfloat[][]{\includegraphics[width=.3\textwidth]{Example-Image}}\hfill
        \subfloat[][]{\includegraphics[width=.3\textwidth]{Example-Image}}\hfill
        \subfloat[][]{\includegraphics[width=.3\textwidth]{Example-Image}}\par
        \raisebox{65pt}{\parbox{.05\textwidth}{\rotatebox{90}{Ligne 4}}}%
        \subfloat[][]{\includegraphics[width=.3\textwidth]{Example-Image}}\hfill
        \subfloat[][]{\includegraphics[width=.3\textwidth]{Example-Image}}\hfill
        \subfloat[][]{\includegraphics[width=.3\textwidth]{Example-Image}}\par
        \raisebox{65pt}{\parbox{.05\textwidth}{\rotatebox{90}{Ligne 5}}}%
        \makebox[.3\textwidth]{}\hfill% <<<<<<<<<<<<<<<<<<<<<<<<<<<<
%       \subfloat[][]{\includegraphics[width=.3\textwidth]{Example-Image}}\hfill
        \subfloat[][]{\includegraphics[width=.3\textwidth]{Example-Image}}\hfill
        \subfloat[][]{\includegraphics[width=.3\textwidth]{Example-Image}}\par
        \caption{Fields}
    \end{figure}

\end{document}

答案2
\subfloats in table. Using通过插入tblroftabularraypackage withcounterandvarwidth` 库,它是简单的代码。- 对于较短的图形代码,使用键
\adjustboxset{width=\linewidth, valign=c}˙ of\adjustbox` 包。它定义图像的宽度并将其基线移动到图像的垂直中心。 - 第一列中的内容通过
rotating和makecell包的帮助进行旋转:
\documentclass{article}
\usepackage[export]{adjustbox}  % for vertical center images baseline,
                                % use \adjincludegraphics instead of \includegraphics
\usepackage{rotating, makecell}
\usepackage{tabularray}
\UseTblrLibrary{counter,        % <===
                varwidth}       % <===
\usepackage[skip=0.5ex, belowskip=1ex]{subcaption}

\begin{document}
    \begin{figure}
\setlength\rotheadsize{3em}                % from makecell
\adjustboxset{width=\linewidth, valign=c}  % from adjustbox
\begin{tblr}{colsep=3pt,
             colspec={@{} Q[c, m, cmd=\rothead] *{3}{X[c,h]}@{}},
            }
Ligne 1
    & \subfloat[\label{fig1:a1}]{\adjincludegraphics{example-image-a}}
        & \subfloat[\label{fig1:b1}]{\adjincludegraphics{example-image-b}}
            & \subfloat[\label{fig1:c1}]{\adjincludegraphics{example-image-c}}  \\
Ligne 2
    & \subfloat[\label{fig1:a1}]{\adjincludegraphics{example-image-a}}
        & \subfloat[\label{fig1:b1}]{\adjincludegraphics{example-image-b}}
            & \subfloat[\label{fig1:c1}]{\adjincludegraphics{example-image}}   \\
Ligne 3
    & \subfloat[\label{fig1:a1}]{\adjincludegraphics{example-image-a}}
        & \subfloat[\label{fig1:b1}]{\adjincludegraphics{example-image-b}}
            & \subfloat[\label{fig1:c1}]{\adjincludegraphics{example-image-c}}   \\
Ligne 4
    & \subfloat[\label{fig1:a1}]{\adjincludegraphics{example-image-a}}
        & \subfloat[\label{fig1:b1}]{\adjincludegraphics{example-image-b}}
            & \subfloat[\label{fig1:c1}]{\adjincludegraphics{example-image-c}}   \\
Ligne 5
    &
        & \subfloat[\label{fig1:b1}]{\adjincludegraphics{example-image-b}}
            & \subfloat[\label{fig1:c1}]{\adjincludegraphics{example-image-c}}
\end{tblr}
\caption{Fields}
    \end{figure}
\end{document}

答案3
这假设您的所有图像具有相同的尺寸。
我用其中一张图片设置了一个盒子,这样就能找到它的高度(对“Ligne x”有用)并将其用作最后一行的幻影。
\documentclass[12pt,a4paper]{article}
\usepackage{graphicx}
\usepackage{subfig}

\newlength{\dummyheight}
\newsavebox{\dummybox}

\begin{document}

\begin{figure}[p]

% replace example-image with the first image name
\sbox{\dummybox}{\includegraphics[width=.3\textwidth]{example-image}}
\setlength{\dummyheight}{\ht\dummybox}
\newcommand{\ligne}[1]{%
  \rotatebox[origin=bl]{90}{%
    \makebox[\dummyheight]{Ligne #1}%
  }\space\ignorespaces
}

\ligne{1}
\subfloat[][]{\includegraphics[width=.3\textwidth]{example-image}}\hfill
\subfloat[][]{\includegraphics[width=.3\textwidth]{example-image}}\hfill
\subfloat[][]{\includegraphics[width=.3\textwidth]{example-image}}

\vspace{-1.5pt}

\ligne{2}
\subfloat[][]{\includegraphics[width=.3\textwidth]{example-image}}\hfill
\subfloat[][]{\includegraphics[width=.3\textwidth]{example-image}}\hfill
\subfloat[][]{\includegraphics[width=.3\textwidth]{example-image}}

\vspace{-1.5pt}

\ligne{3}
\subfloat[][]{\includegraphics[width=.3\textwidth]{example-image}}\hfill
\subfloat[][]{\includegraphics[width=.3\textwidth]{example-image}}\hfill
\subfloat[][]{\includegraphics[width=.3\textwidth]{example-image}}

\vspace{-1.5pt}

\ligne{4}
\subfloat[][]{\includegraphics[width=.3\textwidth]{example-image}}\hfill
\subfloat[][]{\includegraphics[width=.3\textwidth]{example-image}}\hfill
\subfloat[][]{\includegraphics[width=.3\textwidth]{example-image}}\par

\vspace{-1.5pt}

\ligne{5}
\phantom{\usebox{\dummybox}}\hfill
\subfloat[][]{\includegraphics[width=.3\textwidth]{example-image}}\hfill
\subfloat[][]{\includegraphics[width=.3\textwidth]{example-image}}

\caption{Fields}

\end{figure}

\end{document}
由于 LaTeX 警告浮动值过高(约 6pt),因此我在行之间添加了一些小的负垂直空间;在您的情况下,您可能不需要它,或者需要不同的长度。
将浮动声明为p,因为它肯定不适合包含文本的页面。
