

我的代码是:
%\documentclass{article}
\documentclass[border=3mm]{standalone}
\usepackage{tikz}
\usetikzlibrary{shapes,arrows}
\usepackage{verbatim}
\usepackage[utf8]{inputenc}

\begin{document}
    \tikzstyle{block} = [draw, fill=blue!20, rectangle,minimum height=3em, minimum width=4em]
    \tikzstyle{block2} = [draw, fill=white!20, rectangle,minimum height=3em, minimum width=4em]
    \tikzstyle{block3} = [draw, fill=green!20, rectangle,minimum height=3em, minimum width=4em]
    \tikzstyle{sum} = [draw, fill=white!20, circle, node distance=1.5cm]
    \tikzstyle{sum1} = [draw, fill=white!20, circle, node distance=1.5cm]
    \tikzstyle{input} = [coordinate]
    \tikzstyle{output} = [coordinate]
    \tikzstyle{pinstyle} = [pin edge={to-,thin,white}]


    % The block diagram code is probably more verbose than necessary
    \begin{tikzpicture}[auto,node distance=3.0cm,>=latex']


    % We start by placing the blocks
    \node [input, name=input]{};
    \node [sum, right of=input] (sum){$\Sigma$};
    \node [block, right of=sum,pin={[pinstyle]below:\scriptsize Controlador PI 1}, node distance = 2.5cm](controlador1){$K_{pv}+\frac{K_{iv}}{s}$};

    \node [sum1, right of=controlador1,node distance = 2.5cm] (sum1){$\Sigma$};

    \node [block, right of=controlador1,pin={[pinstyle]below:\scriptsize Controlador PI 2}, node distance = 5cm](controlador2){$K_{pi}+\frac{K_{ii}}{s}$};

    \node [block2, right of=controlador2,pin={[pinstyle]below:\scriptsize Planta de Corrente}, node distance = 3cm](planta1){$G_i(s)$};

    \node [block2, right of=planta1,pin={[pinstyle]below:\scriptsize Planta de Tensão}, node distance = 3cm](planta2){$G_v(s)$};


    % calculate the coordinate vpwm. We need it to place the ems block.
    \draw [->] (controlador2) -- node[name=vpwm] {$d$} (planta1);
    \node [output, right of=planta2,node distance=2.8cm] (output) {};
    \node [block3, below of=sum1,pin={[pinstyle]below:\scriptsize }] (ems) {$Energy\ Management\ System$};


    %connect the nodes
    \draw [draw, ->](input) -- node {$V_{ref}$}(sum);
    \path [->] (sum) edge node {$V_{err}$} (controlador1);
    \path [->] (controlador1) edge node {$I^*_{batt}$}(sum1);
    \path [->] (sum1) edge node {$I_{err}$}(controlador2);
    \path [->] (controlador2) edge node {}(planta1);
    \path [->] (planta1)edge node {$I_{bat}$}(planta2) node[pos=0.95]{$+$};
    \path [->] (planta2) edge node [name=theta] {$V_{DC}$}(output);
    \draw [->] (theta) |- (ems);
    \draw [->] (ems) -| node[pos=0.99] {$-$}
    node [near end] {$V_{med}$} (sum);
    \end{tikzpicture}
\end{document}
我想要的结果是:

答案1
您知道如何绘制垂直箭头,只需从 到 画一条线,ems中间sum1有几个节点。没什么新意。
对于另一个,你可以给I_{batt}节点命名(我使用了ibatt),然后使用
\draw [->] (ibatt) |- (ems.5);
绘制箭头。您知道|-语法,.5表示 5 度角,因此您将获得节点边界上的点,角度为 5。如果您同样使用\draw [->] (theta) |- (ems.355);将另一支箭头绘制到ems,则两个箭头与east的锚点的距离将相等ems。
还有一点(除了与上一个问题相同的内容):不要写$Energy\ Management\ System$。那是文本,不是数学,所以不要在数学模式下写它。只使用Energy Management System。

\documentclass[border=3mm]{standalone}
\usepackage{tikz}
\usetikzlibrary{shapes,arrows,positioning}
\usepackage{verbatim}
\usepackage[utf8]{inputenc}

\tikzset{
  block/.style={draw, fill=blue!20, rectangle,minimum height=3em, minimum width=4em},
  block2/.style={draw, fill=white!20, rectangle,minimum height=3em, minimum width=4em},
  block3/.style={draw, fill=green!20, rectangle,minimum height=3em, minimum width=4em},
  sum/.style={draw, fill=white!20, circle, node distance=1.5cm},
  sum1/.style={draw, fill=white!20, circle, node distance=1.5cm},
  input/.style={coordinate},
  output/.style={coordinate},
  pinstyle/.style={pin edge={to-,thin,white}}
}

\begin{document}


    % The block diagram code is probably more verbose than necessary
    \begin{tikzpicture}[auto,node distance=1.5cm,>=latex']


    % We start by placing the blocks
    \node [input, name=input]{};
    \node [sum, right=of input] (sum){$\Sigma$};
    \node [block, right=of sum,pin={[pinstyle]below:\scriptsize Controlador PI 1}](controlador1){$K_{pv}+\frac{K_{iv}}{s}$};

    \node [sum1, right=of controlador1] (sum1){$\Sigma$};

    \node [block, right=4cm of controlador1,pin={[pinstyle]below:\scriptsize Controlador PI 2}](controlador2){$K_{pi}+\frac{K_{ii}}{s}$};

    \node [block2, right=of controlador2,pin={[pinstyle]below:\scriptsize Planta de Corrente},](planta1){$G_i(s)$};

    \node [block2, right=of planta1,pin={[pinstyle]below:\scriptsize Planta de Tensão}](planta2){$G_v(s)$};


    % calculate the coordinate vpwm. We need it to place the ems block.
    \draw [->] (controlador2) -- node[name=vpwm] {$d$} (planta1);
    \node [output, right=of planta2,node distance=2.8cm] (output) {};
    \node [block3, below=of sum1,pin={[pinstyle]below:\scriptsize }] (ems) {Energy Management System};


    %connect the nodes

    \draw [->] (ems) -- (sum1) node[pos=0.8,swap] {$I_{\mathrm{foo}}$} node[swap,pos=0.99] {$-$};

    \draw [->](input) -- node {$V_{\mathrm{ref}}$}(sum);
    \path [->] (sum) edge node {$V_{\mathrm{err}}$} (controlador1);
    \path [->] (controlador1) edge node {$I^*_{\mathrm{batt}}$}(sum1);
    \path [->] (sum1) edge node {$I_{\mathrm{err}}$}(controlador2);
    \path [->] (controlador2) edge node {}(planta1);
    \path [->] (planta1)edge node (ibatt) {$I_{\mathrm{batt}}$}(planta2) node[pos=0.95]{$+$}; % added (ibatt) name to first node
    \path [->] (planta2) edge node [name=theta] {$V_{DC}$}(output);
    \draw [->] (theta) |- (ems.355); % use a specific anchor -- 355 indicates an angle
    \draw [->] (ems) -| node[pos=0.99] {$-$}  node [near end] {$V_{\mathrm{med}}$} (sum);

    \draw [->] (ibatt) |- (ems.5); % above we used 355, so here we use 5, which makes it symmetric
    \end{tikzpicture}
\end{document}
答案2
只是为了好玩,另一个选项是使用与形状相关的节点,例如EMS(能源管理系统)中的箭头EMS.4和EMS.-4节点,该节点是用书面角度截取形状边缘的节点(section 17.9参见视觉 tikz手动的)。
为了命名所有箭头,我使用了路径中节点的定义,这允许您根据某个因素查找和定义一定距离处的节点,您可以在 Visual tikz 手册中看到它们section 7.9。
mixer node由包给出,circuitikz并且符号的插入是通过相对于section 7.7 in手册中的节点的标签完成的。
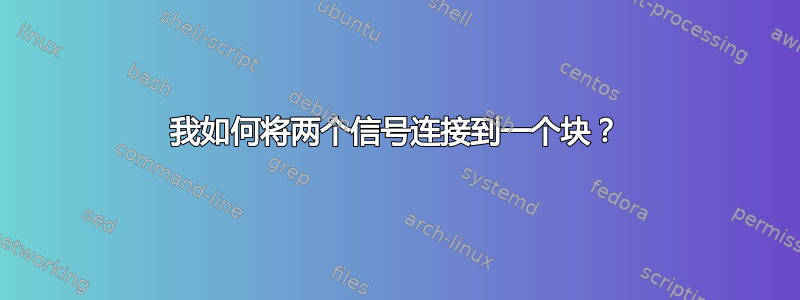
结果:

梅威瑟:
% arara: pdflatex: {synctex: yes, action: nonstopmode}
% By J. Leon V. Share as Beerware philosophy
\documentclass[tikz, border=15pt]{standalone}
\usepackage{amsbsy}% Used to make bold text in math mode by macro \pmb
%\usepackage{xcolor}% This package is already loaded by tikz (Obs. thanks to: Torbjørn T)
\usepackage{tikz}
\usepackage{circuitikz}% Used for mixer node.
\usetikzlibrary{
    arrows.meta,%increase options for arrows personalization
    shapes, % include nodes relative to the shape.
    positioning % Allows positioning relative to nodes.
    }

\begin{document}
    \begin{tikzpicture}[
        %Environment Configuration
        %None global cfg
        %Styles
        Block/.style = {% Style for block systems
            rectangle,
            draw,
            minimum height=3em,
        },
        Sign/.style = {% Style for signs in mixer
            font=\tiny,
            label distance=-1.5pt
        },
        Name/.style = {% Style for arrow labels
            font=\small,
            label distance=5pt
        },
        MyArrow/.style = {% Style for arrows
            line width=0.75pt,
            -{Stealth[inset=0pt]}, % It causes tokenExeptions in TikzEdt, but compiles normally.
        },
    ]
    % Start drawing "the thing..."
    \node (Input)[%Initial node
    ]{};
    \node (Sum1)[%first Mixer
        mixer, % From Circuitikz
        scale=0.6,
        right=1.2cm of Input, % Position declaration for positioning lib.
        label={[Sign]180:$\pmb{+}$},
        label={[Sign]-90:$\pmb{-}$},
    ]{};
    \node(PI-1)[%First block system
        Block,
        right=1.5cm of Sum1,
        fill=blue!30,
        label={[Name]-90:Controlador PI 1},
    ]{$K_{pv}+\frac{K_{iv}}{s}$};
    \node (Sum2)[%Second mixer
        mixer, % From Circuitikz
        scale=0.6,
        right=1.2cm of PI-1, % Position declaration for positioning lib.
        label={[Sign]180:$\pmb{+}$},
        label={[Sign]-90:$\pmb{-}$},
    ]{};
    \node(PI-2)[%Second block system
        Block,
        right=1.5cm of Sum2,
        fill=blue!30,
        label={[Name]-90:Controlador PI 2},
    ]{$K_{pi}+\frac{K_{ii}}{s}$};
    \node(Gi)[
        Block,
        right=1.5cm of PI-2,
        %fill=blue!30,
        minimum width=1.5cm,
        label={[Name]-90:Planta de corriente},
    ]{$G_i(S)$};
    \node(Gv)[
        Block,
        right=2.5cm of Gi,
        %fill=blue!30,
        minimum width=1.5cm,
        label={[Name]-90:Planta de Tensão},
    ]{$G_v(s)$};
    \node (Output)[
        right=2.5cm of Gv,
    ]{};
    \node (EMS)[
        Block,
        inner xsep=5pt,
        fill=green!20,
        below=2cm of Sum2,
        minimum height=2.5em
    ]{\it Energy Management System};

    \draw[MyArrow] (Input) -- (Sum1.west) node[midway,above]{$V_{ref}$};
    \draw[MyArrow] (Sum1.east) -- (PI-1) node[midway,above]{$V_{err}$};
    \draw[MyArrow] (PI-1) -- (Sum2.west) node[midway,above]{$V^*_{batt}$};
    \draw[MyArrow] (Sum2.east) -- (PI-2) node[midway,above]{$I_{err}$};
    \draw[MyArrow] (PI-2) -- (Gi) node[midway,above]{$d$};
    \draw[MyArrow] (Gi) -- (Gv) node[ sloped,midway,](loop2){} node[midway,above]{$I_{bat}$};
    \draw[MyArrow] (Gv) -- (Output) node[sloped,midway](loop1){} node[midway,above]{$V_{DC}$};

    \draw[fill](loop1.center) circle (1.5pt);
    \draw[MyArrow] (loop1.center) |- (EMS.-4);
    \draw[fill](loop2.center) circle (1.5pt);
    \draw[MyArrow] (loop2.center) |- (EMS.4);
    \draw[MyArrow] (EMS) -- (Sum2.south) node[midway, anchor=west]{$I_{med}$};
    \draw[MyArrow] (EMS) -| (Sum1.south) node[pos=0.77, anchor=east]{$V_{med}$};

     \end{tikzpicture}
\end{document}
答案3
绘制此块方案的另一种方法:

在代码中使用库chains来定位节点、calc计算分支点的坐标和quotes边缘标签。定义一个矩形节点类型,其颜色在本地定义。对于块标签使用`label及其语法:
\documentclass[tikz, border=3mm]{standalone}
\usetikzlibrary{arrows.meta,
                calc, chains,
                positioning,
                quotes,
                shapes}

\tikzset{
     block/.style = {rectangle, draw, fill=#1, minimum height=3em, minimum width=4em,
                     on chain},
   block/.default = white,
       sum/.style = {circle, draw, minimum size=6mm, inner sep=0pt, outer sep=0pt,
                     node contents={\huge$+$},
                     on chain},
        }

\begin{document}
    \begin{tikzpicture}[auto,
    node distance = 1.5cm,
      start chain = going right,
every edge/.style = {draw, semithick, -Stealth},
every label/.append style = {label distance=1mm, font=\scriptsize}
                        ]
% We start by placing the blocks
\coordinate[label=$+$,on chain] (input);
\node (sum) [sum];
\node (controlador1) [block=blue!30, label=below:Controlador PI 1] {$K_{pv}+\frac{K_{iv}}{s}$};
\node (sum1) [sum];
\node (controlador2) [block=blue!30, label=below:Controlador PI 2] {$K_{pi}+\frac{K_{ii}}{s}$};
\node (planta1) [block, label=below:Planta de Corrente] {$G_i(s)$};
\node (planta2) [block, label=below:Planta de Tensão] {$G_v(s)$};
\coordinate[on chain2] (output);
% Energy Management System + additional coordinates
\node(ems)  [block=green!30, below=of sum1] {Energy Management System};
\coordinate[above=2mm of ems.east] (ems1);
\coordinate[below=2mm of ems.east] (ems2);
%connect the nodes
\path   (input)         edge ["$V_{\mathrm{ref}}$"]     (sum)
        (sum)           edge ["$V_{\mathrm{err}}$"]     (controlador1)
        (controlador1)  edge ["$I^*_{\mathrm{batt}}$"]  (sum1)
        (sum1)          edge ["$I_{\mathrm{err}}$"]     (controlador2)
        (controlador2)  edge                            (planta1)
        (planta1)       edge ["$I_{\mathrm{batt}}$"]    (planta2)
        (planta2)       edge ["$V_{DC}$"]               (output)
        (ems)           edge ["$I_{\mathrm{foo}}$"] node[pos=0.95] {$-$}     (sum1);
%
    \begin{scope}[semithick, -Stealth]
\draw   (ems) -| node [near end] {$V_{\mathrm{med}}$} node[pos=0.95] {$-$}  (sum);
%
\draw   ($(planta2)!0.5!(planta1)$) |- (ems1);
\draw   ($(planta2.east)!0.5!(output)$) |- (ems2);
        \end{scope}
    \end{tikzpicture}
\end{document}