

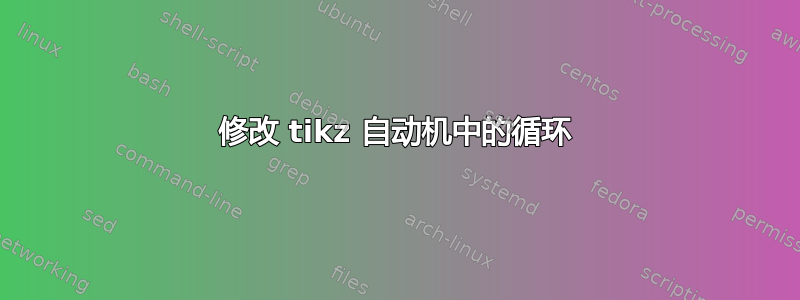
在这张图片中,我的代码绘制了红色的循环。我想用手绘的黑色循环替换它们。

我尝试了很多货物崇拜编程使用来自在 tikz 中更改循环大小和形状,在 tikz 中更改循环大小和形状,如何在自动机中绘制更大的循环状态和多重转换? 和其他网站,但都无济于事。也许这些干预措施可能无法与自动机库正常工作。
(我也想要更大的箭头,谢谢。)
梅威瑟:
\documentclass[border=3.14mm]{standalone}
\usepackage{tikz}
\usetikzlibrary{automata, positioning, arrows}
\tikzset{
->,  % makes the edges directed
>=stealth', % makes the arrow heads bold
node distance=2.5cm, %  minimum distance between two nodes. Change if necessary.
every state/.style={thick}, % sets the properties for each 'state' node
}
\begin{document}
\begin{tikzpicture}
\node[state] (0) {$0$};
\node[state, right of=0] (1) {$1$};
\node[state, right of=1] (2) {$2$};
\node[state, right of=2] (3) {$3$};
\node[state, right of=3] (4) {$4$};
\node[state, right of=4] (5) {$5$};
% march down
\draw[thick](1) edge[bend right, above] (0);
\draw[thick](2) edge[bend right, above] (1);
\draw[thick](3) edge[bend right, above] (2);
\draw[thick](4) edge[bend right, above] (3);
\draw[thick](5) edge[bend right, above] (4);
% skip dowo
\draw[thick](2) edge[bend right, above] (0);
\draw[thick](3) edge[bend right, above] (1);
\draw[thick](4) edge[bend right, above] (2);
\draw[thick](5) edge[bend right, above] (3);
% march up
\draw[thick](1) edge[bend right, below] (2);
\draw[thick](2) edge[bend right, below] (3);
\draw[thick](3) edge[bend right, below] (4);
\draw[thick](4) edge[bend right, below] (5);
% skip up
\draw[thick](1) edge[bend right, below] (3);
\draw[thick](2) edge[bend right, below] (4);
\draw[thick](3) edge[bend right, below] (5);
% loops
\draw[thick] (1) edge[loop left, red] (1);
\draw[thick] (4) edge[loop right, red] (4);
\draw[thick] (5) edge[loop left, red] (5);
\draw[thick] (5) edge[loop right, red] (5);
\end{tikzpicture}
\end{document}
答案1
像这样吗?
\documentclass[border=3.14mm]{standalone}
\usepackage{tikz}
\usetikzlibrary{automata, positioning, arrows}

\tikzset{
->,  % makes the edges directed
>=stealth', % makes the arrow heads bold
node distance=2.5cm, %  minimum distance between two nodes. Change if necessary.
every state/.style={thick}, % sets the properties for each 'state' node
}

\begin{document}

\begin{tikzpicture}
\node[state] (0) {$0$};
\node[state, right of=0] (1) {$1$};
\node[state, right of=1] (2) {$2$};
\node[state, right of=2] (3) {$3$};
\node[state, right of=3] (4) {$4$};
\node[state, right of=4] (5) {$5$};
% march down
\draw[thick](1) edge[bend right, above] (0);
\draw[thick](2) edge[bend right, above] (1);
\draw[thick](3) edge[bend right, above] (2);
\draw[thick](4) edge[bend right, above] (3);
\draw[thick](5) edge[bend right, above] (4);
% skip dowo
\draw[thick](2) edge[bend right, above] (0);
\draw[thick](3) edge[bend right, above] (1);
\draw[thick](4) edge[bend right, above] (2);
\draw[thick](5) edge[bend right, above] (3);
% march up
\draw[thick](1) edge[bend right, below] (2);
\draw[thick](2) edge[bend right, below] (3);
\draw[thick](3) edge[bend right, below] (4);
\draw[thick](4) edge[bend right, below] (5);
% skip up
\draw[thick](1) edge[bend right, below] (3);
\draw[thick](2) edge[bend right, below] (4);
\draw[thick](3) edge[bend right, below] (5);
% loops
\draw[thick] (1) edge[loop left, red] (1);
\draw[thick] (4) edge[loop right, red] (4);
\draw[thick] (5) edge[loop left, red] (5);
\draw[thick] (5) edge[loop right, red] (5);
% back loops
\draw[thick] (1) edge[loop right, out=150, in=210, looseness=7] (1);
\draw[thick] (4) edge[loop right, out=330, in=30, looseness=7] (4);
\draw[thick] (5) edge[loop right, out=330, in=30, looseness=7] (5);
\end{tikzpicture}

\end{document}

答案2
人们总是可以为这样的事情写出一种风格......编辑:增加了箭头。
\documentclass[border=3.14mm]{standalone}
\usepackage{tikz}
\usetikzlibrary{automata, positioning, arrows.meta}
\tikzset{
->,  % makes the edges directed
>={Stealth[length=3.14mm]}, % makes the arrow heads bold
node distance=2.5cm, %  minimum distance between two nodes. Change if necessary.
every state/.style={thick}, % sets the properties for each 'state' node
my loop left/.style={out=165,in=195,loop},
my loop right/.style={out=-15,in=15,loop}
}
\begin{document}
\begin{tikzpicture}
\node[state] (0) {$0$};
\node[state, right of=0] (1) {$1$};
\node[state, right of=1] (2) {$2$};
\node[state, right of=2] (3) {$3$};
\node[state, right of=3] (4) {$4$};
\node[state, right of=4] (5) {$5$};
% march down
\draw[thick](1) edge[bend right, above] (0);
\draw[thick](2) edge[bend right, above] (1);
\draw[thick](3) edge[bend right, above] (2);
\draw[thick](4) edge[bend right, above] (3);
\draw[thick](5) edge[bend right, above] (4);
% skip dowo
\draw[thick](2) edge[bend right, above] (0);
\draw[thick](3) edge[bend right, above] (1);
\draw[thick](4) edge[bend right, above] (2);
\draw[thick](5) edge[bend right, above] (3);
% march up
\draw[thick](1) edge[bend right, below] (2);
\draw[thick](2) edge[bend right, below] (3);
\draw[thick](3) edge[bend right, below] (4);
\draw[thick](4) edge[bend right, below] (5);
% skip up
\draw[thick](1) edge[bend right, below] (3);
\draw[thick](2) edge[bend right, below] (4);
\draw[thick](3) edge[bend right, below] (5);
% loops
\draw[thick] (1) edge[my loop left, red] (1);
\draw[thick] (4) edge[my loop right, red] (4);
\draw[thick] (5) edge[my loop left, red] (5);
\draw[thick] (5) edge[my loop right, red] (5);
\end{tikzpicture}
\end{document}

如果您希望环变得更大,您可以相应地调整in和out角度。此外,您可以增加looseness,但我对结果并不满意,但这只是个人喜好问题。
\documentclass[border=3.14mm]{standalone}
\usepackage{tikz}
\usetikzlibrary{automata, positioning, arrows.meta}
\tikzset{
->,  % makes the edges directed
>={Stealth[length=3.14mm]}, % makes the arrow heads bold
node distance=2.5cm, %  minimum distance between two nodes. Change if necessary.
every state/.style={thick}, % sets the properties for each 'state' node
my loop left/.style={out=160,in=200,loop},
my loop right/.style={out=-20,in=20,loop}
}
\begin{document}
\begin{tikzpicture}
\node[state] (0) {$0$};
\node[state, right of=0] (1) {$1$};
\node[state, right of=1] (2) {$2$};
\node[state, right of=2] (3) {$3$};
\node[state, right of=3] (4) {$4$};
\node[state, right of=4] (5) {$5$};
% march down
\draw[thick](1) edge[bend right, above] (0);
\draw[thick](2) edge[bend right, above] (1);
\draw[thick](3) edge[bend right, above] (2);
\draw[thick](4) edge[bend right, above] (3);
\draw[thick](5) edge[bend right, above] (4);
% skip dowo
\draw[thick](2) edge[bend right, above] (0);
\draw[thick](3) edge[bend right, above] (1);
\draw[thick](4) edge[bend right, above] (2);
\draw[thick](5) edge[bend right, above] (3);
% march up
\draw[thick](1) edge[bend right, below] (2);
\draw[thick](2) edge[bend right, below] (3);
\draw[thick](3) edge[bend right, below] (4);
\draw[thick](4) edge[bend right, below] (5);
% skip up
\draw[thick](1) edge[bend right, below] (3);
\draw[thick](2) edge[bend right, below] (4);
\draw[thick](3) edge[bend right, below] (5);
% loops
\draw[thick] (1) edge[my loop left, red] (1);
\draw[thick] (4) edge[my loop right, red] (4);
\draw[thick] (5) edge[my loop left, red] (5);
\draw[thick] (5) edge[my loop right, red] (5);
\end{tikzpicture}
\end{document}

答案3
我接受了@JasperHabicht 的答案,并赞同了@marmot 的答案。在这里发布我自己的答案只是为了展示它们是如何结合在一起的。

\documentclass[border=3.14mm]{standalone}
\usepackage{tikz}
\usetikzlibrary{automata, positioning, arrows.meta}
\tikzset{
->,  % makes the edges directed
>={Stealth[length=3.14mm]}, % makes the arrow heads bold and bigger
%>=stealth', % makes the arrow heads bold
node distance=2.5cm, %  minimum distance between two nodes. Change if necessary.
every state/.style={thick}, % sets the properties for each 'state' node
}
\begin{document}
\begin{tikzpicture}
\node[state] (0) {$0$};
\node[state, right of=0] (1) {$1$};
\node[state, right of=1] (2) {$2$};
\node[state, right of=2] (3) {$3$};
\node[state, right of=3] (4) {$4$};
\node[state, right of=4] (5) {$5$};
% march down
\draw[thick](1) edge[bend right, above] (0);
\draw[thick](2) edge[bend right, above] (1);
\draw[thick](3) edge[bend right, above] (2);
\draw[thick](4) edge[bend right, above] (3);
\draw[thick](5) edge[bend right, above] (4);
% skip dowo
\draw[thick](2) edge[bend right, above] (0);
\draw[thick](3) edge[bend right, above] (1);
\draw[thick](4) edge[bend right, above] (2);
\draw[thick](5) edge[bend right, above] (3);
% march up
\draw[thick](1) edge[bend right, below] (2);
\draw[thick](2) edge[bend right, below] (3);
\draw[thick](3) edge[bend right, below] (4);
\draw[thick](4) edge[bend right, below] (5);
% skip up
\draw[thick](1) edge[bend right, below] (3);
\draw[thick](2) edge[bend right, below] (4);
\draw[thick](3) edge[bend right, below] (5);
% loops
\draw[thick] (1) edge[loop right, out=150, in=210, looseness=7] (1);
\draw[thick] (4) edge[loop right, out=330, in=30, looseness=7] (4);
\draw[thick] (5) edge[loop right, out=330, in=30, looseness=7] (5);
\draw[thick] (5) edge[loop right, out=330, in=30, looseness=9] (5);
\end{tikzpicture}
\end{document}