


答案1
这是你的起点。为了更好地遵循您引用的代码我冒昧地:
- 通过注释指出各个部分的作用
- 删除一些这里不需要的部分(我们称之为简化)
- 调整缩进以更好地查看代码结构
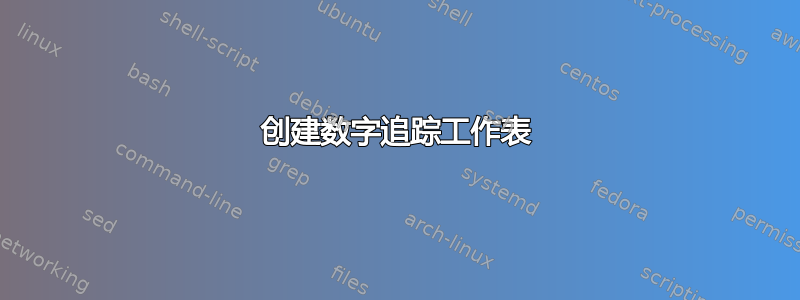
- 添加“1”和“4”作为演示
作为Tikz对于初学者来说可能会有点难以理解,但一旦你理解了它的基本概念,它就变得“简单”,我建议你学习pgfmanual 开头的 4 个教程多次。为了区分常用命令和不常用命令,我建议首先关注这些命令:
\draw和styles(放入 [options])...;\path...;
在这里使用的更高级的语句中尝试获取这些语句的本质:
\foreach \X [count=\Y] in {A,1,4}
- 让变量
\X取值 A、1 和 4 - 使用索引计数(\X),遍历 1、2 和 3,用于展示位置
code={
...
}
- 一种将一系列“绘图”命令放入
\pic - 你可以把图片看作
\pic是一种 tikz-macro
这应该会使大约 70% 的代码对你来说变得相当易读。
最后,只需按照我所指示的方式在语句中引入更多数字\tikzset,并在此语句末尾扩展列表\foreach \X [count=\Y] in {A,1,4}。注意-mid在绘图路径中的某个位置定义坐标,因为需要在文档主代码中绘制这些字符行。
在手册里寻找\arc、circle、ellipse其他数字,同时重现path-concept: 来执行一系列操作,直到;。

\documentclass[tikz,border=3mm]{standalone}
 % ~~~ drawing on 3 layers, display-order as stated ~~~~~~~~~
 \pgfdeclarelayer{background}
 \pgfdeclarelayer{behind}
 \pgfdeclarelayer{foreground}
 \pgfsetlayers{behind,background,main,foreground}
% from https://tex.stackexchange.com/a/460842/121799
%
% ~~~ drawing each character ~~~~~~~~~~~~~~~~~~~~~
\tikzset{pics/.cd,
  A/.style={
    code={
            % ~~~ the A's outer shape (start, up, down) ~~~
            \draw[pic actions]
            (0,-0.5) -- (0.3,0.4) -- (0.6,-0.5);
            % ~~~ the A's line in the middle ~~~~~~~
            \draw[pic actions](0.1,1/3-0.45) -- coordinate(-mid)
            (0.5,1/3-0.45);
            % ~~~│ some kind of advance ~~~
            \path (0.7,0);
      }
    },
  %
  1/.style={
    code={
            % ~~~ the 1, with coordinate defined for the middle ~~~
            \draw[pic actions]
            (0.3,0.4)-- coordinate(-mid) (0.3,-.1) -- (0.3,-0.5);
            % ~~~│ some kind of advance ~~~
            \path (0.7,0);
      }
    },
  %
  4/.style={
    code={
            % ~~~ the 4, with coordinate defined for the middle ~~~
            \draw[pic actions]
            (0.5,0.4)-- (0.5,-0.5);
            \draw[pic actions]
            (0.1,0.4)-- coordinate(-mid) (0.1,-.1) -- (0.6,-.1);
            % ~~~│ some kind of advance ~~~
            \path (0.7,0);
      }
    },
  %
}
% ~~~~~~~~~~~~~~~~~~~~~~~~~~~~~~~~~~~
\begin{document}
 \begin{tikzpicture}
  \begin{scope}[local bounding box=letters]
    % ~~~ left column of letters A-Z ~~~~~~~~
    \foreach \X [count=\Y] in {A,1,4}
     {
        % ~~~ drawing upper and lower line for the characters ~~~
        \draw[thick,blue] (0,-\Y-0.25) -- ++ (5,0) (0,-\Y+0.25) -- ++ (5,0);
        % ~~~ drawing the character as a \pic ~~~~~~~~~~
        \path[thick] (0.5,-\Y) pic[scale=0.5](\X){\X}% first solid character
            % ~~~ introducing 4 dashed characters ~~~
            foreach \Z in {1,...,4}
            {(\Z+0.5,-\Y) pic[scale=0.5,dash pattern=on 1.5pt off 1.2pt]{\X}}
        ;

        % ~~~ drawing the dashed red line in the middle
        \begin{pgfonlayer}{background}
          \draw[red,dashed] (0,-\Y|-\X-mid) -- ++ (5,0);
        \end{pgfonlayer}
      }
            % ~~~ NOT NEEDED HERE ~~~~~~~~~~~~~~~~~~~~~~~~~~~~~~~
            %   % ~~~ right column of letters a-z ~~~~~~~~
            %   \foreach \X [count=\Y] in {a,...,z}
            %    {\draw[thick,blue] (6,-\Y-0.25) -- ++ (5,0) (6,-\Y+0.25) -- ++ (5,0);
            %     \path[thick] (6.5,-\Y) pic[scale=0.5](\X){\X} foreach \Z in {1,...,4}
            %     {(\Z+6.5,-\Y) pic[scale=0.5,dash pattern=on 1.5pt off 1.2pt]{\X}};
            %    \begin{pgfonlayer}{background}
            %     \draw[red,dashed] (6,-\Y|-\X-mid) -- ++ (5,0);
            %    \end{pgfonlayer}
            %     }
  \end{scope}

   % ~~~ NOT NEEDED HERE ~~~~~~~~~~~~~~~~~~~~~~~~~~~~~~~~~~~~~~~~~~
   % ~~~ putting all those blueish colors on paper ~~~
%  \begin{pgfonlayer}{behind}
%    \path[left color=cyan!10,right color=cyan!30]
%       (letters.south west) rectangle (letters.north east);
%  \end{pgfonlayer}
%  \draw[line width=2mm,blue!30] ([xshift=-3mm,yshift=3mm]letters.north west)
%       -- ([xshift=-3mm,yshift=-3mm]letters.south west);

 \end{tikzpicture}
\end{document}
答案2
感谢您的大力帮助,我算出了其他数字。这很有趣!
    \pgfdeclarelayer{behind}
    \pgfdeclarelayer{foreground}
       \pgfsetlayers{behind,background,main,foreground}
    % from     https://tex.stackexchange.com/a/460842/121799
    %
    % ~~~ drawing each character     ~~~~~~~~~~~~~~~~~~~~~
    \tikzset{pics/.cd,
     9/.style={code={\draw[pic actions] (0.2,0.15) circle[x radius=0.2,y radius=0.25];
    \draw[pic actions] (0.4,-0.5) -- coordinate[pos=0.5](-mid)(0.4,0.4);}},
      %
      6/.style={code={\draw[pic actions] (0.2,-0.25) circle[x radius=0.2,y radius=0.25];
    \draw[pic actions] (0.0,-0.175) -- coordinate[pos=0.5](-mid)(0.3,0.4);}},
      %
      %
      2/.style={
    code={
            % ~~~ the 4, with coordinate defined for the middle ~~
            \draw[pic actions]
   (0,0.25) to[out=45,in=45,looseness=2.5]  (0,-0.45);
  \draw[pic actions](0,-0.45) -- (0.5,-0.45);
   \path (0.7,0);}},
    1/.style={code={\draw[pic actions] (0.3,0.4) -- (0.3,-0.5);}},
  %
        4/.style={code={\draw[pic actions] (0.3,0.4) -- (0.3,-0.5);
    \draw[pic actions] (0,0.4) -- (0,-0.1) -- (0.5,-0.1);}},
  %
    Is    5/.style={code={\draw[pic actions] (0.5,0.4) -- (0,0.4) -- (0,0.1)-- (0.15,0.1);
\draw (0.15,0.1) arc(90:-90:0.4cm and 0.275cm);
\draw[pic actions] (0,-0.45) -- (0.15,-0.45);
%\draw (-0.02,0.1) arc(90:-90:0.5cm and 0.3cm);
  %\draw[pic actions] (0,0.1)  to[out=0,in=0,looseness=3] (0,-0.45);
  }},
  %
        3/.style={code={
\draw (0.0,0.35) arc(130:-90:0.25cm and 0.2cm);
\draw (0.15,0) arc(90:-120:0.3cm and 0.225cm);
  }},
  %
   7/.style={code={\draw[pic actions] (0.0,0.4) -- (0.5,0.4) -- (0.2,-0.45);
  }},
  %
     8/.style={code={
 \draw (0.25,0.4) arc(90:-90:0.2cm and 0.2cm);
  \draw (0.25,0.4) arc(90:270:0.2cm and 0.2cm);
   \draw (0.25,0) arc(90:-90:0.25cm and 0.25cm);
  \draw (0.25,0) arc(90:270:0.25cm and 0.25cm);
  }},
  %
      0/.style={code={
 \draw (0.25,0.4) arc(90:-90:0.25cm and 0.45cm);
  \draw (0.25,0.4) arc(90:270:0.25cm and 0.45cm);
  }},
  %
}


     % ~~~~~~~~~~~~~~~~~~~~~~~~~~~~~~~~~~~
    \begin{document}
     \begin{tikzpicture}
  \begin{scope}[local bounding box=letters]
    % ~~~ left column of letters A-Z ~~~~~~~~
    \foreach \X [count=\Y] in {1,2,3,4,5,6,7,8,9,0}
     {
        % ~~~ drawing upper and lower line for the characters ~~~
        \draw[thick,blue] (0,-\Y-0.25) -- ++ (5,0) (0,-\Y+0.25) -- ++ (5,0);
        % ~~~ drawing the character as a \pic ~~~~~~~~~~
        \path[thick] (0.5,-\Y) pic[scale=0.5](\X){\X}% first solid character
            % ~~~ introducing 4 dashed characters ~~~
            foreach \Z in {1,...,4}
            {(\Z+0.5,-\Y) pic[scale=0.5,dash pattern=on 1.5pt off 1.2pt]{\X}}
        ;


      }
            % ~~~ NOT NEEDED HERE ~~~~~~~~~~~~~~~~~~~~~~~~~~~~~~~
            %   % ~~~ right column of letters a-z ~~~~~~~~
            %   \foreach \X [count=\Y] in {a,...,z}
            %    {\draw[thick,blue] (6,-\Y-0.25) -- ++ (5,0) (6,-\Y+0.25) -- ++ (5,0);
            %     \path[thick] (6.5,-\Y) pic[scale=0.5](\X){\X} foreach \Z in {1,...,4}
            %     {(\Z+6.5,-\Y) pic[scale=0.5,dash pattern=on 1.5pt off 1.2pt]{\X}};
            %    \begin{pgfonlayer}{background}
            %     \draw[red,dashed] (6,-\Y|-\X-mid) -- ++ (5,0);
            %    \end{pgfonlayer}
            %     }
  \end{scope}

   % ~~~ NOT NEEDED HERE ~~~~~~~~~~~~~~~~~~~~~~~~~~~~~~~~~~~~~~~~~~
   % ~~~ putting all those blueish colors on paper ~~~
%  \begin{pgfonlayer}{behind}
%    \path[left color=cyan!10,right color=cyan!30]
%       (letters.south west) rectangle (letters.north east);
%  \end{pgfonlayer}
%  \draw[line width=2mm,blue!30] ([xshift=-3mm,yshift=3mm]letters.north west)
%       -- ([xshift=-3mm,yshift=-3mm]letters.south west);

 \end{tikzpicture}
    \end{document}