

我扫描了很多我写的 A4 笔记,但很多旧笔记上都有订书钉孔。其中一些扫描件还存在轻微瑕疵,例如上面有一个小点(污垢),这在阅读这些 PDF 时确实让我很烦。
我曾尝试通过编辑去除订书钉孔,因为订书钉孔总是在同一个区域,我可以将相同的编辑应用到多个页面。然而,这却带来了一个不幸的结果,那就是 PDF 文件大小增加了 7 倍!
类似地,当我尝试通过在 Paint 中编辑 PDF 页面来手动去除污垢时,文件大小也会急剧增加,每个编辑页面约 2MB。
有没有更好的方法来完成我正在做的事情?
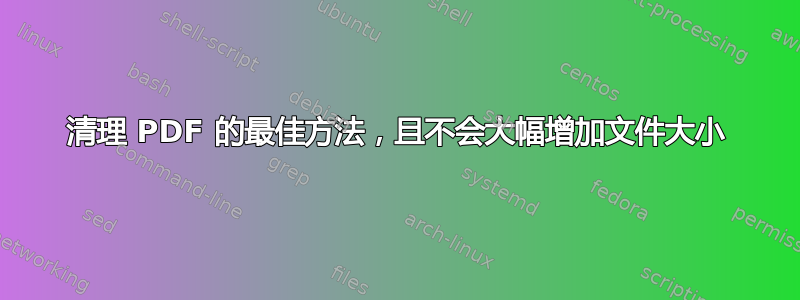
这里是此类 PDF 的一个页面示例。在此页面上,我想删除实际页面上的一些污渍、左上角的订书钉孔、左侧的打孔孔和右上角的黑条。
答案1
清洁PDF(9 MB)
我编写了一个 PowerShell 脚本,名为清洁PDF批量删除 PDF 页面中的特定区域。无需安装其他程序。这是一种便携式解决方案
用户必须设置适当的蒙版图像来告诉程序应该删除哪些区域。使用 Paint.net、Gimp、Photoshop 或任何你有编辑面具.png并保持透明度
PowerShell 脚本
# user variables
$scriptDir = Split-Path -Parent $MyInvocation.MyCommand.Definition
$pdfimages = "$scriptDir\pdfimages.exe"
$convert   = "$scriptDir\convert.exe"
$composite = "$scriptDir\composite.exe"
$mask      = "$scriptDir\mask.png"
$temp      = "$enc:temp\cleanPDF"

# function to remove certain areas from each PDF site according to mask.png
function cleanPDF($file){

    # check if temp folder exists. Maybe from a previous run. If yes, delete it
    if (Test-Path $temp){ Remove-Item $temp -Force -Recurse}

    # Create a new temp folder which is always empty
    New-Item $temp -ItemType Dir | Out-Null

    # Extract one JPG per PDF site and save them in temp folder
    & $pdfimages '-j' $file.FullName "$temp\image"

    # Iterate through each new image and process them
    Get-ChildItem "$temp\image-*.jpg" | foreach {

        # Remove unwanted areas from current JPG with the help of mask.png. Convert JPG to PNG to preserve transparency
        & $composite -compose dst-out "$mask" $_.Fullname -matte "$temp\$($_.BaseName)_result.png"

        # Convert PNG back to JPG so we can replace transparent with white areas. Without this JPG>PNG>JPG trick they would be black
        & $convert "$temp\$($_.BaseName)_result.png" -background white -alpha remove "$temp\$($_.BaseName)_result.jpg"
    }

    # combine all images back to a single pdf and append "_result" to the file name
    & $convert "$temp\image*_result.jpg" "$($file.Directory)/$($file.BaseName)_result.pdf"

    # Remove temp folder and work images
    Remove-Item $temp -Force -Recurse
}

# Iterate through each passed commandline argument
ForEach ($path in $args){

    # Get path as Powershell item
    $file = Get-Item $path

    # If file extension is .pdf, start CleanPDF function for this pdf
    If ($file.Extension.ToLower() -eq '.pdf') { cleanPDF $file }
}
使用的工具和技术
该脚本使用以下第三方工具来处理不同的任务
pdfimages 文件扩展名(在Xpdf 项目) 将所有 PDF 页面提取为单独的图像。但是,既然 imagemagick 也能将 PDF 文件转换为图像,为什么还要使用 pdfimages?pdfimages 的优点是我们不需要安装 GhostScript
pdfimages.exe -j C:\inputfile.pdf C:\outputfolder复合程序(在imagemagick 项目)来掩盖某些预定义区域
composite.exe -compose dst-out C:\mask.png C:\input1.jpg -matte C:\output2.png转换程序(在imagemagick 项目)将透明区域转换为白色区域。并将所有处理过的图像合并回单个 PDF
convert.exe C:\input2.png -background white -alpha remove C:\output3.jpg
convert.exe C:\input*.jpg C:\output.pdf
如何使用
- 下载此 .zip 文件并将其解压到您选择的文件夹中。您可以忽略警告前方站点含有有害程序来自 Google 安全浏览
.zip 文件包含所有必需的文件,因此您不需要下载 imagemagick 包 (155 MB) 或 Xpdf 包 (11 MB)
cleanPDF.ps1
转换.exe
composite.exe
pdfimages.exe
mask.png 样本.pdf
打开 sendto 文件夹 ( Win+ R» shell:sendto) 并创建一个新的快捷方式。将其命名为 CleanPDF 并输入以下路径作为目标位置,但更改
D:\dir为您自己提取文件的文件夹C:\Windows\System32\WindowsPowerShell\v1.0\powershell.exe -file "D:\dir\cleanPDF.ps1"打开
mask.png并根据需要进行更改。所有不透明区域标记将被移除(屏蔽)的区域。必须保留透明度右键单击任意 PDF 并选择发送至 » CleanPDF. 将在同一位置创建一个新的 PDF

OP样本。注意现在删除了哪些部分:
sample.pdf (1,35 MB) sample_result.pdf (1,46 MB)

