

考虑以下 MWE:
\documentclass[a4paper]{scrartcl}
\usepackage{mathtools}
\usepackage{amssymb}
\usepackage[compatibility=false]{caption}
\usepackage[list]{subcaption}
\usepackage{fancyvrb}
\usepackage{tikz}
\usetikzlibrary{patterns, fit, positioning, calc, shapes.arrows}
\usepackage[active, tightpage, floats, displaymath]{preview}
\mathtoolsset{%
mathic=true
}
% Vectors and matrices
\renewcommand*{\vec}[1]{\mathbf{#1}}
\newcommand{\mat}[1]{\mathbf{#1}}
\newcommand{\trans}{\intercal}
% Operators
\DeclareMathOperator{\rank}{rank}
\DeclareMathOperator*{\argmin}{arg\,min}
\DeclareMathOperator*{\argmax}{arg\,max}
\begin{document}
\begin{figure}
\centering
\captionsetup[subfigure]{margin={2.5cm, 0cm}}
\begin{subfigure}[b]{0.60\textwidth}
\centering
\begin{tikzpicture}[>=latex, shorten >=2pt, shorten <=2pt]
\node[draw, rectangle, label=below:the] (the) {\(\mat W\)};
\node[draw, rectangle, right=of the, label=below:cat] (cat) {\(\mat W\)};
\node[draw, rectangle, right=of cat, label=below:sat] (sat) {\(\mat W\)};
\node[draw, rectangle, fit=(the.west) (the.east), pattern=vertical lines, above=of the] (in_the) {};
\node[draw, rectangle, fit=(cat.west) (cat.east), pattern=vertical lines, above=of cat] (in_cat) {};
\node[draw, rectangle, fit=(sat.west) (sat.east), pattern=vertical lines, above=of sat] (in_sat) {};
\node[draw, rectangle, fit={($(cat.west) + (-8pt,0pt)$) ($(cat.east) + (8pt,0pt)$)}, pattern=vertical lines, above=2cm of cat] (in) {};
\node[draw, rectangle, above=of in, label=above:mat] (out) {\(\vec b\), \(\mat U\)};
\node[left=of the, outer sep=0] (embed) {embed};
\node[above=2cm of embed, outer sep=0] (concatenate) {concatenate};
\node[above=1cm of concatenate, outer sep=0] {softmax};
\foreach \word in {the, cat, sat}{%
\draw[->] (\word) -- (in_\word);
\draw[->] (in_\word) -- (in);
}
\draw[->] (in) -- (out);
\end{tikzpicture}
\caption{CBOW model}\label{fig:cbow}
\end{subfigure}
\captionsetup[subfigure]{margin={0cm,0cm}}
\begin{subfigure}[b]{0.35\textwidth}
\centering
\begin{tikzpicture}[>=latex, shorten >=2pt, shorten <=2pt]
\node[draw, rectangle, label=below:cat] (cat) {\(\mat W\)};
\node[draw, rectangle, fit=(cat.west) (cat.east), pattern=vertical lines, above=of cat] (in) {};
\node[draw, rectangle, above=2cmof in, label=above:on] (on) {\(\vec b\), \(\mat U\)};
\node[draw, rectangle, left=of on, label=above:sat] (sat) {\(\vec b\), \(\mat U\)};
\node[draw, rectangle, right=of on, label=above:the] (the) {\(\vec b\), \(\mat U\)};
\draw[->] (cat) -- (in);
\foreach \word in {sat, on, the}{%
\draw[->] (in) -- (\word);
}
\end{tikzpicture}
\caption{Skip\=/gram model}\label{fig:sg}
\end{subfigure}
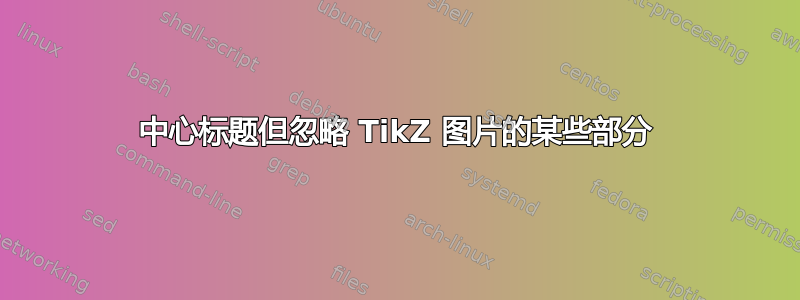
\caption{\protect\Verb+Word2Vec+ with vocabulary size \(V\), context
size \(C\), and embedding size \(N\)}
\end{figure}
\end{document}
%%% Local Variables:
%%% mode: latex
%%% TeX-master: t
%%% End:
排版成:

如您所见,我使用 将“(a) CBOW 模型”标题“居中” \captionsetup[subfigure]{margin={2.5cm, 0cm}}。我的问题是:是否可以不这样做?或者至少以某种方式计算出我需要偏移标题的正确宽度?
答案1
您可以\useasboundingbox在 TikZ 中使用它来设置图片的尺寸。TikZ 随后将忽略该命令之后的所有内容来计算图片大小。(current bounding box)您可以使用它来参考图片到目前为止的大小。只要您在线条之前绘制了所有应该计入纸张尺寸的内容,\useasboundingbox (current bounding box)图片就会具有所需的大小。
此外,还需要一个空位subfigure以允许左侧重叠。所以它必须是第一个。当然,必须调整左侧(嗯,现在是中间)子图的宽度。
\documentclass[a4paper]{scrartcl}

\usepackage{mathtools}
\usepackage{amssymb}

\usepackage[compatibility=false]{caption}
\usepackage[list]{subcaption}

\usepackage{fancyvrb}

\usepackage{tikz}
\usetikzlibrary{patterns, fit, positioning, calc, shapes.arrows}

\usepackage[active, tightpage, floats, displaymath]{preview}

\mathtoolsset{%
  mathic=true
}

% Vectors and matrices
\renewcommand*{\vec}[1]{\mathbf{#1}}
\newcommand{\mat}[1]{\mathbf{#1}}
\newcommand{\trans}{\intercal}

% Operators
\DeclareMathOperator{\rank}{rank}
\DeclareMathOperator*{\argmin}{arg\,min}
\DeclareMathOperator*{\argmax}{arg\,max}

\begin{document}
\begin{figure}
  \centering
% no longer needed
%  \captionsetup[subfigure]{margin={2.5cm, 0cm}}
  %empty subfugure to allow for overlap to the left
  \begin{subfigure}[b]{0.15\textwidth}
  \mbox{}
  \end{subfigure}
  \begin{subfigure}[b]{0.40\textwidth}
    \centering
    \begin{tikzpicture}[>=latex, shorten >=2pt, shorten <=2pt]
      \node[draw, rectangle, label=below:the] (the) {\(\mat W\)};
      \node[draw, rectangle, right=of the, label=below:cat] (cat) {\(\mat W\)};
      \node[draw, rectangle, right=of cat, label=below:sat] (sat) {\(\mat W\)};

      \node[draw, rectangle, fit=(the.west) (the.east), pattern=vertical lines, above=of the] (in_the) {};
      \node[draw, rectangle, fit=(cat.west) (cat.east), pattern=vertical lines, above=of cat] (in_cat) {};
      \node[draw, rectangle, fit=(sat.west) (sat.east), pattern=vertical lines, above=of sat] (in_sat) {};

      \node[draw, rectangle, fit={($(cat.west) + (-8pt,0pt)$) ($(cat.east) + (8pt,0pt)$)}, pattern=vertical lines, above=2cm of cat] (in) {};
      \node[draw, rectangle, above=of in, label=above:mat] (out) {\(\vec b\), \(\mat U\)};

      % set the picture size to everything drawn so far
      \useasboundingbox (current bounding box);

      % not taken into account for the picture size
      \node[left=of the, outer sep=0] (embed) {embed};
      \node[above=2cm of embed, outer sep=0] (concatenate) {concatenate};
      \node[above=1cm of concatenate, outer sep=0] {softmax};

      % this belongs to the main part, but it doesn't increase its size
      % otherwise it must be moved before \useasboundingbox
      \foreach \word in {the, cat, sat}{%
        \draw[->] (\word) -- (in_\word);
        \draw[->] (in_\word) -- (in);
      }

      \draw[->] (in) -- (out);
    \end{tikzpicture}
    \caption{CBOW model}\label{fig:cbow}
  \end{subfigure}
% no longer needed
%  \captionsetup[subfigure]{margin={0cm,0cm}}
  \begin{subfigure}[b]{0.35\textwidth}
    \centering
    \begin{tikzpicture}[>=latex, shorten >=2pt, shorten <=2pt]
      \node[draw, rectangle, label=below:cat] (cat) {\(\mat W\)};
      \node[draw, rectangle, fit=(cat.west) (cat.east), pattern=vertical lines, above=of cat] (in) {};
      \node[draw, rectangle, above=2cmof in, label=above:on] (on) {\(\vec b\), \(\mat U\)};
      \node[draw, rectangle, left=of on, label=above:sat] (sat) {\(\vec b\), \(\mat U\)};
      \node[draw, rectangle, right=of on, label=above:the] (the) {\(\vec b\), \(\mat U\)};

      \draw[->] (cat) -- (in);
      \foreach \word in {sat, on, the}{%
        \draw[->] (in) -- (\word);
      }
    \end{tikzpicture}
    \caption{Skip\=/gram model}\label{fig:sg}
  \end{subfigure}
  \caption{\protect\Verb+Word2Vec+ with vocabulary size \(V\), context
    size \(C\), and embedding size \(N\)}
\end{figure}
\end{document}
答案2
与我原来的(相对)简单的答案相比,这种方法(相对)不那么简单,它更灵活,而且经过了更好的测试。它需要etoolbox和xparse。(如果需要,您可以轻松省去后者,但这样很方便。)
正如我所设置的那样,这会修改所有
tikzpicture环境。如果需要的话,它可以扩大到包括
\tikz宏。如果不希望产生全局影响,请删除
every picture定义并简单地mark out在可选参数中使用tikzpicture。
它允许调整左侧、右侧、两侧或两侧的材料。
基于 MWE 的简单情况的唯一要求是\tikzmarkerwest在图片中您想要标记图片左侧部分的位置插入,该部分\caption应用于放置标题。如果您在图片中根本不使用宏,则当图片完成时,代码只会返回到图片边界框的左侧。这发生在subfigure示例中的第二个。
第一个代码subfigure被重新排列,以便所有\caption应该忽略的内容都位于图片的第一部分之后。\tikzmarkerwest然后插入以标记此时的左侧。
...
      \foreach \word in {the, cat, sat}{%
        \draw[->] (\word) -- (in_\word);
        \draw[->] (in_\word) -- (in);
      }
      \draw[->] (in) -- (out);
这就是我们要\caption用于放置的所有内容,因此现在标记图片的左侧。
\tikzmarkerwest
现在我们将应该忽略的东西放在那个点的左边\caption。
      \node[left=of the, outer sep=0] (embed) {embed};
      \node[above=2cm of embed, outer sep=0] (concatenate) {concatenate};
      \node[above=1cm of concatenate, outer sep=0] {softmax};
现在我们完成图片并像往常一样添加标题和标签。
    \end{tikzpicture}
    \caption{CBOW model}\label{fig:cbow}

对于右边的材料,\tikzmarkereast可以代替 或与 一起使用\tikzmarkerwest。
在某些情况下,以这种方式重新排列图片中的代码是不方便或不可能的。它根本无法按照所需的顺序轻松绘制。出于这个原因,\tikzmarkereast并\tikzmarkerwest支持可选参数。如果指定,这应该是圆括号中的坐标,就像坐标一样。在这种情况下,放置标题时将忽略指定坐标右侧或左侧的所有内容。
支持此功能的代码定义宏\tikzmarkerwest如下。
\NewDocumentCommand \tikzmarkerwest { D () {current bounding box.west} } {%
  \coordinate (tikz marker west) at (#1);
  \let\tikzmarkerwestdefault\relax
}
这会在适当的位置创建一个坐标(tikz marker west)。然后确保\tikzmarkerwestdefault不会成功执行任何操作。
\tikzmarkereast以同样的方式定义。
\NewDocumentCommand \tikzmarkereast { D () {current bounding box.east} } {%
  \coordinate (tikz marker east) at (#1);
  \let\tikzmarkereastdefault\relax
}
我们确保\tikzmarkerwestdefault并\tikzmarkereast定义。默认情况下,它们不执行任何操作。
\NewDocumentCommand \tikzmarkerwestdefault {} {}
\NewDocumentCommand \tikzmarkereastdefault {} {}
现在对于 Ti钾Z 代码。
\tikzset{%
mark out如果在环境中的可选参数中给出,则样式会添加在当前图片的开始和结束处执行的代码,或者如果按如下所示配置,则在所有图片中执行。
  mark out/.style={%
    execute at begin picture={%
      \RenewDocumentCommand \tikzmarkerwestdefault {}
      {%
        \coordinate (tikz marker west) at (current bounding box.west);
      }%
      \RenewDocumentCommand \tikzmarkereastdefault {}
      {%
        \coordinate (tikz marker east) at (current bounding box.east);
      }%
    },
这将重新定义我们的\tikzmarkerwestdefault和宏,以在当前边界框的左侧和右侧\tikzmarkereastdefault创建坐标(tikz marker west)和。这些只是定义,覆盖默认的空定义。它们实际上还没有创建任何坐标。(tikz marker east)
    execute at end picture={%
      \tikzmarkerwestdefault
      \tikzmarkereastdefault
在图片的末尾,我们执行\tikzmarkerwestdefault。如果\tikzmarkerwest已经在图片中调用,则此操作不会成功。否则,它将在当前边界框的左侧创建标记,这是图片的最终边界框。对于 也类似\tikzmarkereastdefault。
\path let \p1=(tikz marker west), \p2=(current bounding box.west), \n1={\x1-\x2} in \pgfextra{\xdef\myadjustwest{\n1}} ;
x这将计算坐标部分(tikz marker west)与x当前边界框左侧坐标部分之间的差值。通常,该差值为 0pt。但是,如果\tikzmarkerwest已调用,则标记节点与当前边界框左侧的距离可能不为零。(事实上,如果已调用宏,则情况可能如此,因为这是使用宏的唯一原因。)
现在我们对(tikz marker east)当前边界框的右侧执行相同的操作。
      \path let \p1=(tikz marker east), \p2=(current bounding box.east), \n1={\x2-\x1} in \pgfextra{\xdef\myadjusteast{\n1}} ;
    },
  },


  every picture/.style={mark out},
此行将mark out样式应用于所有 Ti钾Z 图片。如果这会导致问题,请将其移除并添加mark out到您想要的图片中。
}
\newlength\myadjustwest
\newlength\myadjusteast
确保无论如何\myadjustwest均可\myadjusteast使用。
\AfterEndEnvironment{tikzpicture}{%
  \captionsetup{margin={\myadjustwest,\myadjusteast}}%
}{\typeout{OK!}}{\typeout{Oh, no!}}
这将调整所有环境的结尾tikzpicture以正确修改。如果您使用此功能,则\caption应该用自己有意义的消息代替和OK!。Oh, no!
以下示例集说明了基本可能性。如果您想将标题放置在阴影矩形的位置,您无法(完全不能)先阴影一部分,然后再阴影另一部分,然后阴影另一部分,适当地标记阶段之间的边界框。因此,在这种情况下,我们使用可选参数\tikzmarkerwest和/或\tikzmarkereast来获取标题的位置,重点关注可见光谱的红端、蓝端和中间偏左的部分。
对于红军来说……
...
      \shade [shading=wave, shading angle=90] (0,0) rectangle ++(\linewidth,1) coordinate [pos=.4] (r);
      \tikzmarkereast(r)
...
对于蓝调来说......
...
      \shade [shading=wave, shading angle=90] (0,0) rectangle ++(\linewidth,1) coordinate [pos=.6] (b);
      \tikzmarkerwest(b)
...
对于内脏来说……
...
      \shade [shading=wave, shading angle=90] (0,0) rectangle ++(\linewidth,1) coordinate [pos=.1] (a) coordinate [pos=.5] (b);
      \tikzmarkereast(b)
      \tikzmarkerwest(a)
...

完整代码:
% arara: pdflatex
\pdfminorversion=7
% ateb: https://tex.stackexchange.com/a/377652/ addaswyd o gwestiwn d125q: https://tex.stackexchange.com/q/377476/
\documentclass[a4paper]{scrartcl}
\usepackage{mathtools,amssymb}
\usepackage[compatibility=false]{caption}
\usepackage[list]{subcaption}
\usepackage{fancyvrb,tikz,etoolbox,xparse}
\usetikzlibrary{patterns, fit, positioning, calc}
\usepackage[active, tightpage, floats, displaymath]{preview}
\mathtoolsset{%
  mathic=true
}
\NewDocumentCommand \tikzmarkerwest { D () {current bounding box.west} } {%
  \coordinate (tikz marker west) at (#1);
  \let\tikzmarkerwestdefault\relax
}
\NewDocumentCommand \tikzmarkerwestdefault {} {}
\NewDocumentCommand \tikzmarkereast { D () {current bounding box.east} } {%
  \coordinate (tikz marker east) at (#1);
  \let\tikzmarkereastdefault\relax
}
\NewDocumentCommand \tikzmarkereastdefault {} {}
\tikzset{%
  mark out/.style={%
    execute at begin picture={%
      \RenewDocumentCommand \tikzmarkerwestdefault {}
      {%
        \coordinate (tikz marker west) at (current bounding box.west);
      }%
      \RenewDocumentCommand \tikzmarkereastdefault {}
      {%
        \coordinate (tikz marker east) at (current bounding box.east);
      }%
    },
    execute at end picture={%
      \tikzmarkerwestdefault
      \tikzmarkereastdefault
      \path let \p1=(tikz marker west), \p2=(current bounding box.west), \n1={\x1-\x2} in \pgfextra{\xdef\myadjustwest{\n1}} ;
      \path let \p1=(tikz marker east), \p2=(current bounding box.east), \n1={\x2-\x1} in \pgfextra{\xdef\myadjusteast{\n1}} ;
    },
  },
  every picture/.style={mark out},
}
\newlength\myadjustwest
\newlength\myadjusteast
\AfterEndEnvironment{tikzpicture}{%
  \captionsetup{margin={\myadjustwest,\myadjusteast}}%
}{\typeout{OK!}}{\typeout{Oh, no!}}

% for the examples
\definecolor{wave start}{wave}{380}
\definecolor{wave violet}{wave}{400}
\definecolor{wave indigo}{wave}{445}
\definecolor{wave blue}{wave}{475}
\definecolor{wave green}{wave}{510}
\definecolor{wave yellow}{wave}{570}
\definecolor{wave orange}{wave}{590}
\definecolor{wave red}{wave}{650}
\definecolor{wave end}{wave}{780}
\pgfdeclareverticalshading{wave}{100bp}{% manual 1088; xcolor manual; does not work to use wave model directly (?); https://science-edu.larc.nasa.gov/EDDOCS/Wavelengths_for_Colors.html
  color(0bp)=(wave start);
  color(25bp)=(wave start);
  color(27bp)=(wave violet);% 400 nm
  color(33bp)=(wave indigo);% 445nm
  color(37bp)=(wave blue);% 475nm
  color(41bp)=(wave green);% 510nm
  color(49bp)=(wave yellow);% 570nm
  color(51bp)=(wave orange);% 590nm
  color(59bp)=(wave red);% 650nm
  color(75bp)=(wave end);% 780nm
  color(100bp)=(wave end)
}
\begin{document}
\begin{figure}
  \centering
  \begin{subfigure}[b]{0.60\textwidth}
    \centering
    \begin{tikzpicture}[>=latex, shorten >=2pt, shorten <=2pt]
      \node[draw, label=below:the] (the) {\(\mathbf{W}\)};
      \node[draw, right=of the, label=below:cat] (cat) {\(\mathbf{W}\)};
      \node[draw, right=of cat, label=below:sat] (sat) {\(\mathbf{W}\)};
      \node[draw, fit=(the.west) (the.east), pattern=vertical lines, above=of the] (in_the) {};
      \node[draw, fit=(cat.west) (cat.east), pattern=vertical lines, above=of cat] (in_cat) {};
      \node[draw, fit=(sat.west) (sat.east), pattern=vertical lines, above=of sat] (in_sat) {};
      \node[draw, fit={($(cat.west) + (-8pt,0pt)$) ($(cat.east) + (8pt,0pt)$)}, pattern=vertical lines, above=2cm of cat] (in) {};
      \node[draw, above=of in, label=above:mat] (out) {\(\mathbf{b}\), \(\mathbf{U}\)};
      \foreach \word in {the, cat, sat}{%
        \draw[->] (\word) -- (in_\word);
        \draw[->] (in_\word) -- (in);
      }
      \draw[->] (in) -- (out);
      \tikzmarkerwest
      \node[left=of the, outer sep=0] (embed) {embed};
      \node[above=2cm of embed, outer sep=0] (concatenate) {concatenate};
      \node[above=1cm of concatenate, outer sep=0] {softmax};
    \end{tikzpicture}
    \caption{CBOW model}\label{fig:cbow}
  \end{subfigure}
  \begin{subfigure}[b]{0.35\textwidth}
    \centering
    \begin{tikzpicture}[>=latex, shorten >=2pt, shorten <=2pt]
      \node[draw, label=below:cat] (cat) {\(\mathbf{W}\)};
      \node[draw, fit=(cat.west) (cat.east), pattern=vertical lines, above=of cat] (in) {};
      \node[draw, above=2cmof in, label=above:on] (on) {\(\mathbf{b}\), \(\mathbf{U}\)};
      \node[draw, left=of on, label=above:sat] (sat) {\(\mathbf{b}\), \(\mathbf{U}\)};
      \node[draw, right=of on, label=above:the] (the) {\(\mathbf{b}\), \(\mathbf{U}\)};
      \draw[->] (cat) -- (in);
      \foreach \word in {sat, on, the}{%
        \draw[->] (in) -- (\word);
      }
    \end{tikzpicture}
    \caption{Skip\=/gram model}\label{fig:sg}
  \end{subfigure}
  \caption{\protect\Verb+Word2Vec+ with vocabulary size \(V\), context size \(C\), and embedding size \(N\)}
\end{figure}

\begin{figure}
  \centering
  \begin{subfigure}{.33\linewidth}
    \centering
    \begin{tikzpicture}
      \shade [shading=wave, shading angle=90] (0,0) rectangle ++(\linewidth,1) coordinate [pos=.4] (r);
      \tikzmarkereast(r)
    \end{tikzpicture}
    \caption{Reds.}
  \end{subfigure}\hfill
  \begin{subfigure}{.33\linewidth}
    \centering
    \begin{tikzpicture}
      \shade [shading=wave, shading angle=90] (0,0) rectangle ++(\linewidth,1) coordinate [pos=.6] (b);
      \tikzmarkerwest(b)
    \end{tikzpicture}
    \caption{Blues.}
  \end{subfigure}\hfill
  \begin{subfigure}{.33\linewidth}
    \centering
    \begin{tikzpicture}
      \shade [shading=wave, shading angle=90] (0,0) rectangle ++(\linewidth,1) coordinate [pos=.1] (a) coordinate [pos=.5] (b);
      \tikzmarkereast(b)
      \tikzmarkerwest(a)
    \end{tikzpicture}
    \caption{Innards.}
  \end{subfigure}\par
  \caption{Main figure}
\end{figure}
\end{document}
答案3
首先,我没有编辑我的第一个答案,因为它可能对某些人有用。
这个新答案计算了标题的边距。为此,序言中有一些宏。然后必须放置三个命令。它们都没有任何参数。
在图片中,必须先绘制主要部分(即标题应居中的部分)。然后\pgfremembermainx必须插入。它设置坐标以记住迄今为止最外面的 x 位置。之后必须绘制与主要部分左侧和右侧重叠的部分。
必须在最后,就在 之前放置\end{tikzpicture}该命令\pgfgetoverlap。它计算两侧的重叠(相对于主要部分)并将它们存储在尺寸寄存器\overlapleft和中\overlapright。两者都设置为全局,因此可以在 之后使用tikzpicture。注意:之后绘制的所有内容\pgfgetoverlap都不会被考虑用于计算重叠。
最后,在tikzpicture和标题之间使用 设置边距\captionsetmargins。由于它处于subfigure环境中,因此其效果是局部的。它不应在环境之外使用,因为它会设置所有标题的边距,因为可选参数 ( [subfigure]) 不能在这里使用。当然,这只在图片之后有效,因为在它之前不知道重叠。
\documentclass[a4paper]{scrartcl}

\usepackage{mathtools}
\usepackage{amssymb}

\usepackage[compatibility=false]{caption}
\usepackage[list]{subcaption}

\usepackage{fancyvrb}

\usepackage{tikz}
\usetikzlibrary{patterns, fit, positioning, calc, shapes.arrows}

\usepackage[active, tightpage, floats, displaymath]{preview}

\mathtoolsset{%
  mathic=true
}

% Vectors and matrices
\renewcommand*{\vec}[1]{\mathbf{#1}}
\newcommand{\mat}[1]{\mathbf{#1}}
\newcommand{\trans}{\intercal}

% Operators
\DeclareMathOperator{\rank}{rank}
\DeclareMathOperator*{\argmin}{arg\,min}
\DeclareMathOperator*{\argmax}{arg\,max}

%---------------------------------------------------------------------
% code for automatic setting of caption margins
\makeatletter
\newdimen\overlapleft
\newdimen\overlapright

\newcommand{\pgfremembermainx}{%
    \coordinate (main west) at (current bounding box.west);
    \coordinate (main east) at (current bounding box.east);
}
\newcommand{\pgfgetoverlap}{%
    \pgfextractx{\@tempdima}{%
        \pgfpointdiff{\pgfpointanchor{current bounding box}{west}}%
                     {\pgfpointanchor{main west}{center}}%
    }%
    \global\overlapleft=\@tempdima
    \pgfextractx{\@tempdima}{%
        \pgfpointdiff{\pgfpointanchor{main east}{center}}%
                     {\pgfpointanchor{current bounding box}{east}}%
    }%
    \global\overlapright=\@tempdima
}
\newcommand{\captionsetmargins}{%
    % no additional calculation required here
    \captionsetup{margin={\overlapleft,\overlapright}}%
}
\makeatother
%---------------------------------------------------------------------

\begin{document}
\begin{figure}
  \centering
% not needed here
%  \captionsetup[subfigure]{margin={2.5cm, 0cm}}
  \begin{subfigure}[b]{0.60\textwidth}
    \centering
    \begin{tikzpicture}[>=latex, shorten >=2pt, shorten <=2pt]
      \node[draw, rectangle, label=below:the] (the) {\(\mat W\)};
      \node[draw, rectangle, right=of the, label=below:cat] (cat) {\(\mat W\)};
      \node[draw, rectangle, right=of cat, label=below:sat] (sat) {\(\mat W\)};

      \node[draw, rectangle, fit=(the.west) (the.east), pattern=vertical lines, above=of the] (in_the) {};
      \node[draw, rectangle, fit=(cat.west) (cat.east), pattern=vertical lines, above=of cat] (in_cat) {};
      \node[draw, rectangle, fit=(sat.west) (sat.east), pattern=vertical lines, above=of sat] (in_sat) {};

      \node[draw, rectangle, fit={($(cat.west) + (-8pt,0pt)$) ($(cat.east) + (8pt,0pt)$)}, pattern=vertical lines, above=2cm of cat] (in) {};
      \node[draw, rectangle, above=of in, label=above:mat] (out) {\(\vec b\), \(\mat U\)};

      % remember the x-coordinates of the main part
      \pgfremembermainx
      % \useasboundingbox was here in the first answer

      % not taken into account for the picture size
      \node[left=of the, outer sep=0] (embed) {embed};
      \node[above=2cm of embed, outer sep=0] (concatenate) {concatenate};
      \node[above=1cm of concatenate, outer sep=0] {softmax};

      % this belongs to the main part, but it doesn't increase its size
      % otherwise it must be moved before \pgfremembermainx
      \foreach \word in {the, cat, sat}{%
        \draw[->] (\word) -- (in_\word);
        \draw[->] (in_\word) -- (in);
      }

      \draw[->] (in) -- (out);

      %for testing, if it also works with overlap to the right
      %\node[draw, right= of sat] {t};

      % must be right before \end{tikzpicture}, everything after it
      % would not be taken into account for the calculation of the overlap
      \pgfgetoverlap
    \end{tikzpicture}
    % setting the caption margins
    % moving this here sets the margin locally (only for the current environment)
    % and here the computed values for the margins are known
    \captionsetmargins
    \caption{CBOW model}\label{fig:cbow}
  \end{subfigure}
% no longer needed
%  \captionsetup[subfigure]{margin={0cm,0cm}}
  \begin{subfigure}[b]{0.35\textwidth}
    \centering
    \begin{tikzpicture}[>=latex, shorten >=2pt, shorten <=2pt]
      \node[draw, rectangle, label=below:cat] (cat) {\(\mat W\)};
      \node[draw, rectangle, fit=(cat.west) (cat.east), pattern=vertical lines, above=of cat] (in) {};
      \node[draw, rectangle, above=2cmof in, label=above:on] (on) {\(\vec b\), \(\mat U\)};
      \node[draw, rectangle, left=of on, label=above:sat] (sat) {\(\vec b\), \(\mat U\)};
      \node[draw, rectangle, right=of on, label=above:the] (the) {\(\vec b\), \(\mat U\)};

      \draw[->] (cat) -- (in);
      \foreach \word in {sat, on, the}{%
        \draw[->] (in) -- (\word);
      }
    \end{tikzpicture}
    \caption{Skip\=/gram model}\label{fig:sg}
  \end{subfigure}
  \caption{\protect\Verb+Word2Vec+ with vocabulary size \(V\), context
    size \(C\), and embedding size \(N\)}
\end{figure}
\end{document}